
When it comes to map size and collectibles, Rise of the Ronin doesn’t really hold back. The Yokohama map is the first major map in the game. It is where the Black Ships first landed and our best lead to find the person we’re looking for.
In this guide, I’ll tell you everything you need to do to get 100% Map Completion in Yokohama, including completion rewards maxing out area bond levels and the regional items you occasionally get as tribute for your help in ridding the area of criminal activity.
The following actions will help you to strengthen your Area Bonds:
- Cultivate ‘Chance Encounters’ with the people who live in an area
- Restore order to ‘Unruly Areas’
- Defeat ‘Fugitives’
- Pray at ‘Shrines’
Strengthening your bond with an area and increasing your Bond Level will allow you to use your map to uncover Veiled Edge Banners, Fugitive(s) locations, treasure chests, shrines, and cat locations. Information that would otherwise be hidden unless stumbled upon.
Finding all the collectibles in a given area will earn you a “Completion Reward”, resulting in regional items being periodically sent to your longhouse. Some regional items, like the clam shells, are more valuable than others, but they are all necessary to craft support items or upgrade equipment.
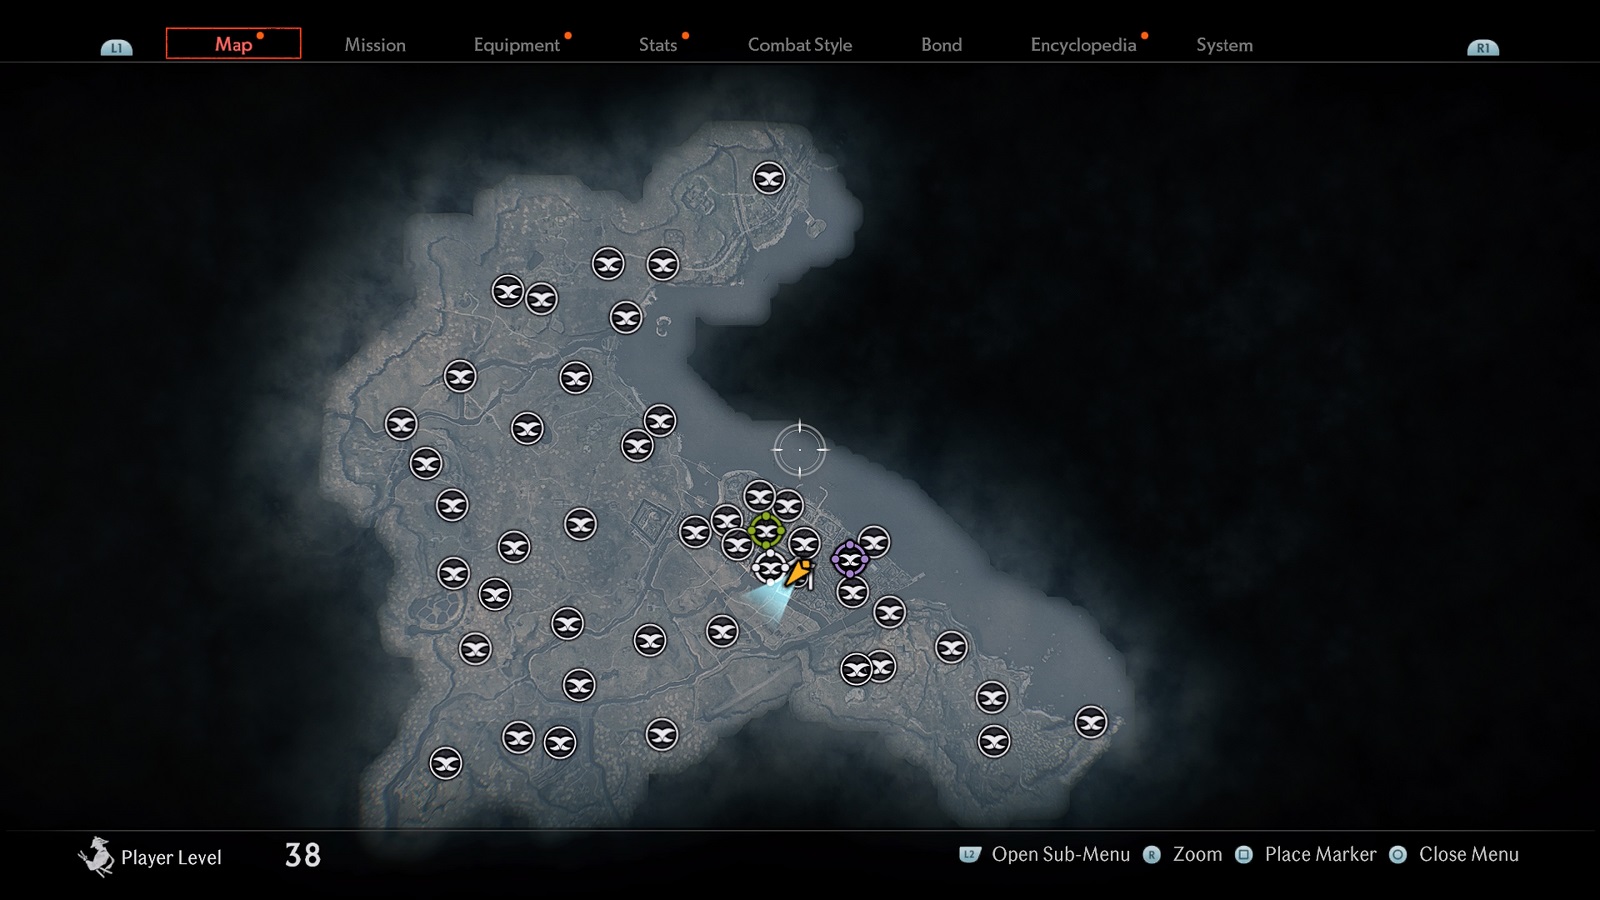
All Yokohama Regions in Rise of the Ronin
An interesting thing to note about the regions on the Yokohama map is the lack of barriers blocking entry into deeper regions. Usually, things like broken bridges or enemy walls keep curious players out until the game says otherwise. Well, that still happens in Rise of the Ronin but that is reserved for places important to the story. The game allows you to move freely between regions without much issue. You might run into the occasional bandit toll gate but it’s nothing your katana can’t handle. Unless you are really under leveled for the area.
Truly, the only thing that counts as a barrier are the higher-level enemies that might give you a hard time. And there are few things more annoying than constantly dying to grunts.
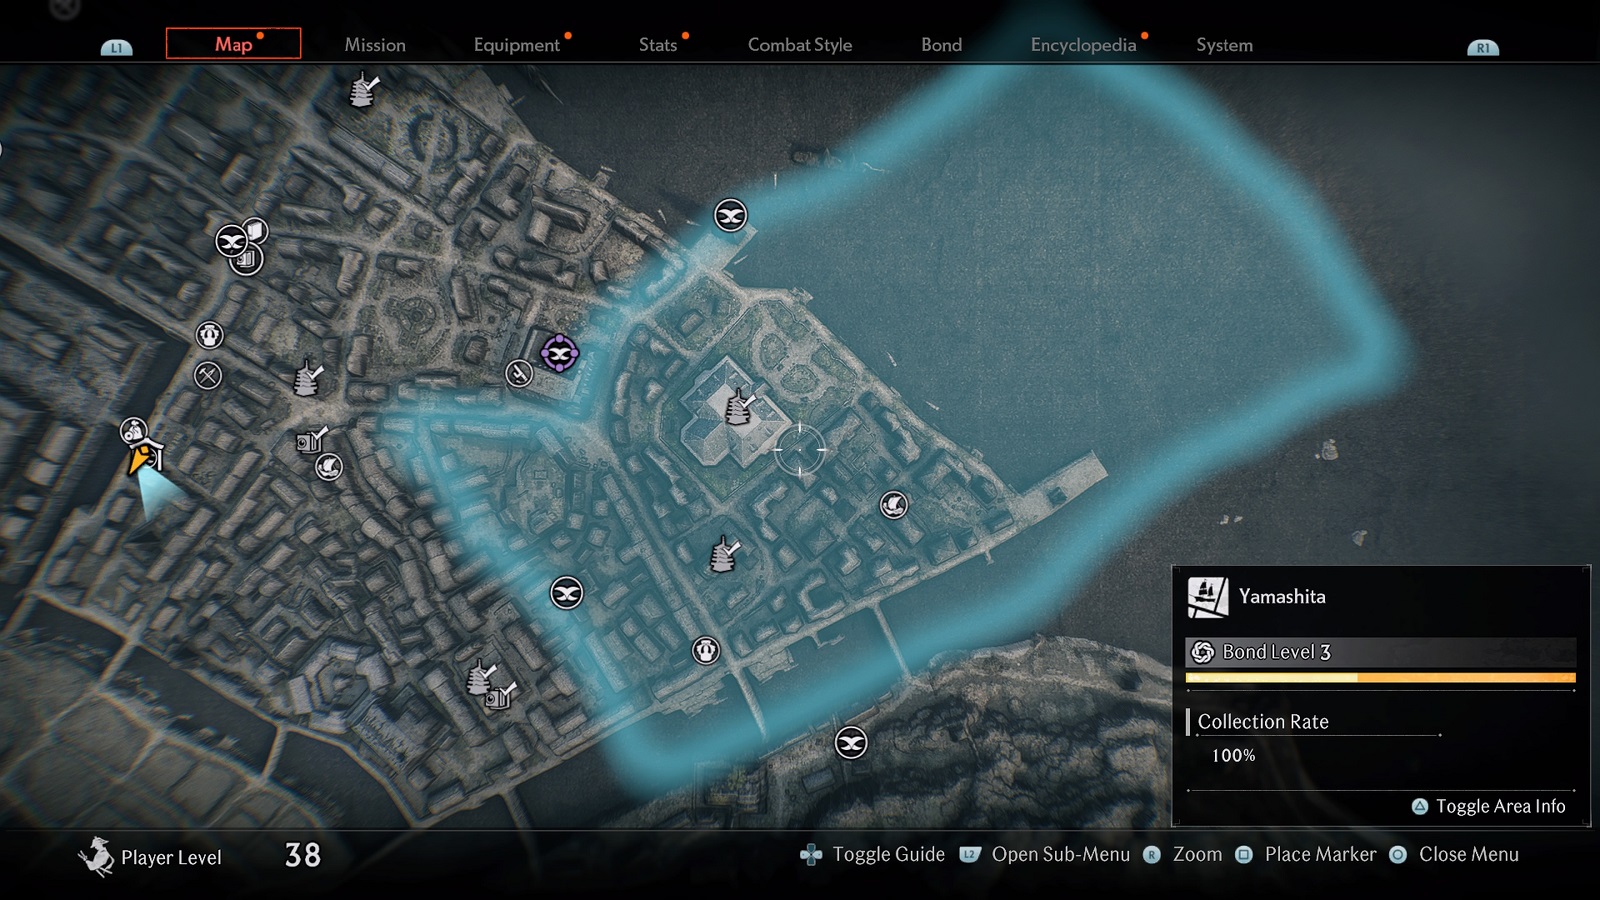
Yamashita
Collectibles:
- 1x Veiled Edge Banner
- 1x Public Order
- 1x Fugitive
- 2x Landmarks
- 1x Shrine
- 1x Cat
- 1x Treasure Chest
Regional Items:
- Pulverized Coal
Completion Reward:
- 2x Knot of Destiny
- +2 Skill Points
Honcho
Collectibles:
- 4x Veiled Edge Banner
- 1x Public Order
- 1x Fugitive
- 4x Landmark
- 1x Shrine
- 3x Cat
- 5x Treasure Chesty
- 1x Photography
Regional Items:
- Saltpeter
Completion Reward:
- 10x Flaming Whetstone
- +1 Intellect Points
Miyozaki
Collectibles:
- 4x Veiled Edge Banner
- 1x Public Order
- 1x Fugitive
- 1x Landmark
- 1x Shrine
- 2x Cat
- 1x Treasure Chest
Regional Items:
- Feather
Completion Reward:
- 3x Oban
- +2 Skill Points
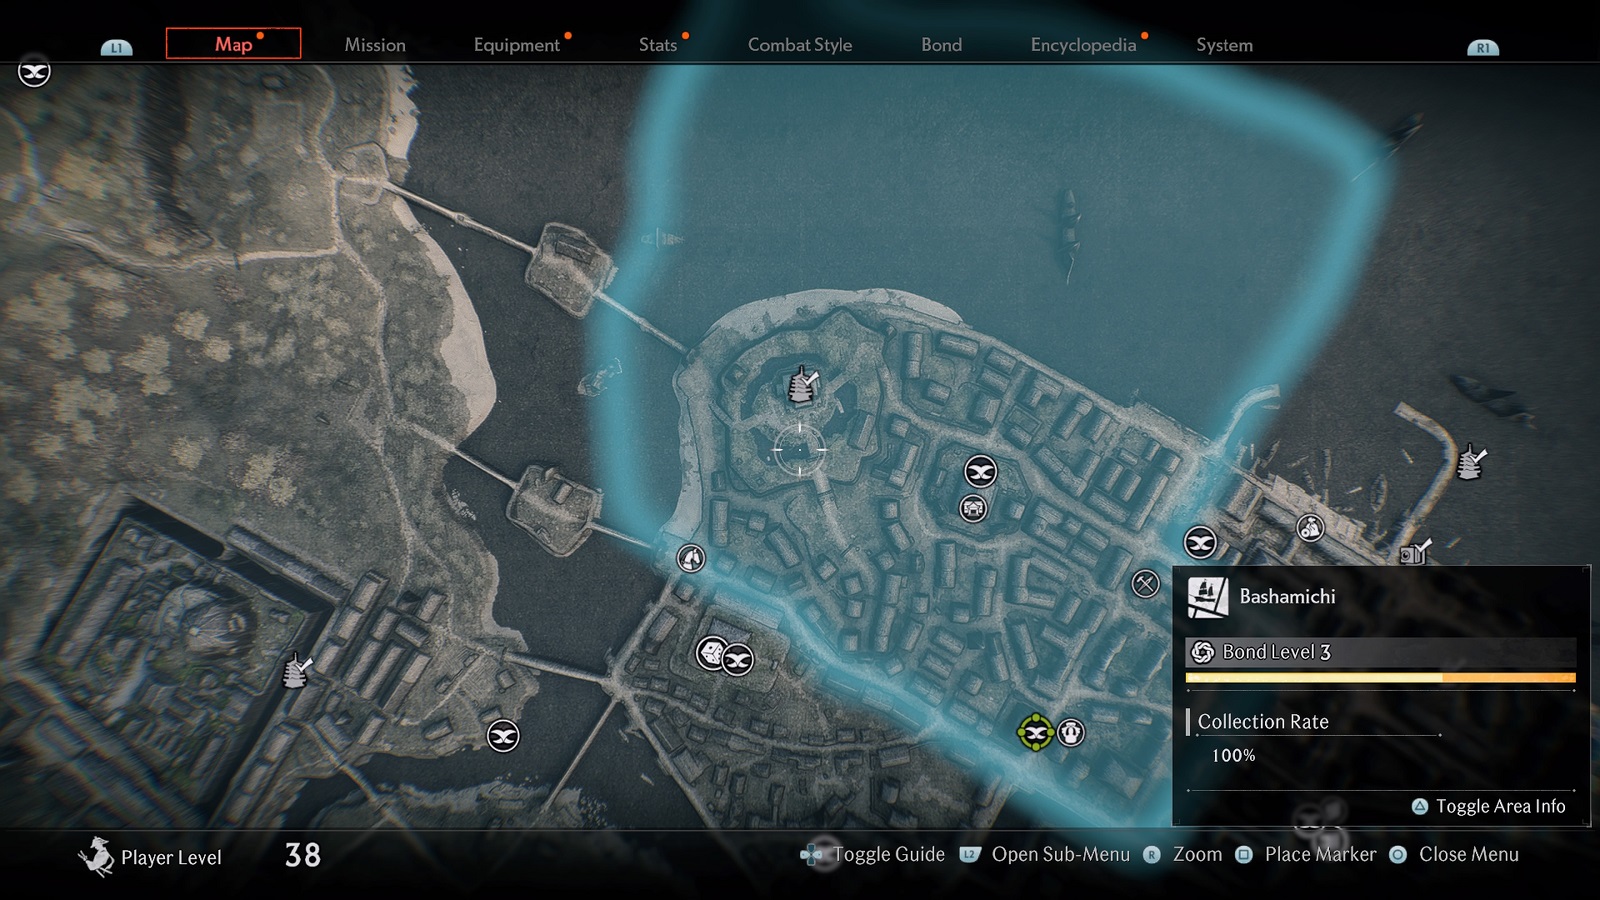
Bashamichi
Collectibles:
- 2x Veiled Edge Banner
- 1x Public Order
- 1x Fugitive
- 2x Landmark
- 1x Shrine
- 2x Cat
- 3x Treasure Chest
Regional Items:
- Egg
Completion Reward:
- 5x Bond Jewel
- +2 Skill Points
Noge
Collectibles:
- 3x Veiled Edge Banner
- 1x Public Order
- 1x Fugitive
- 2x Landmark
- 1x Shrine
- 2x Cat
- 2x Treasure Chest
Regional Items:
- Animal Fat
Completion Reward:
- 2x Knot of Destiny
- +2 Skill Points
Hodogaya
Collectibles:
- 3x Veiled Edge Banner
- 1x Public Order
- 2x Fugitive
- 1x Landmark
- 1x Shrine
- 3x Cat
- 3x Treasure Chest
- 1x Photography
Regional Items:
- Gardenia Fruit
Completion Reward:
- 2x Knot of Destiny
- +2 Skill Points
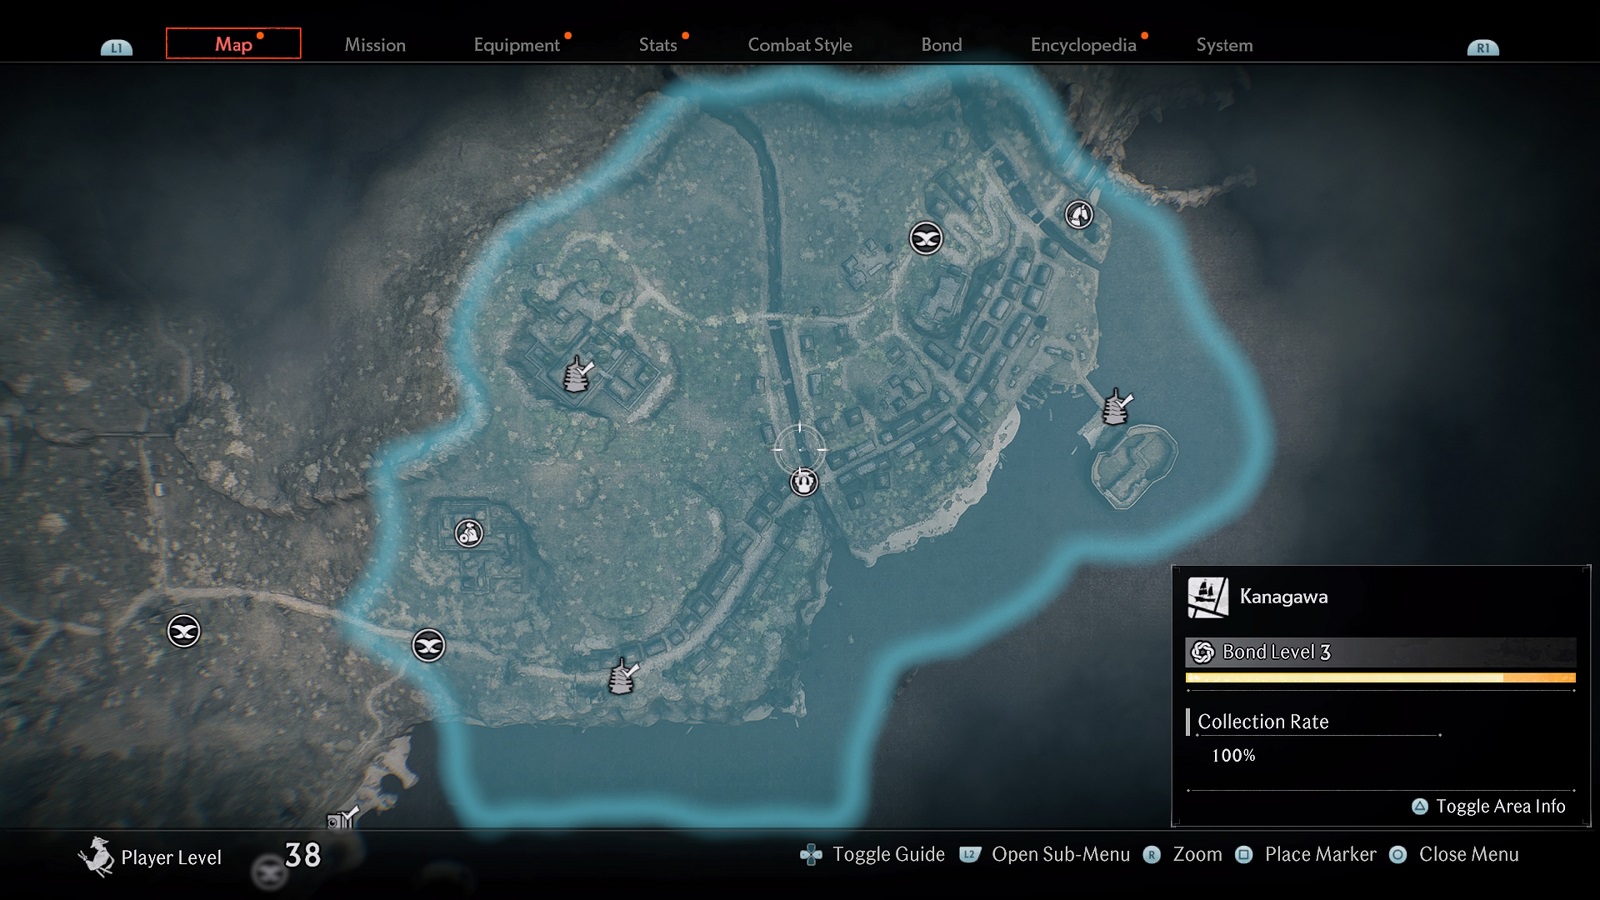
Kanagawa
Collectibles:
- 2x Veiled Edge Banner
- 1x Public Order
- 2x Fugitive
- 3x Landmark
- 1x Shrine
- 2x Cat
- 3x Treasure Chest
Regional Items:
- Unpressed Sake
Completion Reward:
- 2x Knot of Destiny
- +2 Skill Points
Yoshida-Shinden
Collectibles:
- 3x Veiled Edge Banner
- 2x Public Order
- 2x Fugitive
- 1x Shrine
- 3x Cat
- 2x Treasure Chest
- 1x Horseback Archery
- 1x Firearm Training
- 2x Photography
Regional Items:
- Bamboo Shoot
Completion Reward:
- 3x Oban
- +2 Skill Points
Tobe
Collectibles:
- 2x Veiled Edge Banner
- 1x Public Order
- 2x Fugitive
- 1x Landmark
- 1x Shrine
- 2x Cat
- 2x Treasure Chest
Regional Items:
- Bulb
Completion Reward:
- 5x Super Endurance Remedy
- +1 Strength Point
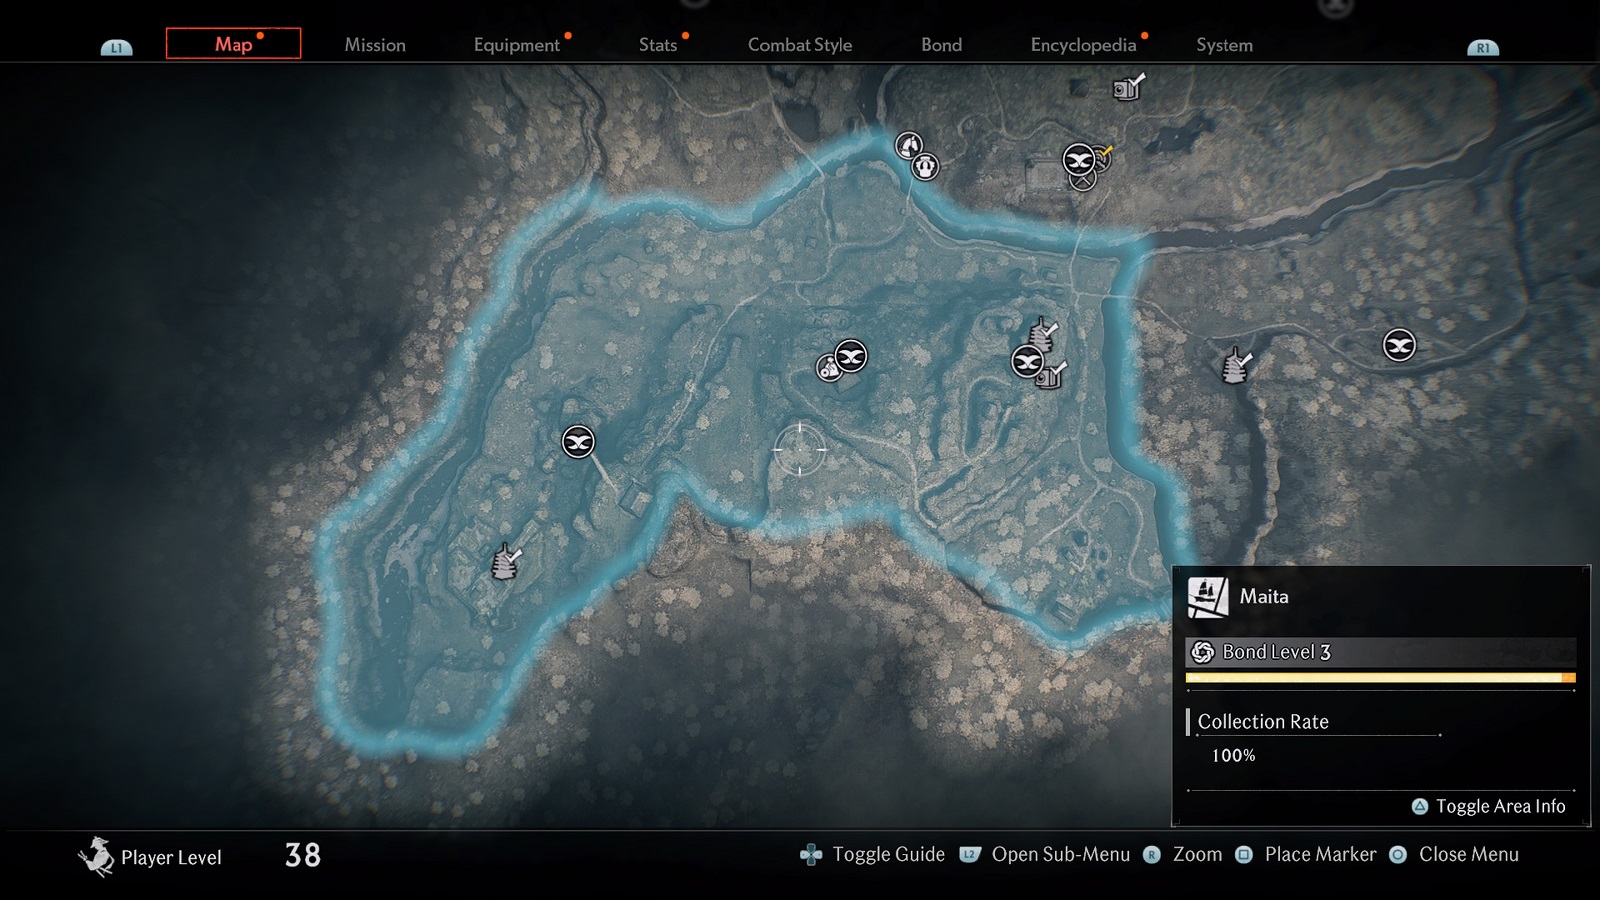
Maita
Collectibles:
- 3x Veiled Edge Banner
- 2x Public Order
- 1x Fugitive
- 2x Landmark
- 1x Shrine
- 3x Cat
- 3x Treasure Chest
- 1x Photography
Regional Items:
- Chaff
Completion Reward:
- 5x Bond Jewel
- +2 Skill Points
Hiranuma-Shinden
Collectibles:
- 2x Veiled Edge Banner
- 1x Public Order
- 2x Fugitive
- 1x Landmark
- 1x Shrine
- 2x Cat
- 2x Treasure Chest
- 1x Firearm Training
Regional Items:
- Gypsum
Completion Reward:
- 5x Super Anti-Ki Remedy
- +1 Dexterity Point
Sodegaura
Collectibles:
- 1x Veiled Edge Banner
- 1x Public Order
- 1x Shrine
- 1x Cat
- 2x Treasure Chest
- 1x Photography
Regional Items:
- Shell
Completion Reward
- 5x Super Power Remedy
- +1 Strength Point
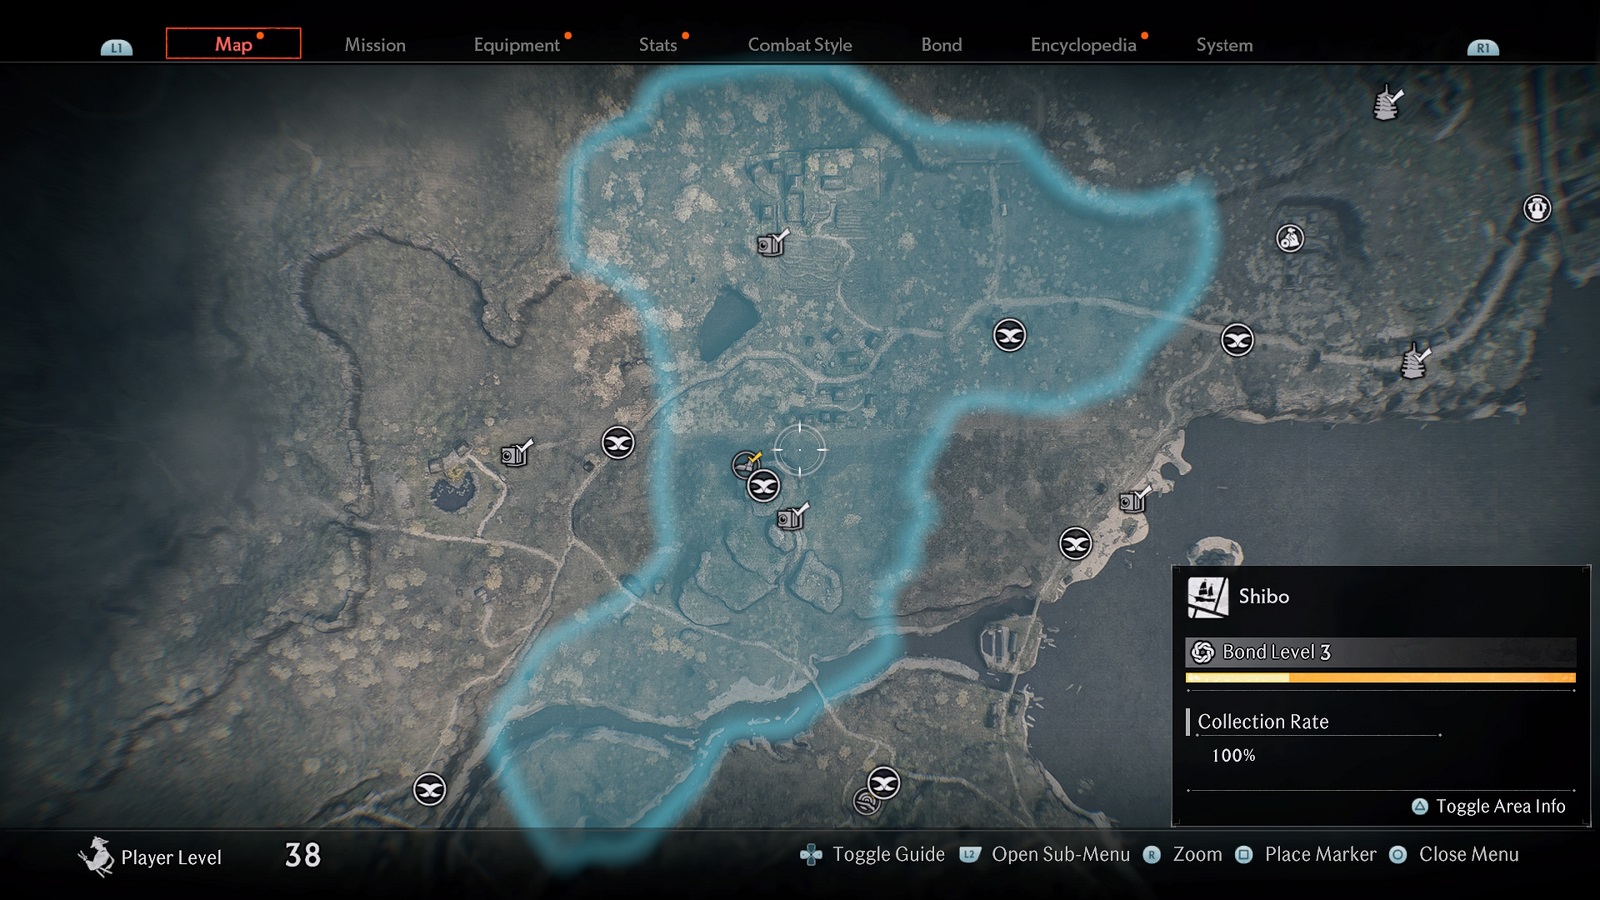
Shibo
Collectibles:
- 2x Veiled Edge Banner
- 1x Public Order
- 3x Fugitive
- 1x Shrine
- 2x Cat
- 2x Treasure Chest
- 1x Gliding Training
- 2x Photography
Regional Items:
- Bamboo Sheath
Completion Reward:
- 3x Oban
- +2 Skill Points
Yamate
Collectibles:
- 3x Veiled Edge Banner
- 2x Public Order
- 2x Fugitive
- 1x Landmark
- 1x Shrine
- 2x Cat
- 2x Treasure Chest
- 1x Photography
Regional Items:
- Yellow Flower
Completion Reward:
- 10x Paralytic Whetstone
- +1 Intellect Point
Nakamura
Collectibles:
- 1x Veiled Edge Banner
- 1x Public Order
- 1x Fugitive
- 1x Landmark
- 1x Shrine
- 1x Cat
Regional Items:
- Red Nuts
Completion Reward:
- 5x Super Ki Remedy
- +1 Charm Point
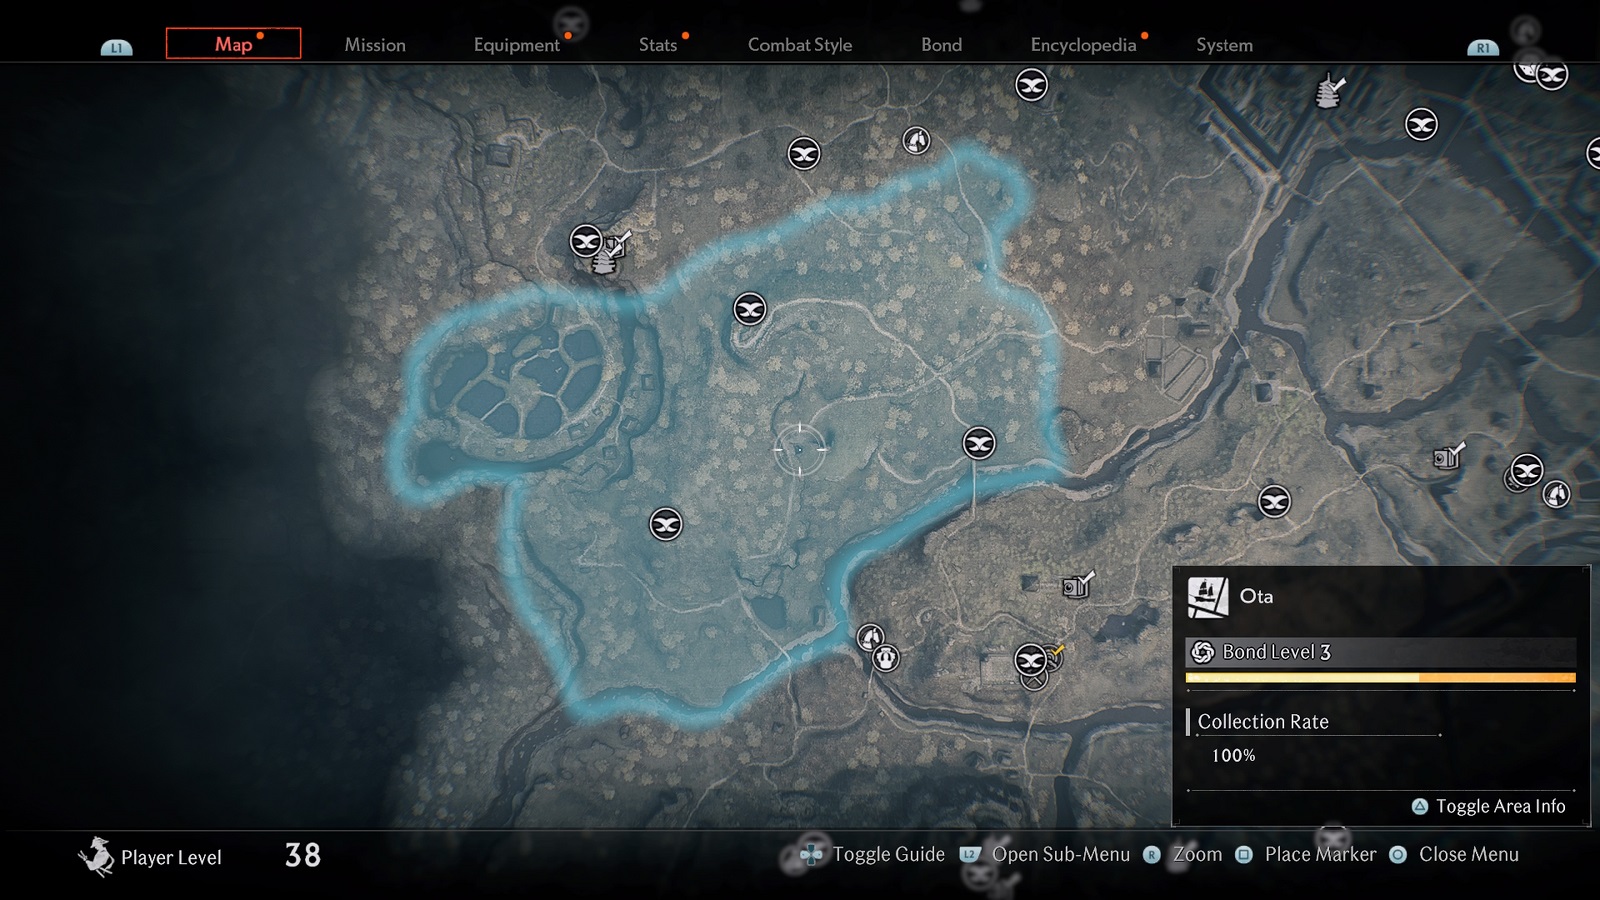
Ota
Collectibles:
- 3x Veiled Edge Banner
- 2x Public Order
- 2x Fugitive
- 1x Shrine
- 2x Cat
- 1x Treasure Chest
Regional Items:
- Game Meat
Completion Reward:
- 2x Knot of Destiny
- +2 Skill Points
Honmoku
Collectibles:
- 2x Veiled Edge Banner
- 2x Public Order
- 2x Fugitive
- 1x Landmark
- 1x Shrine
- 2x Cat
- 1x Treasure Chest
Regional Items:
- Red Flower
Completion Reward:
- 5x Super Anti-Ki Remedy
- 1x Dexterity Point
Kariba
Collectibles:
- 3x Veiled Edge Banner
- 1x Public Order
- 3x Fugitive
- 1x Landmark
- 1x Shrine
- 2x Cat
- 2x Treasure Chest
- 1x Gliding Training
- 2x Photography
Regional Items:
- Rapeseed Oil
Completion Reward:
- 3x Oban
- +2 Skill Points
Motomachi
Collectibles:
- 1x Public Order
- 1x Fugitive
- 1x Landmark
- 1x Cat
- 1x Treasure Chest
- 2x Photography
Regional Items:
- Red Dates
Completion Reward:
- 5x Bond Jewel
- +2 Skill Points
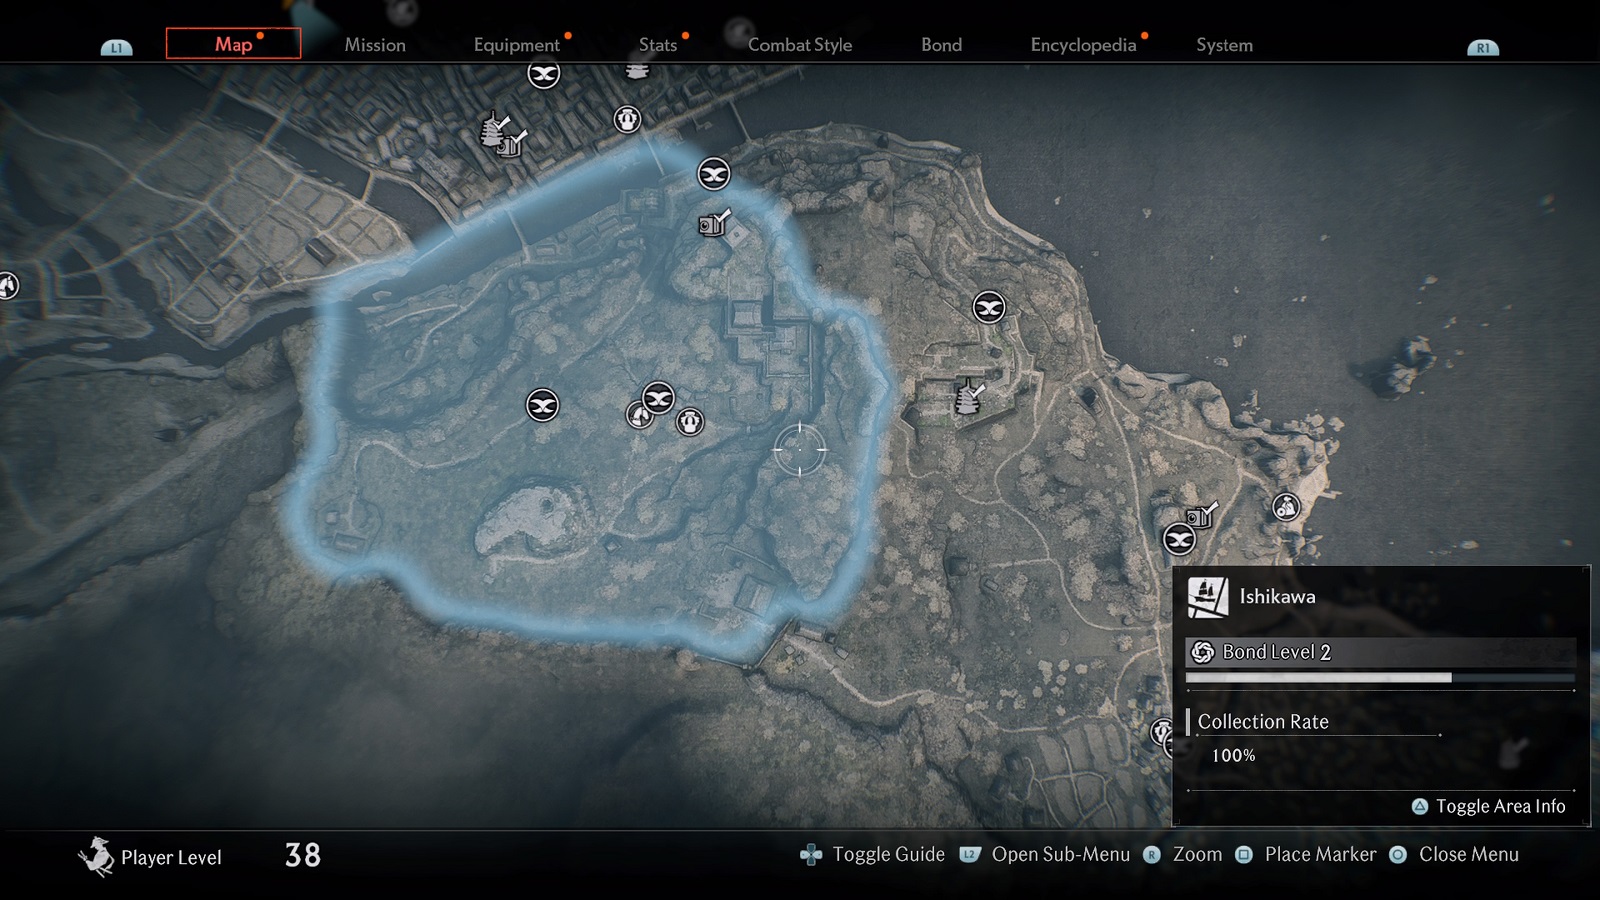
Ishikawa
Collectibles:
- 2x Veiled Edge Banner
- 1x Public Order
- 2x Fugitive
- 1x Shrine
- 2x Cat
- 3x Treasure Chest
- 1x Photography
Regional Items:
- Sulfur
Completion Reward
- 3x Oban
- +2 Skill Points
On a final note, you don’t need max Bond Level with an area for map completion. It’s nice to have the bonus rewards and regional items, but they are not necessary to 100% the map. The collectibles are what counts for map completion. Take that for what you may.


