
God of War is out on PC, with its release comes achievements for those eager to 100% the game, finally leaving its PlayStation exclusivity after nearly four years. On this article you’ll learn about every achievement God of War that you can earn and how to get them. Here is our review of God of War on PC.
The best part about the achievements you can get in God of War on PC is that none of the achievements are missable. You can all acquire them on one playthrough. None of them are difficulty dependent either so you can acquire the achievements regardless if you’re playing on the more forgiving Give Me a Story or the more punishing Give Me God of War game mode difficulty.
There are two different type of achievements in God of War. There are those that are inevitable that you can earn by simply progressing through the story. And there are those that you earn by upgrading your abilities, completing side quests, and doing a bit of exploration.
One this guide, we’ll show you how to get every achievement from locating all the language ciphers to Odin’s raven locations.
All God of War PC Achievements
There are a total of 37 God of War achievements. Some you will earn inevitably as progressing throughout the story means getting them. Others, you’ll have to work for such as fully upgrading Kratos’ Axe and exploring every cranny in a location.
Achievement | Description | |
 | Father and son | Obtain all other achievements |
 | The Journey Begins | Defend your home from The Stranger |
 | A New Friend | Survive the Witch’s Woods |
 | Feels Like Home | Allow the Light Elves to return home |
 | Dragon Slayer | Defeat the Dragon of the Mountain |
 | Troubling Consequences | Defeat Magni and Modi |
 | Hello, Old Friend | Retrieve the Blades of Chaos |
 | Promise Fulfilled | Heal Atreus |
 | Round 2 | Rescue Atreus |
 | Past Haunts | Ride the ship out of Helheim |
 | Twilight Beckons | |
 | Last Wish | Spread the ashes |
 | Beneath the Surface | Explore all the Lake of Nine has to offer |
 | Death Happened Here | Fully explore Veithurgard |
 | Trilingual | Learn the languages of Muspelheim and Niflheim |
 | Dwarven Ingenuity | Upgrade a piece of armor |
 | Nice Moves | Obtain a Runic Attack Gem |
 | Iðunn’s Orchard | Fully upgrade your Health |
 | Quick Tempered | Fully upgrade your rage |
 | Best Dressed | Craft an outfit for Atreus |
 | Enchanted | Slot an Enchantment into your armor |
 | All Will Fall | Kill 1000 enemies |
 | Dangerous Skies | Free all of the Dragons |
 | Like Oil and Water | Complete all of Brok and Sindri’s Favors |
 | Curator | Collect all of the Artifacts |
 | Allfather Blinded | Kill all of Odin’s ravens |
 | The Best Moves | Fully upgrade a runic attack |
 | Worthy | Fully upgrade the Leviathan ax |
 | Why Fight It? | Fully upgrade the Blades of Chaos |
 | Path of the Zealot | Obtain the Traveler’s Armor Set |
 | Primordial | Obtain the Ancient Armor Set |
 | Unfinished Business | Assist all of the wayward spirits |
 | Treasure Hunter | Use treasure maps to find all of the dig spots |
 | The Truth | Read all of the Jötnar shrines |
 | Fire and Brimstone | Complete all of the Trials of Muspelheim |
 | Darkness and Fog | Retrieve all treasure from the Workshop’s center chamber |
 | Chooser of the Slain | Defeat the nine Valkyries |
If you’ve missed any of the above, you’ll be happy to know that you can earn them again through the game’s New Game Plus mode. So don’t worry none of them are missable.
How to Get All God of War Upgrade Achievements
Certain achievements require that you fully upgrade your equipment. Here are those achievements and their requirements.
Dwarven Ingenuity – you can get this by upgrading any piece of armor. Once you get to Brok’s shop you can upgrade it.
Nice Moves – to get this achievement you have to obtain a Runic Attack Gem. You can pretty much find these in chest and enemies will occasionally drop them.
Idunn’s Orchard – to get this achievement, you’ll have to upgrade your health fully. And you’re going to need all 9 Idunn’s Apples that can be found in Nornir chests. Every Nornir chest you find will have 3 rune pots that need to be broken before opening.
- You can find the first Idunn’s Apple at the Wild Woods early in the game. Go to Wild Woods until you find a circle where paths intersect, leading to different directions. You’ll have to keep going until you get to the temple where you can find three rune pots and a Nornir chest with Idunn’s Apple.
- The second Idunn’s Apple isn’t too far off. It is also located in the Wild Woods. You can find it after your first fight with a Revenant. There will be a puzzle that tasks you to lower two sides of a bridge. You can get the Idunn’s Apple then after smashing the three rune pots.
- The third Idunn’s Apple can be found in Midgard at the end of the River Pass. This is right after your encounter with the fire troll. The rune pots you need to destroyed are timed, so you’ll have to use dash to get them all.
- The fourth Idunn’s Apple can be found in Midgard. You’ll have to look for it in the location where the first lookout towers are. You’re going to need your Leviathan Axe for this. There will be a switch there you’ll have to throw it to that will lower the spikes blocking the rune pots you need to break to get to the Nornir chest. You simply have to hit these runes before the spikes raise back up.
- The fifth Idunn’s Apple is in Midgard. It’s in the mountain where you’ll encounter the very first Heavy Viken. The rune pots here can be tricky to find.
- The first rune pot can be found in the room at the back. You’ll have to throw the shatter crystal at the wall before using your shock arrow to get it to open.
- The second rune pot is on the rock wall you can find above the ramp.
- The third rune pot can be found after you raise the ramp.
- The sixth Idunn’s Apple can be found in Alfheim right after you lower the platform in the middle of the lake. Once you’ve gone underneath the lake, you’ll encounter a Nornir chest. Destroying the rune pots for it requires you to use the elevator. You’ll have to freeze the elevator on its down to get a clear shot of two rune pots. You can find the third rune pot behind the switch in the alcove after the elevator lets you back up again.
- The seventh Idunn’s Apple can be found in Tyr’s Vault. You can find the Nornir chest in one of the pots at the side passages filled with traps. There is a rune pot hidden in the trap above the ceiling of this passage.
- The eight Idunn’s Apple can be found in Forgotten Caverns. The Nornir chest is hidden around the Lake of the Nine. After kill the three Hel-Walkers the three rune pots will spin around the pole.
- The last Idunn’s Apple can be found in the Light Elf Outpost. You can find the rune pots by looking around the walls. They’re hidden just behind it. You can find the first rune pot halfway above the tower on the outside.
Quick Tempered – you’ll have to fully upgrade your Rage. You need all 9 Horns of Blood Mead that are found in Nornir chests. Each chest has three rune pots you need to break before opening.
Best Dressed – you’ll have to craft an outfit for Atreus. You’re going to need 10,000 Hacksilver and 2 Soft Svartalfheim Steel. Head to Brok’s Shop and navigate to the Atreus Armor section. Pick any armor.
Enchanted – you have to enchant any armor. Certain armor pieces have enchantment slots you can upgrade. Place any enchantment in the socket and you’re good.
The Best Moves – you’ll have to fully upgrade any Runic attack to get this achievement. When you’ve obtain one from chests, quests, or enemy drops you can fully upgrade it using your xp points. No other material required.
- The first Blood Mead can be found in Midgard. After you meet Brok, you can encounter an elevator puzzle. Raising this elevator will lead you to the three rune pots.
- The second Blood Mead can be found in The Foothills. After your meeting with Sindri, you’ll have to make the symbols on each switch match that of the Nornir chest. You’ll have to freeze the poisoned switch to be able to see the rune pot.
- The third Blood Mead can be found in Alfheim. You’ll see it in front of the Temple of Light. You’ll have to go left, down the stairs, and you’ll find a chest which has the mead.
- The fourth Blood Mead can be found in Alfheim also in front of the Temple of Light. This time, head to the right and you’ll the find the Nornir chest containing the Blood Mead. You’re going to require the Light of Alfheim on the Bifrost as well as Atreus’ bow. The rune pots can be located in the final room. You’ll have to throw the Leviathan Axe through the gas while you’re on the platform.
- The fifth Blood Mead can be found in Midgard. After you dispel the black smoke covering the area you’ll come to a place where the giants will test you. You can find two switches that has runes which will lead you to a light bridge. You’ll be able to find the last switch up ahead. Just make sure that the switches match the runes.
- The sixth Blood Mead can be found in Midgard. Below her house in the Witch’s Caves, you’ll find the Nornir chest. You’ll need Shock arrows to open it though, so you’ll have to come back for it after the summit of The Mountain.
- The seventh Blood Mead can be found in Helheim. Before you enter the large boat, push the box into a gap which will let you get into an open area. You’ll be able to see a box with a rune pot in it, you can see it by climbing to the other side of the box. Another rune pot is visible from the ledge. The last rune pot can be found on the water nearby. You’ll have to push the box to the back and climb up to see it.
- The eight Blood Mead can be found in Fafnir’s Hoard. It can be found outside the entrance. You’ll be able to find all three rune as they’re visible from where the Nornir chest is.
- The final and ninth Blood Mead can be found in the Lake of the Nine. In the Isle of the Dead, you’ll find the last Blood Mead at the very top.
Worthy – you’ll need to fully upgrade the Leviathan Axe to get this achievement. You’ll have to upgrade it to Level 6. By collecting Frozen Flames which are dropped by bosses, you can upgrade the Leviathan Axe to Level 5. To get the final level, you’ll have to travel to Niflheim and get the last Frozen Flame from the dwarves. You need to get the Chilling Mist which you can get by gathering 5,000 Mist Echoes. These are what will allow you to unlock a chest in the central chamber of Niflheim containing the Chilling Mist.
Why Fight It? – you’ll have to fully upgrade the Blades of Chaos to get this achievement. You’ll have to upgrade them all the way to Level 5. You can upgrade them to Level 4 via the Chaos Flames dropped by bosses. To get to Level 5, you’ll have to go to Muspelheim where you’ll have to buy the last Chaos Flame from the dwarves there. You’re going to need Raging Inferno of Muspelheim which can be acquired by defeating the Valkyrie in the location.
How to Get All God of War Collection Achievements
These achievements require you collect and explore certain areas. Here are those achievements and what you need to do to get them.
Beneath the Surface – you’ll have to explore all of Lake of Nine, which is a bit of a large area. There are 11 total areas you’ll have to find to fulfill the requirements of this achievement.
- Stone Falls
- Veithurgard
- Cliffs of the Raven
- Isle of Death
- Forgotten Caverns
- Light Elf Outpost
- The Mason’s Channel
- Buri’s Storeroom
- Lookout Tower
- Iron Cove
- Ruins of the Ancient
Death Happened Here – you’ll have to explore Veithurgard. In particular, you’ll have to head south where there’s a temple where you’ll have to keep fighting through until reaching the end. There’s a troll you’ll have to take down called Dauði Hamarr before you can open the final door. Once you’ve looted the treasures, the requirements for the achievement has been fulfilled.
Trilingual – to get this, you’ll have to learn all the languages of Muspelheim and Niflheim. There are 4 ciphers from each, making a total of 8 to find overall.
- Muspelheim Ciphers
- In the River Pass, in the lower level of the Witch’s Cave, behind the elevator. You’ll have to explode the three sap with Atreus’ arrow. There’s a puzzle you’ll have to solve before the area can open. You can find the cipher inside a purple chest after entering.
- It’s easy to find the one hidden in The Mountain. You’ll almost certainly encounter it during one of the main story missions. You’ll have to proceed through the Mystic Gateway called The Summit. The purple chest containing the cypher is on top of the staircase right in front of you.
- Head east from Lake of Nine. In Cliffs of the Raven, you’ll have to defeat some dark elves before boosting Atreus up a level. Tell him to lower the gold chain and you can climb up to it to get to the purple chest which has the cipher.
- To the west of Lake of Nine lie the Forgotten Caverns. The purple chest with the cipher is in the south of the docks, not too far off from the Mystic Gateway
- Niflheim Ciphers
- In the mountain, at the top, just near the Mountain Summit. You’ll have to head out the door and into the cliffs below. You’ll find a Realm Tear here. Look around a bit, the chest containing the cipher is just around.
- After you’ve drained the water from the Lake of Nine for the second time, head towards the left of the beach. You’ll have to use the Leviathan Axe to hit the spinner to lower the spikes. After you’ve gone over, you’ll have to hit the spinner again to reveal the chest containing the cipher.
- To get the third Niflheim Cipher, you’ll also be required to lower the water in Lake of Nine for the second time. Below the Alfheim Tower in The Council of Valkyries, stroll along the shore where you can find a Realm Tear. There’s some debris next to it that you can go around on using the ledge on the left. You’ll have to spot the Shatter Crystals on the back of the rubble. Use the Light Arrows to carve a path to the Cypher chest.
- North to the Lake of Night, in Ruins of the Ancient. You’ll have to fight a Stone Ancient first. Afterwards, you can find the Cypher chest nearby on the shore.
Like Oil and Water – you’ll have to complete all of Brok and Sindri’s Favors. There are 5 of them in total.
- Second Hand Soul
- Deus Ex Malachite
- Fáfnir’s Storeroom
- Family Business
- Hail to the King
Curator – locating all 45 artifacts are required for this achievement. Thankfully, you can see just how many there are in a specific area once you’ve roamed to a specific region in the map. None of the artifacts are missable.
- Wildwoods – 4 Toy Artifacts
- River Pass – 9 Mask Artifacts
- Shores of Nine – 9 Ship Artifacts
- Veithurgard – 5 Horn Artifacts
- Alfheim – 5 Elven Artifacts
- The Mountain – 5 Cup Artifacts
- Helheim – 5 Brooch Artifacts
Unfinished Business – you’ll have to assist all of the wayward spirits. You’ll do this by clearing out groups of enemies around braziers in the Lake of Nine. There are 4 wayward spirits you’ll have to assist in total.
- Iron Cove – you can find it southwest of Tyr’s Temple.
- Isle of Death – climb to the highest area of the isle. You’ll find the brazier there.
- Forgotten Caverns – from the Isle of Death, use the boat to sail northeast. You’ll eventually come across the brazier.
- Cliffs of the Raven – head right from Tyr’s Tower.
The Truth – you’ll have to read all the Jotnar shrines to get this achievement. There are 11 Jotnar shrines which all look like big wooden cabinets. They’re scattered throughout different locations. Here is here you find all of them:
- Skol and Haiti – you can find this Jotnar shrine in the Wildwoods. After you exit the temple that has two gates, you’re going to have to head left and and find a chain leading back towards the second floor. You can find the shrine at the end of the hall after climbing the stairs.
- Hrungir – go to where you first killed a Revenant. It’s in the Marketplace Ruins of the River Pass. Go the area up above. There should be a Nornir chest to the right. To the left is where this shrine is located.
- Ymir – after the Dragon boss fight in The Mountain, climb up a long chamber. This shrine is located behind a red sap wall. You’ll have to head further up first to collect a Shatter Crystal which you can find towards the right from a group of Reavers praying to a Nornir chest.
- Starkadr – you’ll have to look for Konunsgard, which you can do after you’ve completed the two quests from the dwarves in which you’re awarded with the Hail to the King favor. You’ll first have to look for the tunnel behind the Forgotten Caverns which will lead you through King’s Hollow. When you’ve entered Konunsgard, you can an imprisoned dragon and a locked door that needs three keys to open. Once you’ve opened this door, head right to find this shrine.
- Skadi – you’ll have to look near the Shores of the Nine in Veithurgard. Enter the Veithurgard Keep that is just past the dragon. You’ll have to align the runes to be able to enter. The first chamber is where this shrine is located.
- Bergelmir – there is a hidden chamber in Tyr’s Temple. There is a room with 2 Troll Statues in it along with an elevator that leads down below. You’ll find this shrine located at the bottom.
- Thamur – you’ll find this apt named shrine in Thamur’s Corpse. After you’ve obtain the chisel, you’ll have to go back to the main docks in the Thamur’s Corpse region. You can now open the Hidden Chamber of Odin to your left which is where you can find this shrine.
- Jormungandr – you’ll have to cross the bridge to the Vanaheim Tower in the Shores of Nine after Tyr’s Temple. After you’ve entered the tower, go left through some debris and you’ll find this shrine.
- Thrym – after you’ve drained the lake twice in Shores of Nine, you’ll have to use the boat and head over to the Lookout Tower. You’ll have to climb towards the top using the ledges and zip down to the back of the Muspelheim Tower. You’ll find this shrine guarded by a Revenant.
- Goa – you’ll have to activate the light bridge in Alfheim near Ringed Temple Trench. This bridge will lead you to a blue sealed temple. Once you’ve crossed this bridge, head to the right and you’ll encounter Sindri’s Shop. You’ll find the shrine next to it.
- Surtr – cross the bridge from Tyr’s Temple in Muspelheim. You can find one of Brok’s Shops here. Head left and climb up the trials. You’ll find this shrine afterwards.
Darkness and Fog – you’re going to need 68500 Mist Coins and 3 Anchor Fogs. To get this achievement, you need to open all the treasure chests and Realm Tears in the Workshop’s central chamber. You gather Mist Coins by going through the randomly generated dungeon. There are 5 chests and 3 Realm Tears in total you have to open.
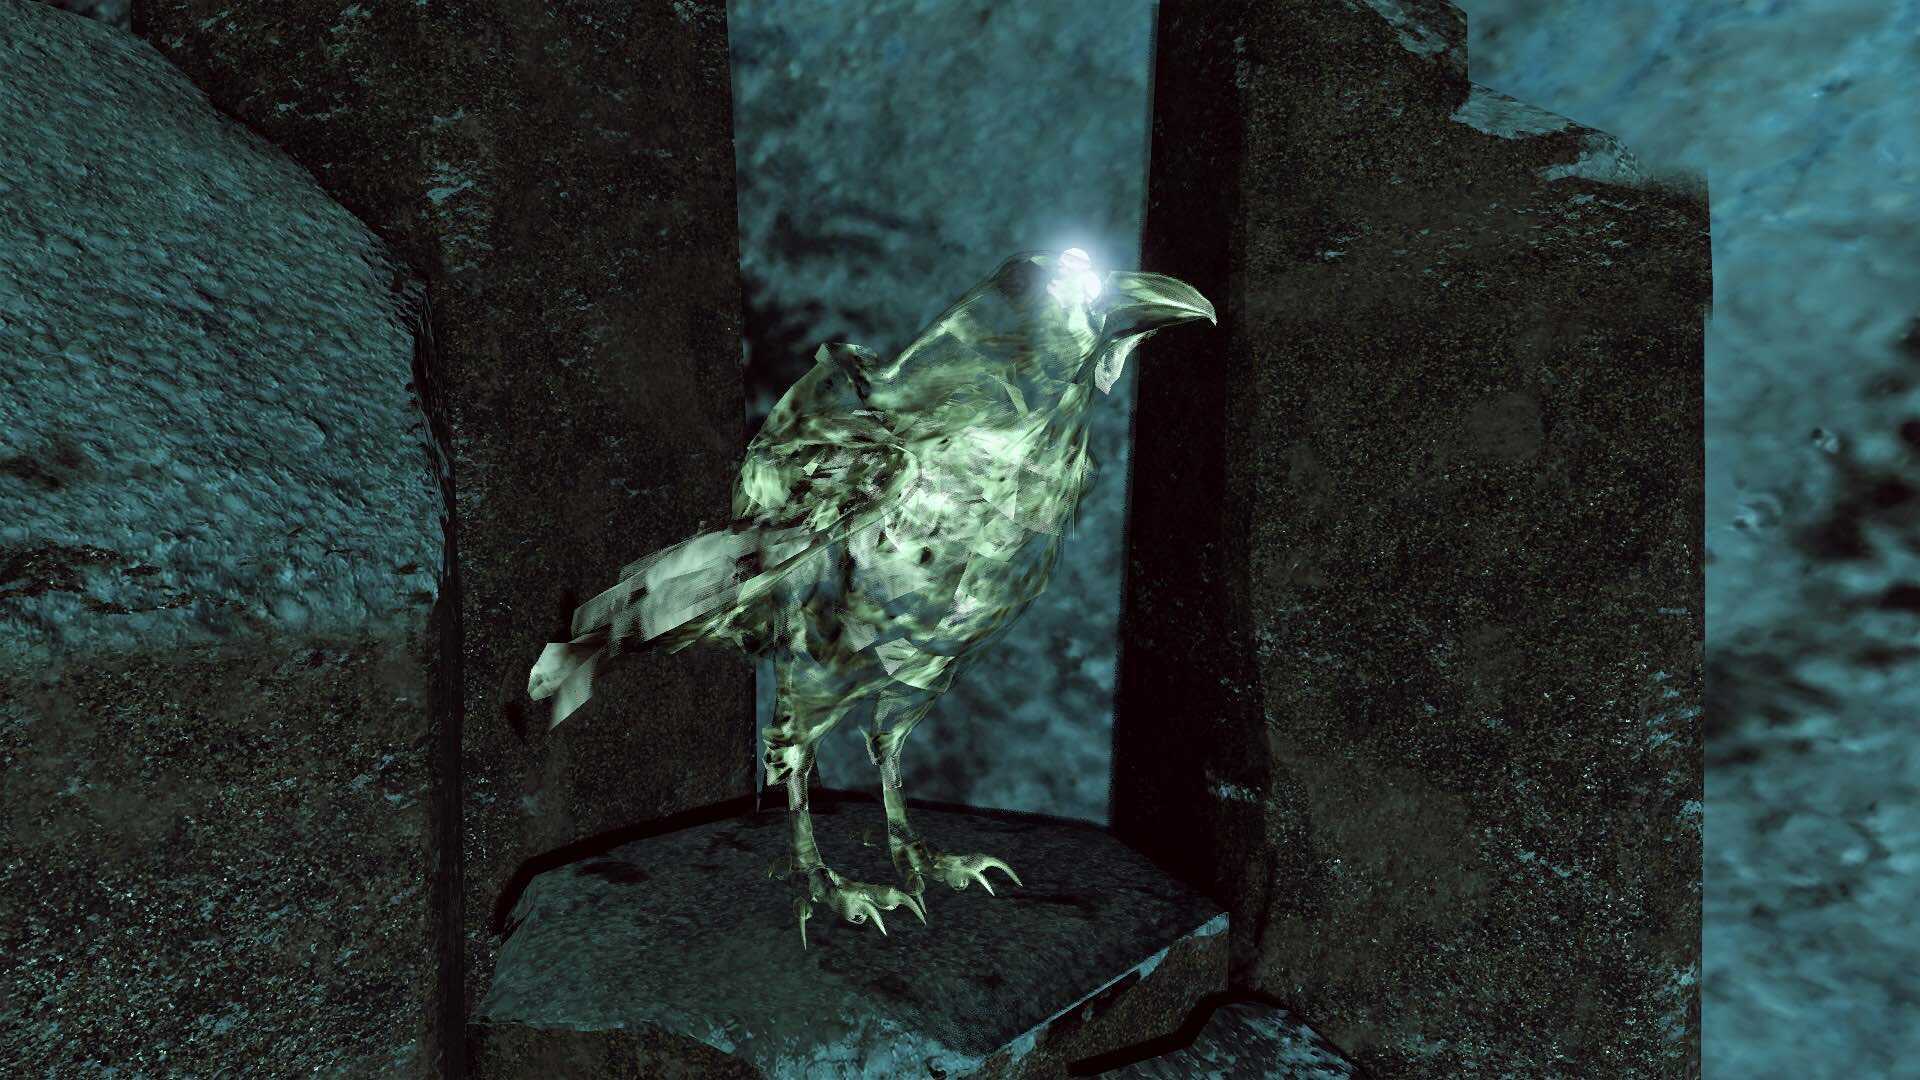
How to Get AllFather Blinded Achievement
In order to get the AllFather Blinded achievement, you’re going to have to kill all of Odin’s ravens. They’re scattered throughout the map and require a keen eye to spot. This is going to take some time for you to get since there are 51 ravens you have to kill. They’re all scattered throughout different locations of the map.
River Pass has six ravens you can kill.
- A raven can be seen sitting on the rocks before the bridge where you meet Brok for the very first time.
- After your second encounter with a troll, go to the big rib cage. The raven can be seen on one of the ribs at the back.
- In the center of River Pass after you’ve beaten the ogre, go through the stone tunnel. Look up towards the stone stacks. The raven is just sitting there but is hidden well due to the light.
- The remnants of a destroyed village, just at the end of the River Pass trail, lies a raven on the roof of the first house to the right.
- Once you’ve entered the Witch’s Woods, look for the Nornir chest on top of a platform. The raven is hiding around there.
- Head east in the Witch’s Woods. You’ll find the Hidden Chamber of Odin. As the name apt suggests there is a raven hiding there just on the small pillar near the wall.
Foothills has 2 ravens you can kill.
- Look south from the Hidden Chamber of Odin. A raven can be seen at the edge of the waters south of the location.
- It’s at the top of the lift you ride which will bring you to the base of The Mountain. It’s right behind the lift station high up on the cliffs.
The Mountain has four ravens you can kill.
- Head left from the stag statue and go through the door. A raven can be found sitting on the struts under the bridge.
- A raven can be seen flying around from the west of the central area in the region. Go through the tunnel located at the bottom of the tunnel, the one near the lift and look up. It may take some accuracy to hit.
- Deep inside The Mountain, you’ll eventually a big block for the lift. You’ll have to head up to the platform on the gold chain. You can see the raven sitting on the wooden struts.
- Inside the Hidden Chamber of Odin where you’ll encounter a Valkyrie. The raven can be seen at the wall’s edge to the left.
Shores of Nine only has one raven to kill.
- At the top of the Niflheim Realm Tower on the right side, you’ll be able to spot a boat where a raven is on.
Lookout Tower only has 1 raven to kill.
- After you’ve docked there, climb up the tower and look up. The raven is flying ahead.
Cliffs of Raven despite the name, there’s only one raven to kill.
- There is a corpse of a giant that has a gold chain behind it you can climb up on. Once you’ve reached the top, look to the lake and you’ll see the raven perched on some rocks.
Volunder Mines only has 1 raven to kill.
- A raven can be spotted flying above. Head up the platform nearby the Mystic Gateway.
Buri’s Storeroom only has one raven to kill.
- You’ll have to head over to the top of Stone Falls. You’ll be heading through the gate that leads towards the Lake of Nine. The raven is flying around the stone column.
Veithurgard has 3 ravens you can kill.
- There are two wooden blockades right where you meet the dragon. On the left blockade you’ll find the raven hiding behind it.
- A raven can be found towards the left of the giant gates. Look for a lore marker, there’s a raven nearby the area.
- Head over towards the island with the statue. A raven can be seen flying overhead of it.
Stone Falls only has one raven to kill.
- After going through the Stone Falls Mystic Gateway, go across the wooden bridge. There is a crank on the right side you should stand behind. Look behind you towards the cliffs, you should see the raven.
Council of Valkyries only has 1 raven to kill.
- Just at the entrance, you’ll be able to see a raven on top of the wooden ship on the right.
Thamur’s Corpse has two ravens you can kill.
- Just in front of the region’s Mystic Gateway, look up in front of it. There is a raven on the edge of the building.
- There is a raven hiding in the trees of the main area inside of the Hidden Chamber of Odin.
Northri Stronghold has 2 ravens you can kill.
- Once you’ve docked your boat at Sindri’s Store in Northri Stronghold look behind you. You’ll be able to see a raven.
- On the ship where the battle happened, look towards the left and try to spot a hole in the giant water gate. There should be a raven hiding there.
Konunsgard has five ravens you can kill.
- After going down to Sindri’s shop and going through the poison mist, you should encounter a red chest. There should be a raven behind it perched on the rocks just on the other side of the valley.
- Once you’ve encountered the sealed doors you can pass through at the lower left of the map, a bit beyond it is a bridge you can drop. A raven can be seen on the rocks to the right.
- After you’ve freed the dragon, look below. A raven can be seen underneath it.
- Once you’re inside the Konunsgard Fortress, there is a pathway to the right side of the door you’ll have to take. You’ll eventually come across a shrine in which you need to turn left. You’ll see the raven above a red chest.
- On the right where the dragon tether was, there is a pathway that will lead you up. The raven is above some rocks on the platform to your left.
Forgotten Caverns has 2 ravens you can kill.
- Once you’ve reached the top of the wall you’re climbing, look downwards from your right. You should see a raven.
- There is a Nornir chest with a column made of wood. On the column is a raven you can kill.
Fafnir’s Storeroom has five ravens you can kill.
- A bit beyond where the Mystic Gateway is in Fafnir’s Storeroom. You’ll be able to see the raven once you can see the skies.
- Once you’ve reached a green open area, you’ll be able to see a raven perched up on a branch above.
- Before you enter the storeroom, you can see a raven above its entrance.
- You can find a raven nearby the central platform. It’s where you placed the entry stones.
- A raven can be found on the wooden struts on your way back to the boat.
Landsuther Mines has 2 ravens you can kill.
- There is a gap near the entrance. Once you’ve climbed the wall you’ll be able to see a raven on a wooden structure in front of you.
- Once you’ve come across a waterside area with a deceased ancient, you have to go through the tunnel and then head left. Once you’re at the docks, look above you and you’ll see a raven.
Isle of Death has one raven you can kill.
- At the western beach of the isle, there is a red chest. There is a raven on the gap in the middle of the cliffs.
Iron Cove only has 1 raven to kill.
- At the dock of Iron Cove, climb up the platforms and head right. You’ll have to get on top of the ship wreck and look up to the left to see the raven.
Wildwoods only has one raven to kill.
- You’ll find a raven flying above the big tree in the Hidden Chamber of Odin.
Alfheim has 2 ravens you can kill.
- A raven is on the marble statue, right side of the Light Elf Sanctuary dock.
- Once you’ve entered the Valkyrie arena to your left inside the Hidden Chamber of Odin, you’ll be able to see a raven to the left side.
Helheim has six ravens you can kill.
- Before you enter the doors to Helheim, you should climb up the first central platform. Head to the right. You’ll have to explore a sap barrier. You’ll see a raven just above the red chest.
- Head back to the central area where you’ll have to climb the second platform. You’ll have to head left. Shoot down the red sap door which reveals the entrance to a Hidden Chamber of Odin. You’ll see the raven before you head inside the chamber.
- Inside the hidden chamber of Odin, go to the upper level. You’ll see it above the windows where the rafters are.
- At the very bottom of Helheim, you’ll have to drop down to the platform and unto the lower circle. You’ll have to climb the wall that is in front of you. Before you head down the tunnel, look towards your left and you’ll see the raven on the rocks.
- Once you’ve reached the area with the glowing statues, a raven can be seen circling the abyss across the lowest platform to the right.
- Once you’re going back down to Brok’s shop, you’ll eventually come across a pretty long bridge. About halfway across of it there is a golden structure with a raven at the top of it inside the ring.
How to Get Treasure Hunter Achievement
To get the Treasure Hunter achievement, you’ll have to dig up all the treasures using treasure maps. Here is where you find every treasure map as well as their dig locations. There are 12 treasure maps in total.
Turtles Tribute – can be found in front the Hidden Chamber of Odin in the Witch’s Cave.
To get the treasure, you’ll have to head to the top area. You’ll have to destroy a red wall sap before you can climb the wall. There will be a stone path you’ll need to follow. You’ll have to stop at the turtle’s left front foot. There is a mossy stone you can inspect for the dig spot.
Kneel Before Thor – can be found in the Landsuther Mines in the River Pass. It’s next to the coffin on the first floor of the mines. Though you won’t be able to access it until you’ve returned to the area after progressing in the mines.
You’ll have to use the zip line from on top of the Lookout Tower. You’ll find a Jotnar Shrine at the bottom. Right of it is the dig spot you’re looking for.
The Dead and Bloated – can be found deep inside the Volunder Mines. Once you’ve reached the area with an R-shaped rune, the map can be found in its vicinity. It is just a few feet away from the coffin with a wheel.
After you’ve docked the boat in the Cliffs of Raven, there is a chain you can use to climb up. Turn left afterwards and then climb the walls to your right. You’ll have to make a jump. You should see a Nornir chest with a chain you can drop down on. You’ll have to take the path that leads to the main area. This is where a dead giant lies. You can find the dig spot next to its stomach.
Don’t Blink – can be found in the central pillar of Fafnir’s Storeroom.
The dig site is in the Foothills just above the path up towards the mountain entrance. Just continue along the path until you have to make a jump to cross a gap. You should be able to scale up a wall towards the left. Once you’re at the top, just look around nearby to the left. The dig spot is at the edge of the cliff.
Creation Island – you can find this map in Iron Cove. Once you’ve arrived to the isle, you can find the treasure map in the center of the path.
The dig site is in Buri’s Storeroom which you can find in the Lake of Nine. You’ll have to keep going until you reach the end of the path. Just before you reach the water wheel, there will be a small open spot to the left side. This is the dig spot, you can interact with it at the center.
Finder’s Fee – you can find this in the Forgotten Caverns. Once you’ve docked, just head on until you’ve passed the Mystic Gateway. Once you’ve reached the junction, turn left and you’ll be able to find a chest. The map is in front of said chest.
You can find the dig site at the Northri Stronghold. Once you’ve progressed halfway throughout the stronghold, there will be a room with large gates along with several water wheels. You can identify this because there is a dock just next to that large gate. Go up the stairs and there will be a wall you can scale up to. Once you’ve climbed it, you’ll find the dig spot at the back of the wall.
Njord’s Oarsmen – you can find the map on the lower deck of the ship where you fight The Traveler in Northri Stronghold. You can break through the side of the ship on the dock next to the ship.
You’ll have to dock on the west side of Mason’s Channel. You’re going to go to the back and scale up the wall. Once you made a jump through a gap, you’ll be able to see Sindri’s Shop. Just opposite of where you can talk to Sindri, there is a wall you can climb up on. Once you’re at the top, head on right and keep going until you reach the edge. This is where the dig spot is.
The Boat Captain’s Key – can be found right on the shore of Stone Falls.
Go to the Isle of Death after you’ve drained the water twice in Lake of Nine. You’ll have to go past the main shore where you’ll encounter Revenants to fight against until you reach a big center rock with an area inside you can climb into. You’ll have to climb upwards where you can find the original shore was. There will be a broken ship you’ll be able to see. Enter underneath the ship and you’ll find the dig spot.
Island of Light – you can find this in Mason’s Channel. Dock the boat to the left statue of Oarsmen and continue along the left side of the beach. The map is on the ground you can pick up.
You’ll have to go to the Light Elf Outpost and unlock every part of the outpost using the light crystals and chains. There is a junction where you can either take the chain to go down or climb up the wall. Go down the chain, and you’ll get to the dig site.
The Historian – you’ll find this in the Ruins of the Ancient. You’ll have to dock the boat on the shore to the left instead of continuing through the passage. Just go beyond the pillar and you’ll find the map on the floor in the center.
Go to Fafnir’s Storeroom. Starting from Sindri’s Shop, keep going through the area. Once you’re deep enough into the storeroom, you’ll eventually reach an open field. There should be stairs you can take towards the left. At the top of the stairs is a brazier. To the left of the brazier is the dig spot.
Hunter’s Kingdom – can be found in the Lookout Tower. Once you’ve docked your boat and hit the mechanism go to the to and hit it again. Climb the scalable wall and take a left turn once you’ve hit the top. You’ll have to hop of the edge to get to the middle of the area where the map lies.
Go to the mainland of Veithurgard. There is a large door at the back of the left corner. There is a lore marker to the left of this door. Just at the right of the lore marker is what you’re looking for, the dig spot.
The Last Place They’d Look – can be found at The Mountain. Use the Mystic Gateway to get to The Summit. This time, you’ll be heading down from where you came up. Once you’re halfway along the journey, you should be able to climb down from the left side. Walk along that path until you get the prompt to interact with something. You’ll be going down to the bottom and through some doors. Go right and continue on your way down. You will find a crouch space where you fought an ancient. The map can be picked up from the floor.
Go to the Council of Valkyries. You can locate this in the place where you’ll see eight thrones. In the middle of the second and third throne is the dig spot you’re looking for.
How to Get Every Combat and Armor Achievements
Path of the Zealot – you’ll have to obtain the Traveler Armor set. Once you’ve beaten an enemy that looks like a knight with a large blade and a shield, you’ll be given “The Road Less Traveled” side quest. Like the above, you have to take the item you got from this enemy to one of the Dwarven brothers. This will unlock the armor for you to craft. Playing through the game should get you the materials easily enough.
Primordial – you’ll have to obtain the Ancient Armor set. Once you’ve beaten your first ancient, you’ll be given the “Hearts of Stone” side quest. This will task you to bring an item you picked up from the ancient to one of the Dwarven brothers. You’ll unlock the ability to craft this armor set. The materials for it can be gather through gameplay easily enough.
All Will Fail – kill 1,000 enemies. You can definitely along the way through your journey in God of War. Show no mercy.
Fire and Brimstone – you’ll have to complete every trial in Muspelheim. You’re going to need the four Muspelheim ciphers before you can do this. There will be six arenas you have to complete. Each arena has two trials for you to complete. You’ll have to complete the first six normal difficulties of the Arena before you unlock the hard trials the second time around.
Chooser of the Slain – you’ll have to take down all nine Valkyries. They’re are no pushovers so be careful. You’re in for some challenging fights. Most of them you’ll encounter in the Hidden Chambers of Odin.
- Gunnr – can be fought in Thamur’s Corpse inside the Hidden Chambers of Odin.
- Geirdriful – can be fought in Foothills in the Hidden Chambers of Odin.
- Eir – can be fought in The Mountain inside the Hidden Chambers of Odin.
- Kara – can be fought in the Witch’s Basement in the Hidden Chambers of Odin.
- Rota – fought in Helheim inside the Hidden Chambers of Odin.
- Olrun – fought in Alfheim in the Hidden Chambers of Odin.
- Gondul – can be fought in the trials of Muspelheim (Trial VI).
- Hildr – is fought in Niflheim in the back corner area of the poison fog maze.
- Sigrun – can be fought in the council of Valkyries.
Dragon Skies – you’ll have to free all three dragons. There are three shrines which you have to destroy first.
- Dragon Otr – you’ll find this dragon in east Midgard in Veithurgard. You’ll see a large statue of Thor just at the center of the lake. Sail south of this statue until you find a place to dock. You’ll have to climb the stairs to get to Otr. At the top, you’ll find the dragon held by three runes. You’ll have to look for the shrines to get rid of them.
- The first shrine can be found away from the altar. Head right and choose the left path from the two. You’ll face the first shrine there.
- The second shrine is at the left of the altar. Just climb the edge and there is a draugr praying at this shrine. You’ll have to clear the area of enemies.
- The third shrine can be found across a wooden bridge from where you found the first shrine. You’ll have to drop down from the cliff on the left side of the bridge. Just follow the pathway until you encounter a circle of menhirs. Fight the draugr and go up the stairs. Turn to your right and keep going until you’ve reached the end of the path where you’ll have to drop down. You’ll have to jump to the platforms on the other side. There will be a huge door you can open by rotating the apparatus to the right rune symbols. Choose T and R on the left side and choose the rune that is similar to an F on the right side. You’ll have to explore the dwarven hallway before you can reach the final shrine. You’ll eventually come across it. Once you’ve destroyed this shrine, head back to free Otr.
- Dragon Fafnir – you can find this dragon at the north east at the Lake of Nine. You should progress the game until you get the Shock Arrows because you’ll need those to explode crystals and clear the path. You’ll have to scale up and follow the pathway until you’ve reached a large door. Fafnir is behind this door.
- The first shrine is just below the altar holding Fafnir. Drop down to reach and destroy it.
- The second shrine is in the room just across the altar Fafnir is being held. You’ll have to jump the gap and climb the wall to reach it. At the top of the wall is the shrine you’ll have to destroy.
- The third shrine can be found in the left of the level from where the altar Fafnir is on.
- Dragon Reginn – you’ll have to go to Midgard and make your way to Konunsgard. It is at the northwest from the Lake of Nine. You’ll have to use the boat to get there. Once you’re docked, you’ll have to reach the Konunsgard stronghold. Reginn is at the northeast of the stronghold.
- Head down the path in front of the dragon. You’ll have to jump the gap and march forward to find the first shrine.
- You can continue the pathway from where you found the first shrine. There is a door locked with three runes. You’ll have to take a sap and place it on the rune behind the bars. You’ll have to shoot the sap before you shoot the crystal red crystal near the bell. Use the Leviathan Axe to throw it at the final bell that’s at the top of the door which will open it. Follow the path forward and it’ll lead you to the second shrine.
- You’ll have to take the rope from where you found shrine number 2 to go down a level. When facing Reginn, head down to the cavern at the bottom. At the end of the path is the last shrine.
Father and Son – you’ll get this once you’ve gotten all the trophies above.
How to Unlock New Game Plus
If you want to go back to get any achievement you missed, you can always opt to either reload an existing save file or start a New Game Plus. To unlock New Game Plus, you simply have to beat the game once on any difficulty.
A lot carries over to New Game Plus so you won’t have to worry about working for them all over again, such as Kratos’ skills, Atreus armor, and etc. This won’t mean that game will be too easy as enemies will scale up to challenge you no matter what difficulty you selected this time around.
Alternatively, you could also free roam after you’ve beaten the game. There’s no need to start a new file just to get the achievements above.
That’s about everything you need to know about the achievements you’ll get for God of War on PC. For more content on the game, check out our other God of War articles.
- God of War PC Original Settings vs. PS4 – Is There a Difference?
- God of War PC Features Trailer Showcases High Fidelity Graphics and More
- God of War PC Version Being Handled by Third-Party Studio
Check out this video from Zanar Aesthetics during a boss fight with Baldur.


