
Destiny 2 is getting 14 new Exotics in its latest expansion, Destiny 2: The Witch Queen released this February 22, 2022. This massive expansion brought with it some new exotic weapons and armor to play with. If you’re excited to get your hands on these powerful exotics then you’re going to need to know what they are and how to get them.
Here are all the exotic weapons and armor in Destiny 2 The Witch Queen expansion. We’ll also be teaching you how to get these exotics for yourself.
All 14 New Exotic Weapons and Armor From Destiny 2 The Witch Queen Expansion
There are a total of fourteen new exotics introduced in the Witch Queen expansion of Destiny 2. You have two new exotic armor pieces for each class. This means you’re getting 6 new armor pieces in total. This new expansion also gives you eight new exotic weapons, three of which are class-specific Glaives.
- Grand Overture Exotic Machine Gun
- Parasite Exotic Grenade Launcher
- Osteo Striga Submachine Gun
- Dead Messenger Grenade Launcher
- Edge of Action Glaive (Titan class-specific)
- Edge of Intent Glaive (Warlock class-specific)
- Edge of Concurrence Glaive (Hunter class-specific)
- Lubrae’s Ruin Glaive
- Hoarfrosts-Z Exotic Titan Chest Piece
- Loreley Splendor Titan Helm
- Osmiomancy Gauntlets Warlock Gloves
- Secant Filaments Warlock Legs
- Renewal Grasps Hunter Gloves
- Blight Ranger Helm Hunter Helmet
There is going to be a lot of challenge into acquiring these new exotic armor pieces. They can often be acquired by tackling Lost Sectors on high difficulty. One exotic gear can be acquired by finishing The Witch Queen campaign on Legendary difficulty. So you’re going to have to put in some work if you want to get your hands on them.
The new exotic weapons however have a different variety of sources. These include purchasing the season pass, participating in raids, completing quests, and using the new weapon crafting system.
Here are all the new exotics and how to acquire them in Destiny 2 The Witch Queen expansion.
All Exotic Weapons in Destiny 2 The Witch Queen and How to Get Them
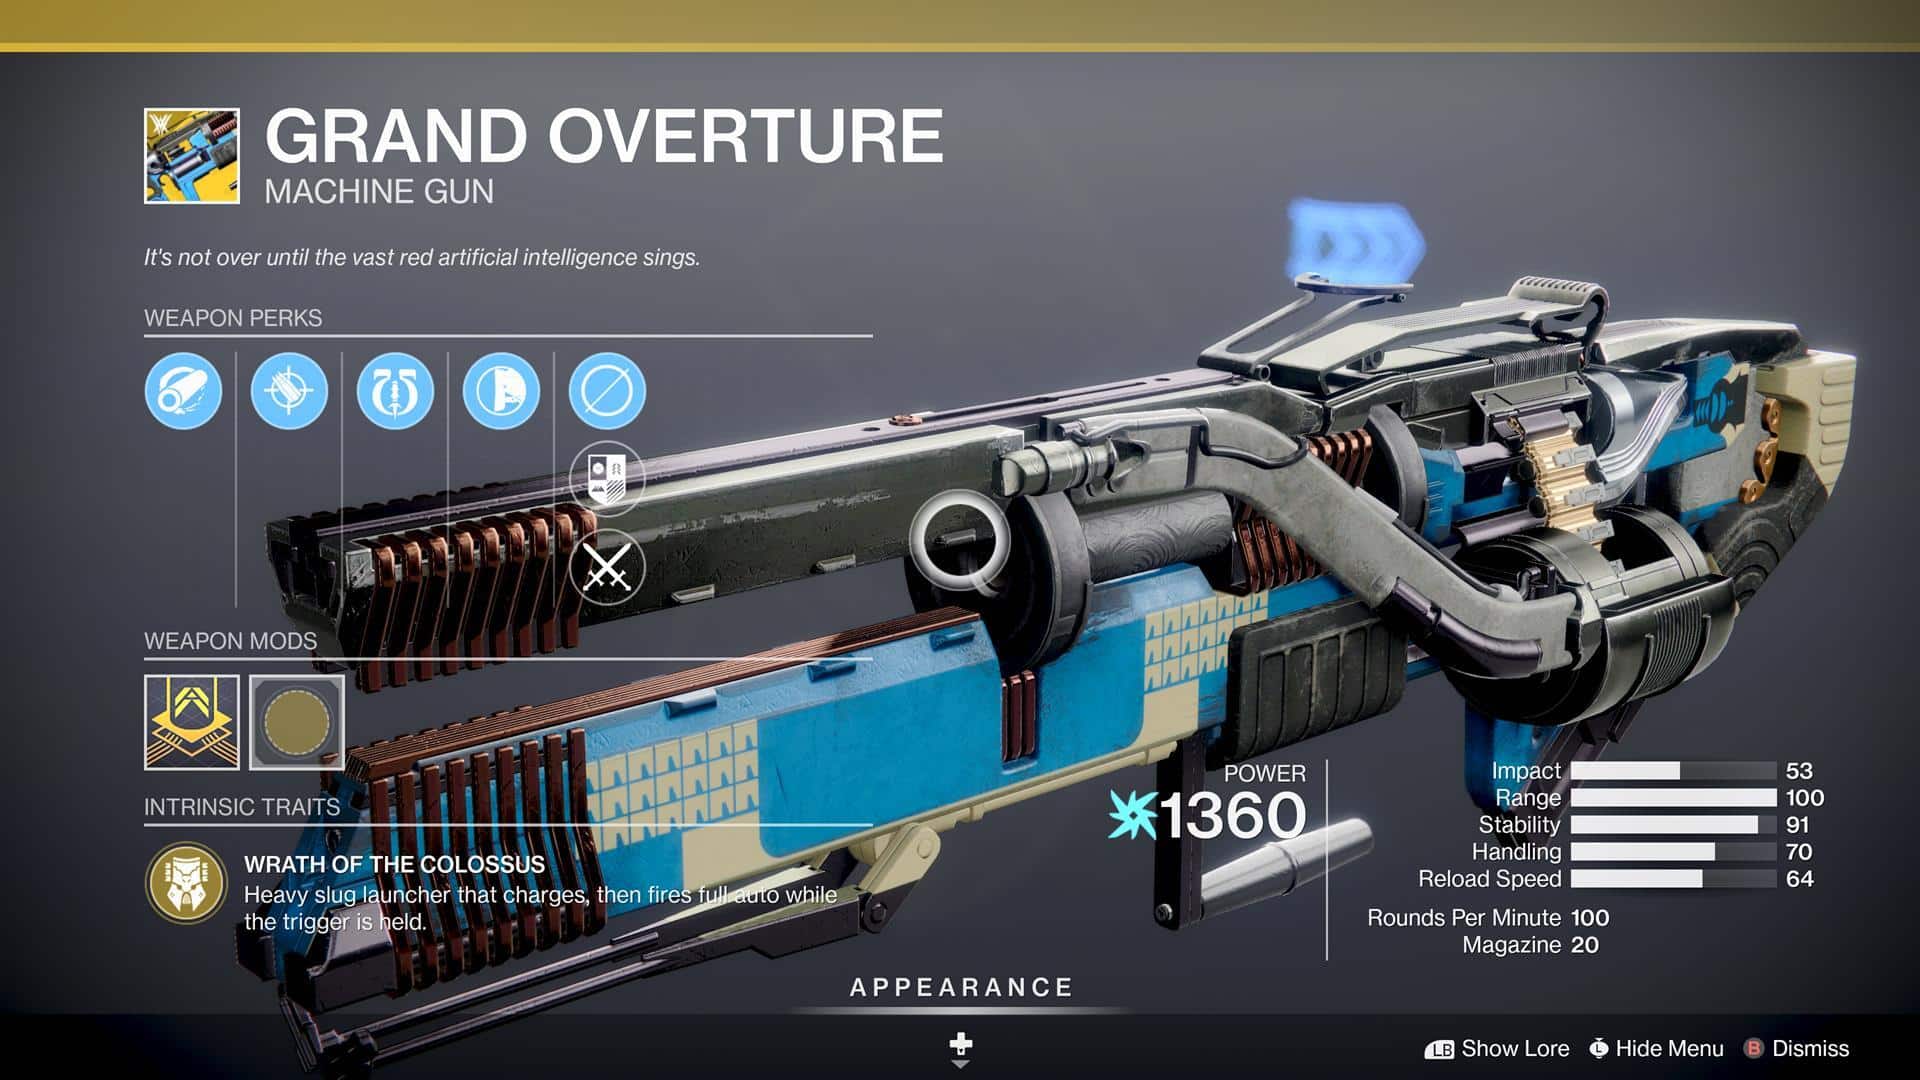
Grand Overture Exotic Machine Gun
The Grand Overture is Machine Gun that can shoots punishing slugs at anything you point it towards. It has an alternative fire thanks to its signature perk, Omega Strike, which will turn those slugs into explosives. Every time you accurately hit an enemy, the Grand Overture will load a missile which you can build up. Once several missiles are packed in, you can launch it at an unfortunate enemy who just happens to be in the way.
How to get Grand Overture
You will need to reach level 35 of the Season of the Risen Season Pass in order to redeem the Grand Overture as a free reward. This exotic is automatically given to players who have purchased the premium Season Pass for $10.
Grand Overture Stats
- Type: Machine gun
- Power Level: 1360
- Impact: 53
- Range: 100
- Stability: 91
- Handling: 70
- Reload Speed: 64
- RPM: 100
- Magazine: 20
How to get the Grand Overture Catalyst
Go to Banshe-44 in The Tower to pick up the “Heavy Does It” quest that will give you the Grand Overture Catalyst. In this quest, you’ll have to do a series of objectives:
Heavy Does It Part 1 objectives:
- Defeat Cabal x50
- Targets defeated with power weapons x50
- Rapidly defeat targets x15
Tips on how to find Cabals: you can find Cabals easily in the NDZ and Nessus maps. There isn’t a shortage of Cabals in Destiny 2 but you can tackle a Lost Sector in Nessus to quickly fulfill the required objectives. Cabals go down pretty easily and aren’t that tough.
Tips on targets defeated with power weapons: you can use either a machine gun or a rocket launcher to rapidly defeat enemies. This will fulfill the second and third requirement into getting the Grand Overture Catalyst.
Tips on rapidly defeating 15 targets: you can do this in conjunction with the above. You can use your machine guns or rocket launchers to quickly kill enemies in rapid succession. That’s two birds with one stone.
Heavy Does It Part 2 objectives:
- Catalyst calibration x100
- Targets defeated (with Overture) x100
Tips on calibrating the Catalyst: Take part in specific activities such as Nightfall, Crucible, and Gambit matches. This objective can be very challenging as it requires you to be at a high power level. Even the lowest tier of difficulty in Nightfall can go beyond the starting threshold for new players. This objective is honestly a grind as participating in Crucible only rewards you with a single point, winning them grants you 2. For this we recommend that you get the Catalyst quest booster by reaching Level 11 and Level 22 of the Season of the Risen’s free version of the Season Pass.
Tips on Targets Defeated with Grand Overture: this objective is easier than the first one. Simply defeat 100 regular enemies to fulfill the required objectives.
Heavy Does It Part 3 objectives:
- Return to Banshee-44 in The Tower
- Defeat Enemies
Go back to Banshee-44 in The Tower and he’ll give you the Catalyst for the Grand Overture. You now just have to defeat around 400 enemies to get your hands on the upgraded version of the Grand Overture.
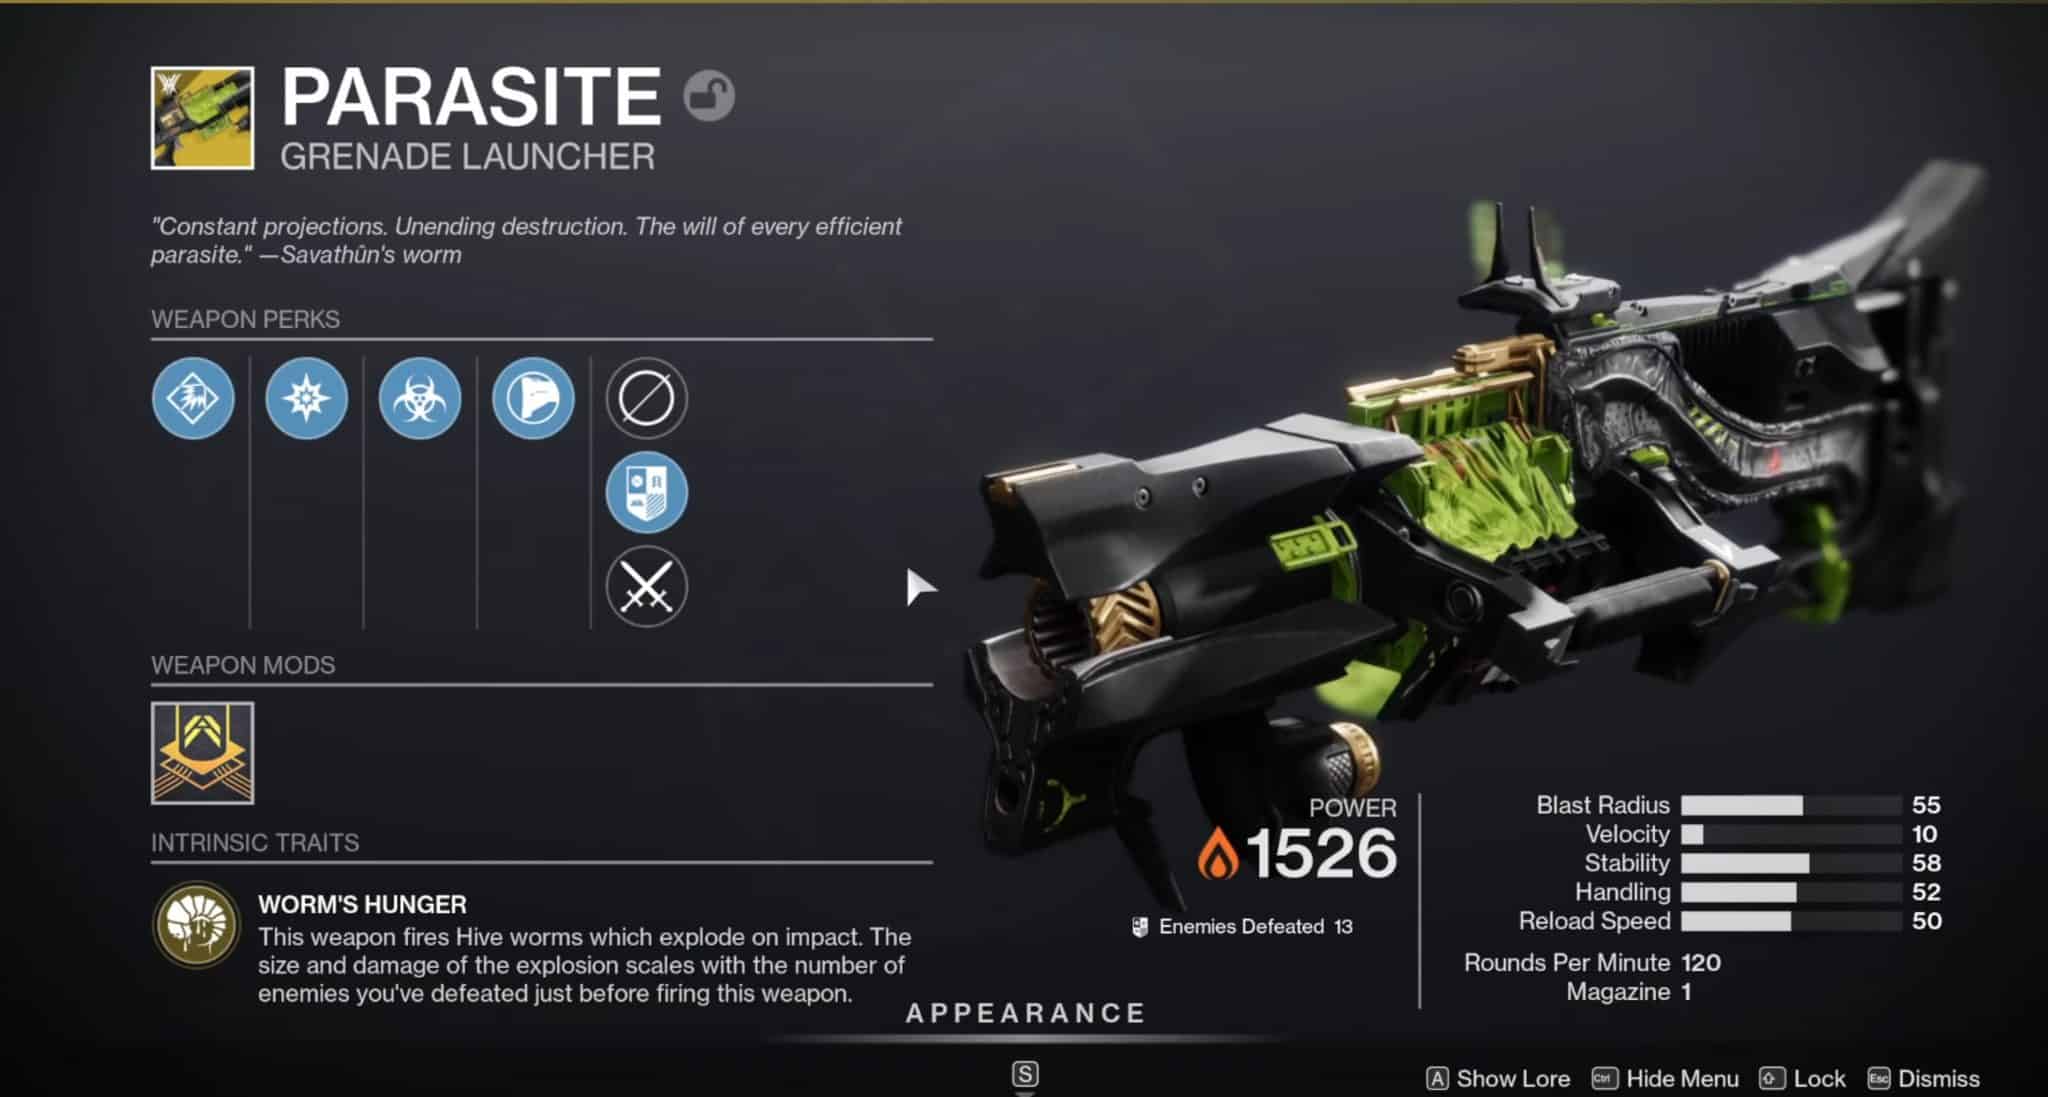
Parasite Exotic Grenade Launcher
The Parasite is an exotic grenade launcher that fires Hive worms which explode upon impact. The size and damage dealt by the worms depend upon the number of enemies killed before firing this weapon. This effect stacks meaning that you can use a submachinegun to take out weaker foes before swapping to the Parasite grenade launcher exotic to deal massive damage to a boss.
The Parasite also has a unique perk, the Worm Byproduct Trait. If you take damage from your own Hive worms, your other weapons will get a 15% damage increase for 10 seconds.
How to get the Parasite Grenade Launcher
The Parasite exotic grenade launcher will be your reward after completing “Of Worms and Queens” quest from Mara Sov.
You won’t be able to start the Of Queens and Worms quest until you finish the main campaign of The Witch Queen expansion. So the Parasite Exotic might be one of the last exotics you’ll collect. Once you have finished the main campaign, visit Mara Sov on Mars who will get you started on the questline into getting the Parasite exotic grenade launcher.
Parasite Grenade Launcher Stats:
- Type: Grenade Launcher
- Power: 1526
- Blast Radius: 55
- Velocity: 10
- Stability: 58
- Handling: 52
- Reload Speed: 50
- RPM: 120
- Magazine: 1
Here is what the Of Queens and Worms quest will require you to do:
- Complete Birthplace of the Vile Strike
- Go to the Temple of the Cunning
- Defeat 100 Scorn
- Complete Sepulcher Lost Sector
- Complete three patrols in Florescent Canal
- Get the Cryptoglyph from Queen’s Baily
- Complete the Metamorphosis Lost Sector
- Get the Cryptoglyph from the Alluring Curtain
- Finish the Last Extraction Lost Sector
- Speak with Flynch
- Complete the Parasitic Pilgrimage mission
Complete the Birthplace of the Vile Strike: go to Savathûn’s Throne World and access the Birthplace of the Vile Strike. This objective is relatively straightforward and you just have to complete it once. The recommended Power Level for this activity is 1510.
Go to the Temple of the Cunning: go to the Temple of the Cunning in the deep undergrounds of Savathûn’s Throne World. This will take some time until you can reach this area. Once you have, you’ll be tasked to fulfill a set of objectives in the Temple of the Cunning. You’ll be greeted with Scorn enemies at the location.
Defeat 100 Scorn: defeat 100 scorn anywhere in Savathûn’s Throne World. While you can accomplish this anywhere on the location, we recommend participating in the Resonant Splinter Public Event as it offers a large quantity of Scorn foes allowing you to farm kills much easier.
Complete the Sepulcher Lost Sector: head to the Sepulcher Lost Sector located in the Savathûn’s Throne World and complete it. Once you’ve progressed to the end of this Lost Sector you’ll have to interact with the Deepsight Darkness Orb that lies behind the final statue. You should be able to spot some hidden platforms that you need to traverse to find the secret area you need to place the Hive worm in to advance your exotic quest.
Complete Three Patrols in the Florescent Canal: you have to finish any Three Patrols in the Florescent Canal. You can finish through this rather quickly as you can pick whatever Patrols strike your fancy and be on your way.
Get the Cryptoglyph from Queen’s Bailey: head over to Queen’s Bailey to retrieve a Cryptoglyph. The marker for the next step in the exotic quest should pop up automatically so your waypoint should show you the way no problem. Once you’ve arrived in the location, Scorn enemies will prevent passage and you have to wipe them out to proceed to the next step.
Complete the Metamorphosis Lost Sector: go to the Metamorphosis Lost Sector and complete it. You’ll have to do the same thing you did in the previous Lost Sector. Interact with the Deepsight Darkness Orb to find the hidden platforms and traverse them. Once you’ve entered the secret room, place the Hive worm on the pedestal.
Get the Cryptoglyph from the Alluring Curtain: go to the Alluring Curtain to get a Cryptoglyph. The waypoint will show you the way automatically. Unlike before where you’ll be greeted by Scorn, this time you’ll be facing up against the Hive. Defeat them and then use the Deepsight Darkness to find the hidden platforms to traverse to. Shoot the unlit torches you can find on three of the hidden platforms to light them. Once they are lit you can interact with the locked chest at the end.
Finish the Extraction Lost Sector: go to where the Extraction Lost Sector is and complete it. It’s going to be the same process as before. Interact with the Deepsight Darkness to reveal the hidden platforms and place the Hive worm on the pedestal inside the hidden room.
Speak with Flynch: return to Flynch and accept the Parasitic Pilgrimage mission.
Complete the Parasitic Pilgrimage mission: this is a straightforward activity that doesn’t require doing anything special. Once you’ve completed this last step the Parasite exotic grenade launcher is now yours.
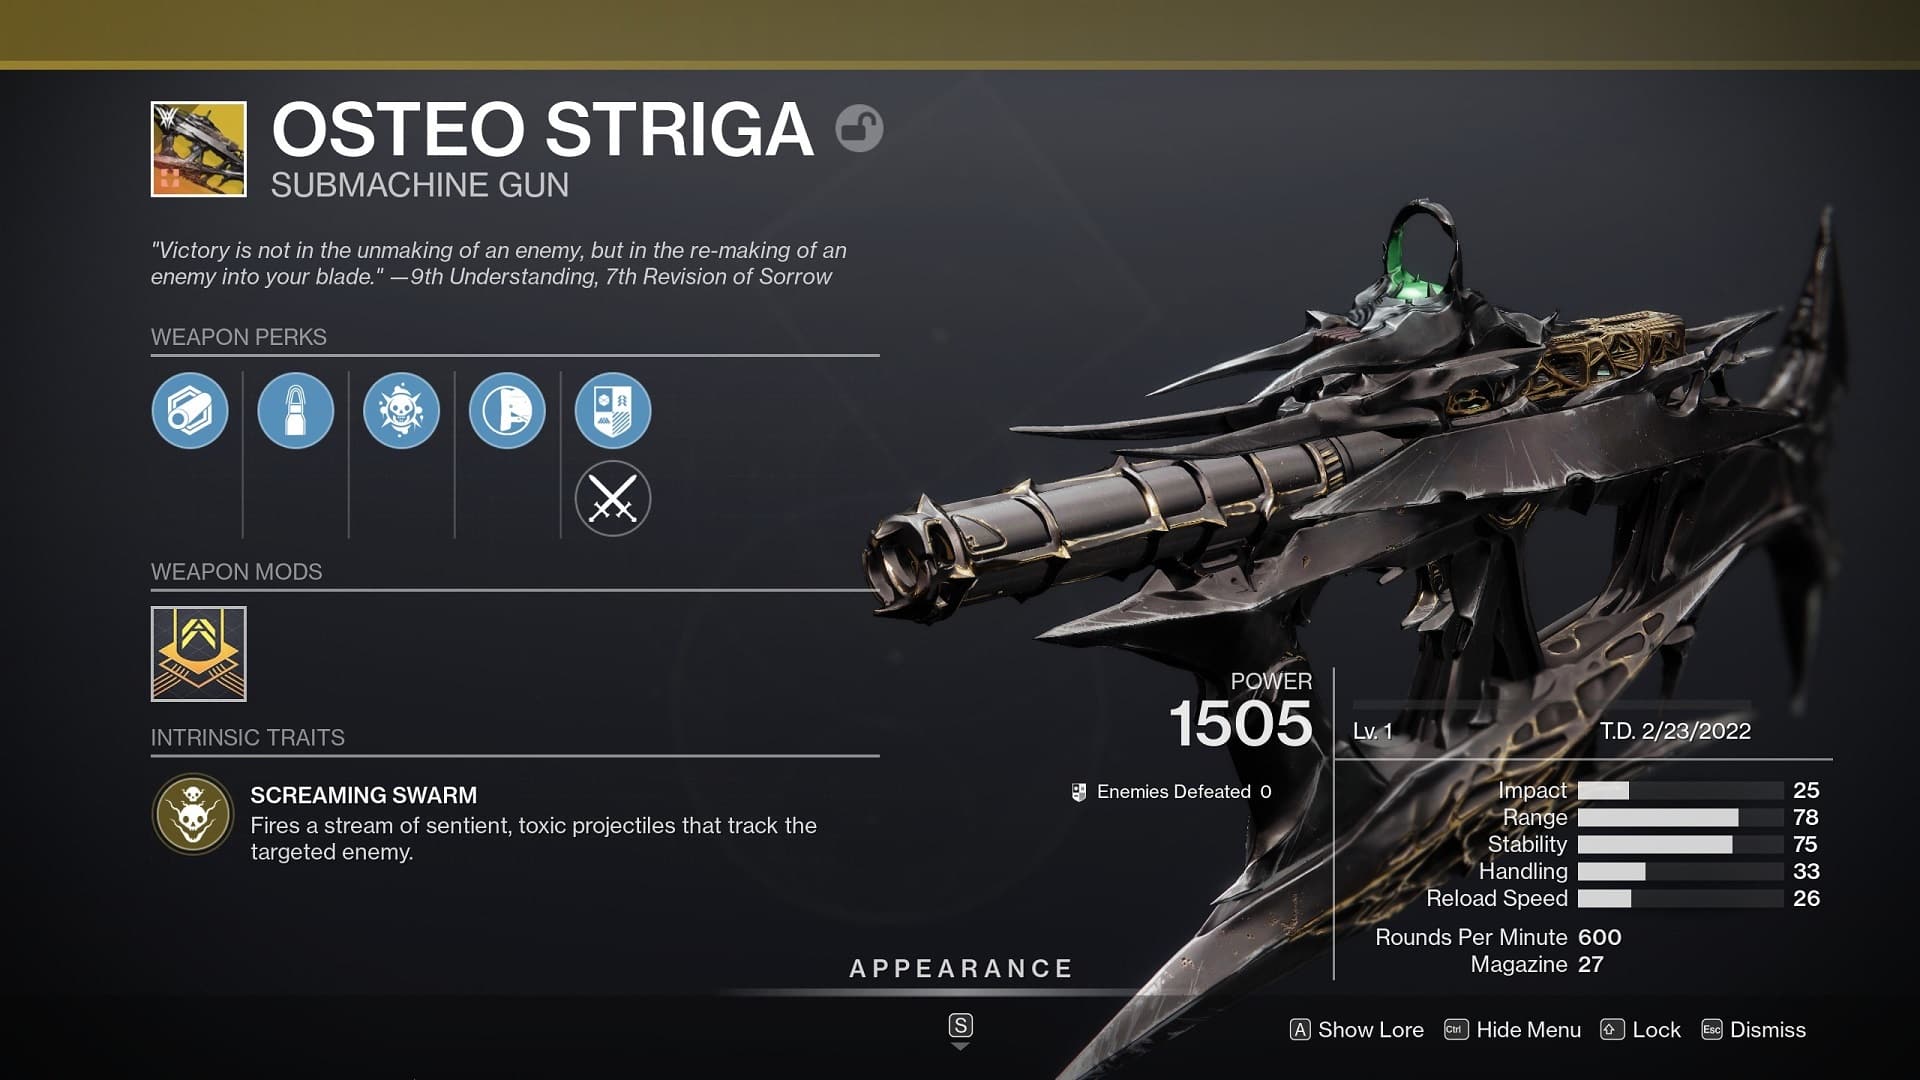
Osteo Striga Submachine Gun
The Osteo Striga an exotic submachine gun that fires toxic projectiles that seem to have a mind of their own. It is the first ever craftable gun ever in Destiny 2.
How to get the Osteo Striga
You have to first finish The Witch Queen campaign on either classic or Legendary difficulty before you can craft the Osteo Striga. Once you’ve finished the campaign, check your Triumphs tab and go to the “Patterns and Catalysts” to unlock the pattern which lets you craft the Osteo Striga.
Go to the Enclave in Savathûn’s Throne World and approach the Relic. The Osteo Striga exotic should now be in your SMG menu. This is when you’ll have to find the materials to craft the Osteo Striga.
More so, to get the Osteo Striga you need to purchase the Destiny 2 The Witch Queen Deluxe Edition and finish the main campaign. You’ll also have to make use to the newly introduced crafting system and find the right materials to be able to make this exotic. If you desire to get the Osteo Striga without purchasing The Witch Queen Deluxe Edition then you’ll have to wait until after the Season of the Risen.
Osteo Striga Stats
- Type: Submachine Gun
- Impact: 25
- Range: 76
- Stability: 75
- Handling: 33
- Reload Speed: 26
- RPM: 600
- Magazine: 27
How to craft the Osteo Striga
Find the crafting materials below in order to craft the Osteo Striga:
- Resonant Alloy x7
- Glimmer x15,000
- Neutral Element x2,375
- Ascendance Alloy x1
- Ruinous Element x70
You should already have these crafting materials after finishing the campaign as they are rewards for completing the new story missions. The only material you really need to look for is the Neutral Element.
Tips on getting the Neutral Element: the best way to farm Neutral Element is by using Deepsight Resonance weapons. You can recognize these by the red glow they emit in your inventory. Deepsight Resonance weapons have a bar called the “Attunement Progress” which it filled by generally using them. Once this bar is full, you get 200 Neutral Element as a reward.
How to get Osteo Striga Catalyst
You can get the Osteo Striga Catalyst by levelling the weapon to Level 10. You can do this by generally just using it. Once you’ve reached level 10 for the Osteo Striga go to the Enclave and you’ll be able to get the Catalyst for the weapon.
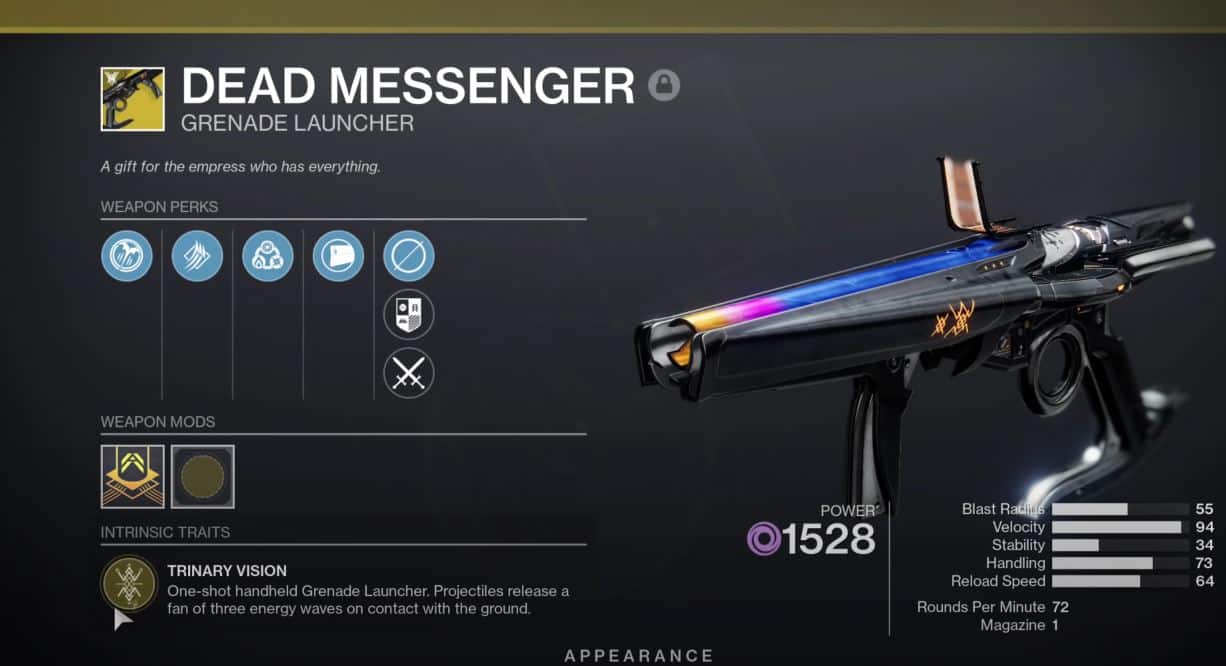
Dead Messenger Grenade Launcher
The Dead Messenger is an exotic grenade launcher that can fire rounds that releases a wave of elemental energy upon impact. The elemental damage it gives can also be changed upon rotation via reloading allowing you to alternate between Void, Solar, or Arc damage.
How to get the Dead Messenger
To get the Dead Messenger you’ll need to finish the Exotic quest “Kill the Messenger” which can be unlocked after completing the steps down below:
- Talk to Ikora in The Enclave for the Rising Tensions quest.
- Complete the 7 objectives of Rising Tensions quest in its entirety.
- Acquire a new quest called Operation Elbrus from The War Table.
- Complete enough steps of Operation Elbrus until you’re able to debrief with Lord Saladin at The War Table.
- Acquire Kill The Messenger Exotic quest from The War Table.
- Complete the Vox Obscura Exotic mission when you’re at least at Power level 1550.
- Acquire Dead Messenger from the chest at the end of the Vox Obscura mission.
Getting the Rising Tensions quest: first head to The Enclave and talk to Ikora. Take the “Rising Tensions” quest which will have you complete 7 objectives which will unlock a new quest called Operation Elbrus which you can get from The War Table. Rising Tensions is the introductory mission to The Witch Queen expansion so you may have already finished it. The 6 of the 7 objectives in this quest really just involves going around talking to a few people before getting a little action. You’ll even get the Recurrent Impact machine gun as a reward.
Getting the Operation Elbrus quest: once you’ve picked up your reward from the Rising Tensions quest in the HELM War Table you’ll automatically start the “Operation Elbrus” quest which will put you in the PsiOps Battlegrounds. You will first have to gather 500 Psychogenic intel as it is required to open the Runic chest at the end of the first activity. What you need to do is to complete 7 out of 28 objectives of the Operation Elbrus quest. Once you’ve reached that point, you’ll unlock the Kill The Messenger exotic quest courtesy of the Caiatl.
Completing Kill The Messenger exotic quest: you have to take the “Kill the Messenger” exotic quest in the HELM War Table which will send you to Savathûn’s Throne World in order to participate in “Vex Obscura.” You’ll need a minimum of 1550 power level which is past the Power Cap to be able to take this mission. You can form a team of three Guardians to help each other finish the mission easier.
Guide on completing the Vex Obscura quest: The Vex Obscura will require that you complete objectives in a given amount of time. It is mostly really about breaking things with the Cabal vehicles before you’re tasked with deactivating the Boss’ shield via melee attacks on other Psions. This can be difficult as surpassing the time limit means you’ll have to retry the whole quest from the beginning. We recommend a good Fireteam with at least one Guardian using an Unstoppable pule rifle or alternatively an Unstoppable hand cannon.
The Time Limits on the quest: It’s important that you don’t underestimate the time as you have 4 minutes and 30 seconds to clear the Airfield. This isn’t a generous amount of time given to you since it will carry over to the next objective which is also time limited. You and your Fireteam have to be swift as you possibly can. Don’t waste time and use the Interceptor to run down the Cabal enemies. Keep an eye out Psion who are roaming the dessert in their own Interceptor as it can kill your entire Fireteam immediately.
Dealing with the Goliath tanks: You will also have to face up against Goliath tanks which aren’t a joke. To take care of them swiftly, you’ll have to drive the Interceptor into the Goliath and start shooting which should immediately take it out then hop off of the Interceptor. This Goliath tank has an Unstoppable Incendior nearby which can be taken out via rocket launchers without much problems. As you’re doing all of this, Cabal reinforcements and Scorpio turrets will provide backup. This is why this mission is so challenging.
Once you’re finished with that, Amanda Holliday will send a Drake tank your way. Hop on board and use it to get to the next area where you’ll have to face up against two more Goliath tanks. Unlike what you did before, do not ram your Drake tank into the Goliath tanks. It’s far too risky at this point as dying means starting over again from the beginning and you can easily wipe your Fireteam.
After you’ve made quick work of the Goliath tanks, you have to destroy the generators and panels on the large towers in order to cancel bombardment. The area you’re in will then be swarmed with Goliath reinforcements and missiles striking you down from above. Keep your Drake tank on the move in order to preserve health and stay alive.
Once you’ve dealt with the Goliaths you have to blow open the bunker door and race to the control room. If your Drake tank took too much damage, you can summon a new one from the platforms over at the Scabland entrance. You’ll have to face up against a variety of enemies including an Unstoppable Champion above the doorway being protected by the Scorpius.
Race to the control room: You’ll be given 10 minutes to get to the control room once you’ve entered the doorway. It won’t be easy since you’ll have Cabal and Psion enemies in the way. Push through the objectives as quick as possible as there is a boss fight at the end of it which you’ll have to use the remaining 10 minutes to beat. We recommend just using melee attacks to quickly take out the shields of the yellow Codewardens in each of the three rooms. After this, you’ll have to face against Qabix, Insurgent which is the final boss of the Vex Obscura quest.
Guide on Defeating Qabix, Insurgent: Watch out for the Qabix boss’ attacks which can be incredibly fatal. Once it shoots out a detainment bubble, shoot the glowing spot on the bubbles to be able to break out of it. After you’ve done enough damage to this boss, it’ll pull out a cannon which deals flaming shots that will track your movement. While the flaming shots can be shot down to prevent incoming damage, you’re better off just dodging them.
Qabix is fought in three phases. He as a strong shield which relies on Psions inside the bubbles. You’ll have to shoot them to deal damage to the shield. It’s going to be quite annoying to deal with his backup while doing so.
Open the chest to get the Dead Messenger: after defeating the Qabix, Insurgent at the end of the quest, you can receive the Dead Messenger by opening the chest.
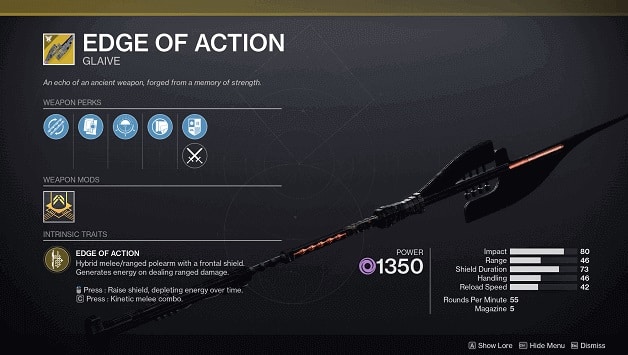
Edge of Action Glaive
The Edge of Action is an all new Glaive weapon type for the Titan Class with protective qualities that offers benefits to the user. This hybrid melee/ranged weapon can place down a protective shield after dealing a certain amount of ranged damage. It is an excellent weapon for Titans wishing to protect their Fireteam.
Edge of Action Glaive stats
- Impact: 80
- Range: 46
- Shield Duration: 73
- Handling: 46
- Reload Speed: 42
- RPM: 55
- Magazine: 5
How to get the Edge of Action Glaive
To get the Edge of Action Glaive, it can be crafted at the Relic (Resonance Engine) in The Enclave on Mars, where you can find the Resonance Engine. In order to craft the Edge of Action Exotic Glaive, you must have unlocked its pattern and you must be using the Titan Class.
There are seven quests to complete in the Enclave on Mars in order to unlock the Edge of Action pattern. If you don’t complete these quests in order, the campaign won’t be complete. Destiny 2’s Witch Queen expansion storyline must be completed before any of the game’s quests can be completed. Ikora’s Hidden has tracked down a wide variety of items across Savathûn’s Throne World, but Guardians should expect an ambush from Hive forces for every item they find.
Tips when crafting the Edge of Action Glaive
- The Remote Shield Exotic trait of the Titan Glaive is by far its most distinctive feature. When the weapon’s energy is depleted, Titans can use it to deploy a protective shield with their next shot. The Edge of Action’s new Titan abilities in Destiny 2’s Void 3.0 restructure work well with the Void weapon.
- Using the following perks will ensure that you get the best Titan Exotic Glaive:
- Alloy Magazine: When the magazine is empty, reloads are significantly faster with the Alloy Magazine.
- Ballistic Tuning: Increases range and reduces charge time, but decreases shield duration.
- Short-Action Stock: Boosts handling speed significantly.

Edge of Intent Glaive
The Edge of Intent is a Glaive weapon specific to the Warlock class which has restorative properties. You can raise a frontal shield that depletes over time and unleash a deadly melee combo. After generating enough energy, you can lay down a turret which restores health to your Fireteam.
Edge of Intent Stats
- Impact: 95
- Range: 73
- Shield Duration: 64
- Handling: 37
- Reload Speed: 60
- RPM: 45
- Magazine: 4
How to get Edge of Intent Glaive
You can get the Edge of Intent Glaive by crafting it at the Relic which you can find on The Enclave in Mars. Go directly to where you can find the Resonance Engine. You have to first unlock the Edge of Intent pattern by completing seven short missions and by strictly playing the Warlock Class.
To get the Edge of Intent pattern, you have to complete a series of seven brief quests. These quests can be taken in the Enclave on Mars but you must have completed The Witch Queen expansion campaign before you can complete all of them. Go to the Evidence Board in The Enclave and undertake these quests to get the pattern. Each of the seven quests needed to unlock crafting for The Edge of Intent Glaive will be unlocked as you progress through the campaign.
Tips when crafting the Edge of Intent Glaive
- The Edge of Intent is one of the most powerful new Glaives added into Destiny 2. It has remarkably high damage and its ability to drop a healing turret allows more modification for your build. Use Healing Rift if you want to prioritize more healing or Empowering Rift if you really want to deal some high damage numbers. Its Lightning Seeker attack can be used rapidly by continuously staying on the offensive.
- These perks will allow you to get the best possible Edge of Intent:
- Restorative Turret – you can drop a turret which will heal your Fireteam once the Edge of Intent’s energy is full.
- Fitted Stock – will make the Edge of Intent more stable allowing you to hit more accurately at the cost it weighing more. You will have increased stability, less recoil, but will experience a decrease in your handling speed.
- Alloy Magazine – the Edge of Intent has faster reload speeds when its magazine is empty.

Edge of Concurrence Glaive
The Edge of Concurrence is a Glaive specific exotic tied to the Hunter class. This glaive has elemental properties and allows you to chain lightning together when it generates enough energy. The Edge of Concurrence glaive is excellent for taking our groups of enemies quickly.
Edge of Concurrence stats
- Impact: 55
- Range: 60
- Shield Duration: 19
- Handling: 60
- Reload Speed: 91
How to get Edge of Concurrence
You have to craft the Edge of Concurrence to get the glaive via crafting it at the Relic which can be found in The Enclave. Head to the Resonance Engine. There are requirements before you can craft the glaive. You have to acquire the pattern for the Edge of Concurrence which you can get by completing seven small missions while playing as the Hunter class.
To unlock all seven of these missions, you first must have finished the Witch Queen expansion campaign. You’ll unlock them as you progress so feel free to take them on one-by-one as they become available to you or wait till the end and finish them in bulk. You can undertake these missions via the Evidence Board found in The Enclave.
Tips on crafting the Edge of Concurrence
- The Edge of Concurrence is a great glaive for crowd control since it can chain lightning attacks. Deal regular damage and fill up the glaive’s energy then unleash lightning whenever possible.
- The perks below can help you shape the Edge of Concurrence to its best:
- Supercooled Accelerator – this will increase your range but your reload and handling speeds will be slightly slowed.
- Composite Rounds – this will increase your handling and stability of the glaive.

Lubrae’s Ruin Glaive
Lubrae’s Ruin is another legendary Glaive, and it can be seen in the Patterns section of Triumphs. It appears that the Lubrae’s Ruin Pattern is Solar-based, but players have not yet figured out how to get this unlockable weapon in Destiny 2.
Little is known about the Lubrae’s Ruin Glaive except that it’s a Raid weapon, and can only be unlocked after completing The Witch Queen raid.
Glaives, in addition to being a class-based weapon, are a new type of weapon in Destiny 2 that has two Legendary and three Exotic types in total, in addition to being a class-based weapon. While Titan players have access to the Edge of Action, Hunters can get and use the Edge of Concurrence and Warlocks the Edge of Intent Glaive.
These new Glaives are exclusively available to players that have access to the weapon crafting mechanic in the Enclave as part of the Witch Queen expansion’s weapon crafting feature.
The Glaives, as well as any of the other sorts of weapon designs in the Enclave, cannot be crafted by players who do not own the Destiny 2: Witch Queen expansion installed on their PC or on their console. However, despite the fact that the Legendary Enigma Glaive is the first weapon that can be made in Destiny 2, these Glaives will not be available for use by players during the campaign.
All Exotic Armors in Destiny 2 The Witch Queen

Hoarfrosts-Z Exotic Titan Chest Piece
This Stasis exotic chest armor piece will replace the Titan barricade with a Stasis wall. You’ll get the same benefits as a Rally Barricade but you can play the Titan class much more aggressively. Enemies will be slowed upon placing the barricade.
How to get Hoarfrost-Z Titan Chest Piece
There are two methods to getting Hoarfrost-Z:
- Complete the Witch Queen campaign on Legendary as the Titan class. This method has a 50% chance of giving you the exotic as a reward.
- Run Lost Sectors on either master or legend difficulty solo if exotic chest pieces are dropped for that Lost Sector. Remember that Lost Sectors do reset per day so you’ll have to wait if you don’t get it as a reward.
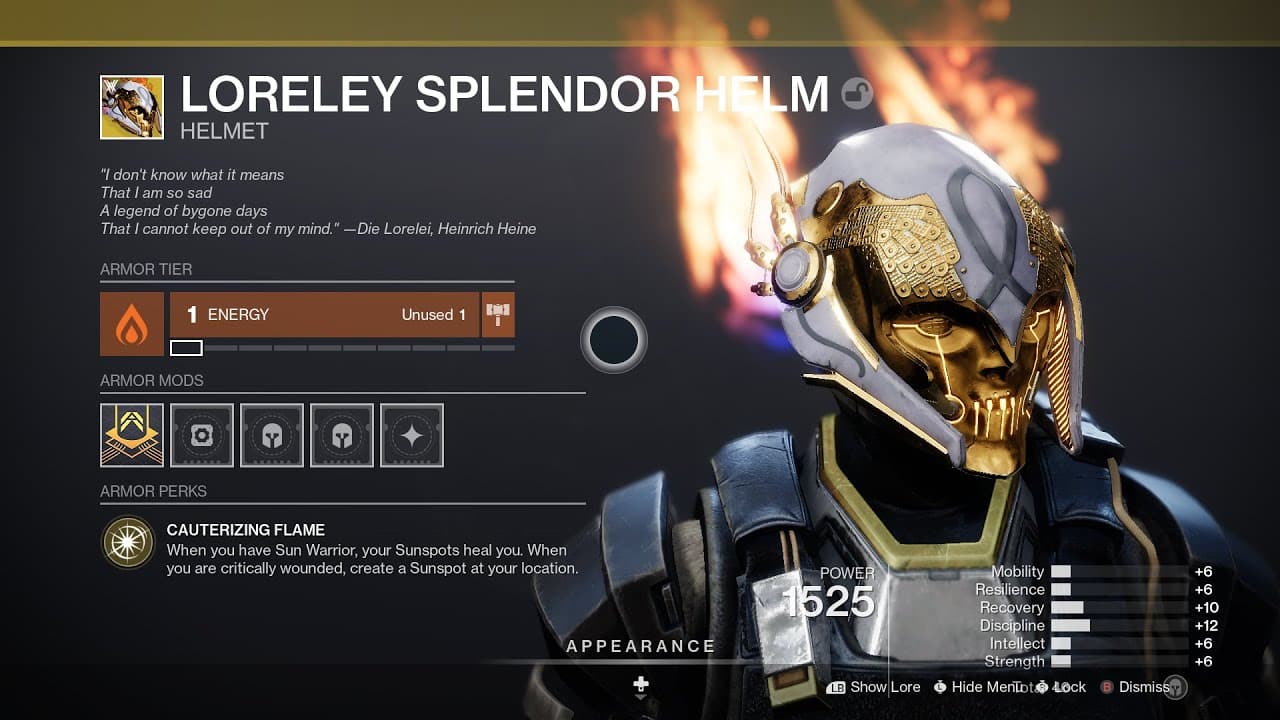
Loreley Splendor Titan Helm
The Lorely Splendor is a Solar Titan helm that will heal you through sunspots. Its armor perk, Cauterizing Flame, lets this titan helm create a sunspot for you to lower cooldowns when you have Sun Warrior. This helm is great for Solar Titans seeking to last longer on the field.
How to get Loreley Splendor
There are two methods to getting Loreley Splendor:
- Finish the main campaign of The Witch Queen expansion on Legendary difficulty as the Titan class. You will have a 50% chance of either getting the Lorely Splendor or the Hoarfrost-Z.
- Tackle Lost Sectors on master or legend difficulty solo if exotic chest pieces are drops.
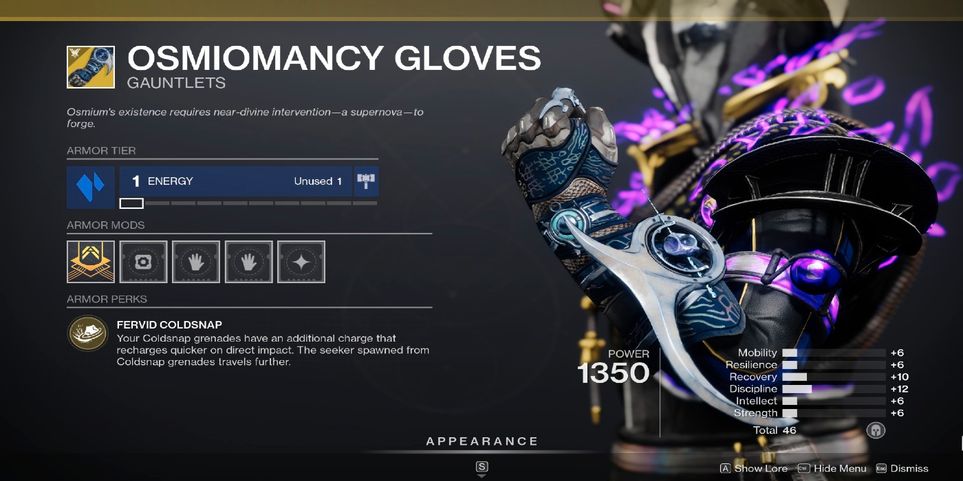
Osmiomancy Gauntlets Warlock Gloves
The Osmiomancy Gauntlets are the new Warlock Stasis exotic. These gauntlets allow you to hold two charges of Coldsnap grenades thanks to its Fervid Coldsnap perk and buff almost every aspect of that grenade.
How to get the Osmiomancy Gauntlets
You can acquire the Osmiomancy Gauntlets through two methods:
- Complete The Witch Queen campaign on Legendary difficulty as the Warlock class. You have a 50% chance of acquiring this as a reward.
- Loot it from drops on master and legend Lost Sectors.
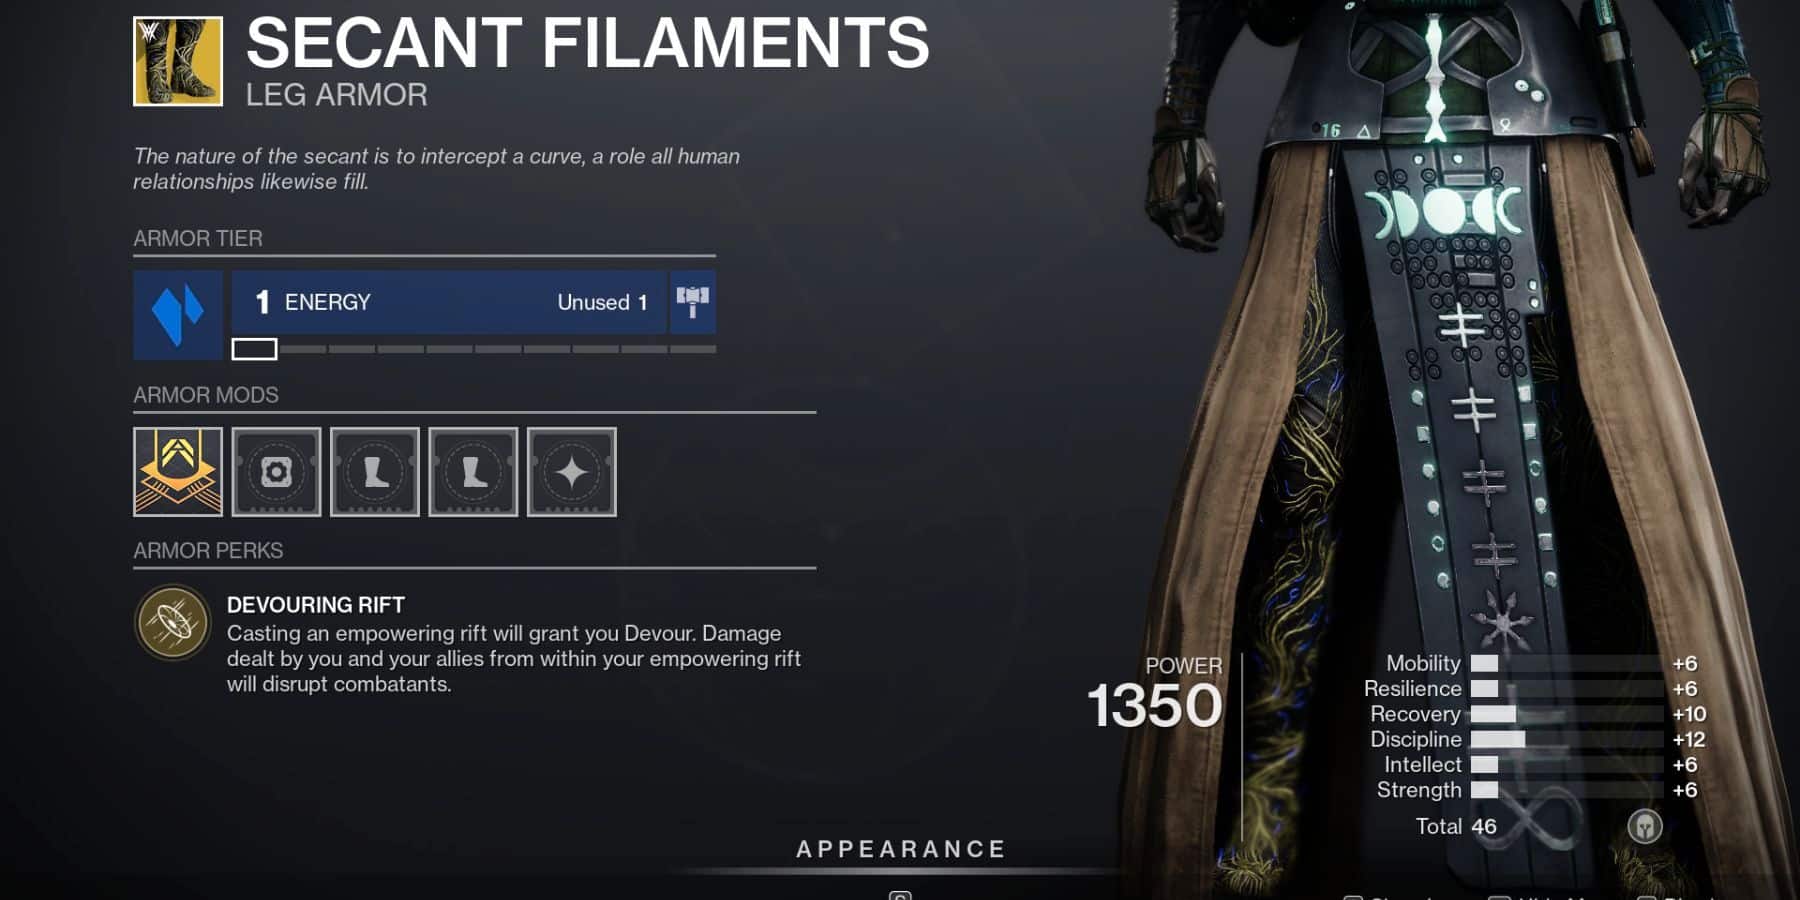
Secant Filaments Warlock Legs
The Secant Filaments are the new Warlock Stasis exotic which will give you Guardian Devour after casting Empowering Rift. Damage dealt by your Fireteam inside your Empowering Rift disrupts enemy combatants.
How to get the Secant Filament
There are two ways to secure the Secant Filament for yourself:
- Finish The Witch Queen campaign on Legendary difficulty as the Warlock class. Like before, you either get the Secant Filament or the Osmiomancy Gauntlets as the rewards.
- Run through Lost Sectors on master or legendary with the Secant Filament as drops.
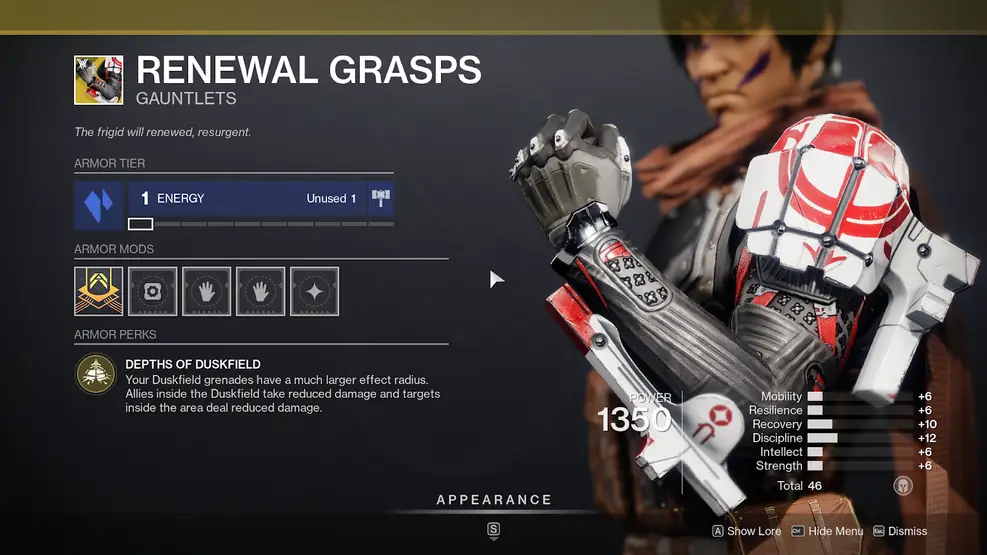
Renewal Grasps Hunter Gloves
The Renewal Grasps are the Stasis Exotic introduced to Hunter Glaives. This exotic will give you a bonus to your Duskfield grenades which widens their impact and also lowers the outgoing damage of enemies who are trapped inside.
How to get the Renewal Grasps
There are two methods to getting the Renewal Grasps:
- Finish the campaign of The Witch Queen expansion on Legendary difficulty as the Hunter class. You have a 50% chance of acquiring the Renewal Grasps as a reward.
- Tackle master or legendary Lost Sectors with exotic drops. You’ll have to try again the next day on that Lost Sector if you don’t get the Renewal Grasps.
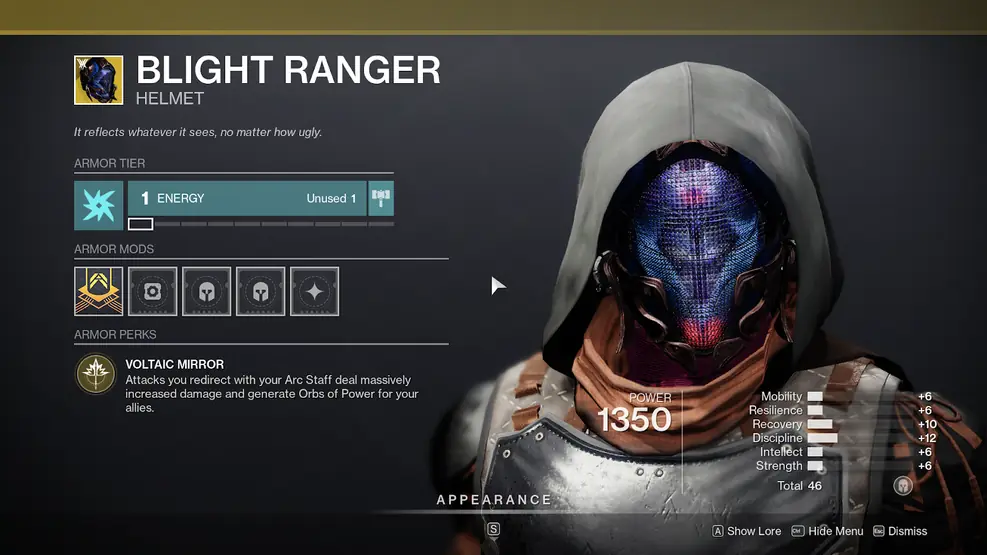
Blight Ranger Helm Hunter Helmet
The Blight Ranger is an Arc exotic exclusive to Hunter Glaives. When you deflect incoming projectiles using the Arc Staff Super, the projectiles reflected will deal increased damage and will generate more Orbs of Power.
How to get Blight Ranger
The Blight Ranger can be acquired via the two methods like before:
- The Blight Ranger can be an exotic drop during The Witch Queen campaign on Legendary difficulty.
- Tackle master or legendary Lost Sectors with exotic drops for the chance of acquiring Blight Ranger.
Check out this Youtube video from KackisHD on how to get the Parasite Exotic Grenade Launcher in Destiny 2:
We have more Destiny 2 content for you to check out:


