
The Prince sends Galeb to Jason Moore’s apartment to find out more about the ones who sent out the Code Red and to bring back five pieces of intel that link the mortal with the members of the Primogen. And it is up to you to find them and extract them.
Check out the rest of this guide to know which points to invest in before starting the level. And remember, just cause there is a solution that saves you Willpower in the end, it doesn’t mean it’s the best solution. You WANT to use your Willpower to improve your mastery of talents.
And with that out of the way, let’s start the level.
After leaving the elevator, Galeb is met by the cops. They inform him of Jason Moore’s demise and how the police got there.
After you’ve been briefed, you should head straight to Mr. Adams to get a key to the basement. But you are free to explore as you please. There are more secrets here than meets the eye.
If you chose to talk to Mr. Adams first, you’ll need to calm him down. You can use Intimidation(3), Psychology(1), or Presence before continuing the conversation. Through Mr. Adams, you get to know about the Moore family. You can use Rhetoric(3) to pry into the Moores’ private lives. After all that, you can ask him for the keys to enter the basement.
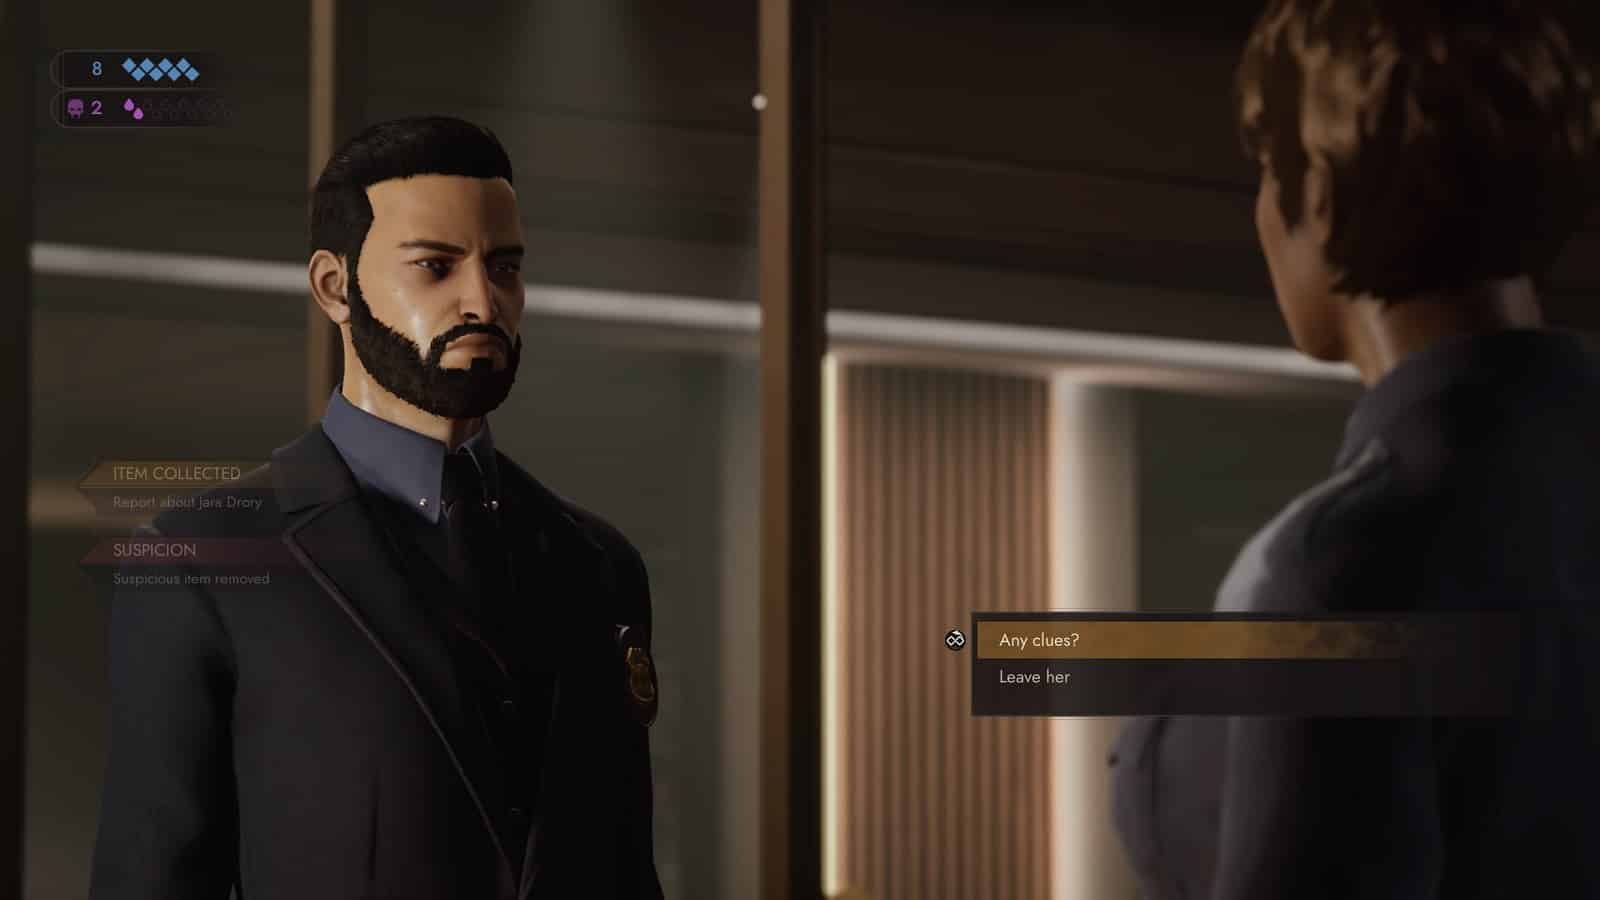
Jara Drory’s File
Jara’s files are located in the second-floor library. To the right of the golden lion statue. This is a sensitive encounter. First off, make sure your Sense the Unseen discipline is turned off. The Person of Interest, Dana Lehane is a ghoul. You don’t want to tip her off first. Talk to her normally and she will give you the file. Reveal her cover early though and you’ll instigate a Confrontation with the file on the line.
Interestingly enough, there is a bug with this encounter. Even if you reveal her to be a ghoul AFTER you’ve got the files, the game’s logic will treat it as though the previous interaction never happened and you’ll still have to confront her about the files.
You can still follow through with the entire Confrontation. But you won’t be fighting for the files but experience points after the level ends.
Confronting Officer Lehane will require a fair bit of Willpower and Hunger. If you want to know more about her mission, you’d better prepare to walk away a little hungry. She’s no pushover.
The first round sees you choosing between Persuasion(3) and Rhetoric(1). You can choose to threaten her, which will cost you the round but you can afford to make 2 mistakes.
The second round sees your choices boil down to Persuasion(3) or not defend yourself. If you chose to not defend yourself, it’s a lost round.
The only way to win the third and final round is Persuade(3) her or use Dominate on her. If you fail here, she’s going to call the attention of the sergeant and she will attempt to pass the documents to her. To keep your suspicion low, even though you already have the documents. This can be seen as a desperation move as you’ve been forced to use Dominate twice and still not get the details of her mission.
At best, I’d say you walk away with having used Hunger(6). It’s unfortunate, but experience is a huge factor in this game.
After the confrontation, you can tell her to leave or let her continue with her mission. Either way, you can finish continuing on your own mission.
Next up, Dajan Siaka’s financials.
Dajan Siaka’s File
The office of Jason Moore is located just left of the library. That’s where you can find Dajan’s files. All you need to do is to walk to Jason’s desk, pick up his archive keys from the drawer, and head to the archive room to complete your task.
For more extra mastery, you can talk to the officer upstairs to get a point in Persuasion and others.
Dr. Durham’s File
If you want to remove Dr. Durham’s files, you’ll need to open Jason’s vault. To reveal it, you need to go to his desk and press a button located near the floor. You can open it by having Technology(4) or finding the code. If you aren’t interested in finding out how to obtain the code, skip the following paragraph.
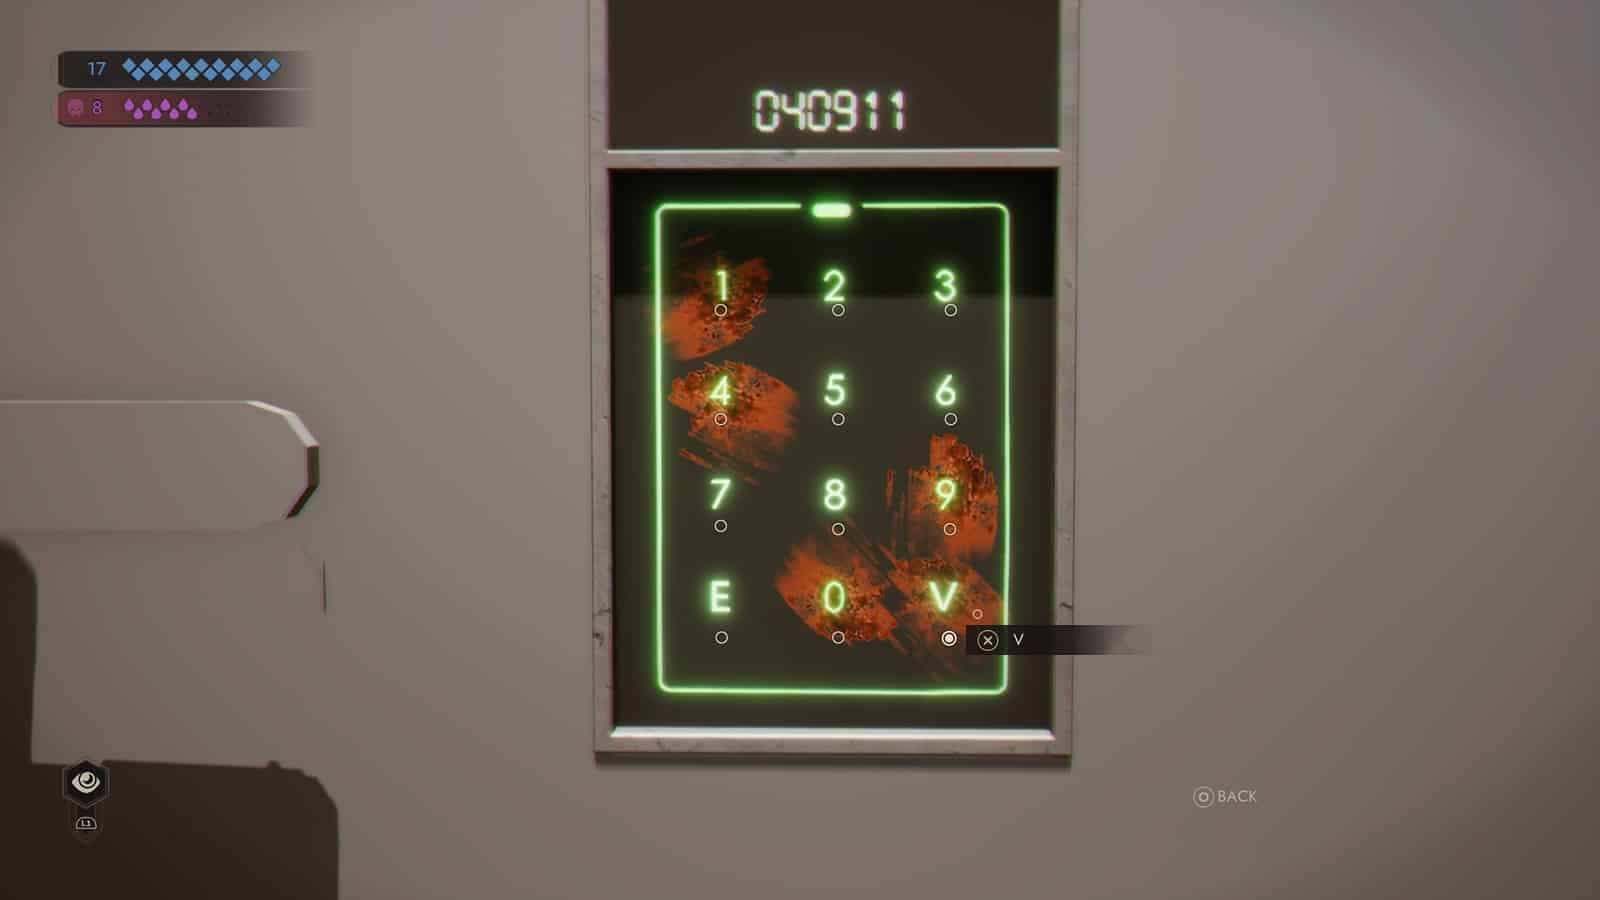
The first hint at finding the code is by consulting Mrs. Moore’s cellphone. On it, you find out that Mr. Moore changed the password to their daughter’s birthday. So, you go into June’s room and find her diary. The very first entry tells you mostly everything you need to know, except her age. That one, you should have already guessed. She’s eight years old.
Anyways, here’s the code for the safe – 040911.
In the safe, you’ll find the files and a hint towards some of the level’s secrets.
Berel Underwood’s Files
Berel’s files are located in the duffle bag in Moore’s bedroom. Pick it up to check it off the list.
Hilda MacAndrews’ Files
Hilda’s files are located in the basement. Before heading there though. You may want to pick up Moore’s car keys on his bed.
After you’ve taken the elevator to the basement, talk to the officer to get the lowdown on what’s happened there. Once you’re done with that. Head to the parked SUV to the right.

Use Moore’s keys to open the car and that’s where you’ll find Hilda’s files.
After you’ve done that, you are free to walk back to the elevator at the start of the level and start heading back to base.
Level Secrets
Alternatively, there are some secrets here that you would want to know about.
The first one can be found in the basement’s trash collection area. You’ve followed the blood trail there from the kitchen and you want to know the truth. Unfortunately, the bins are locked. The only one who knows how to open them is Wyatt.
Confront him and convince him to give you access to the bins.
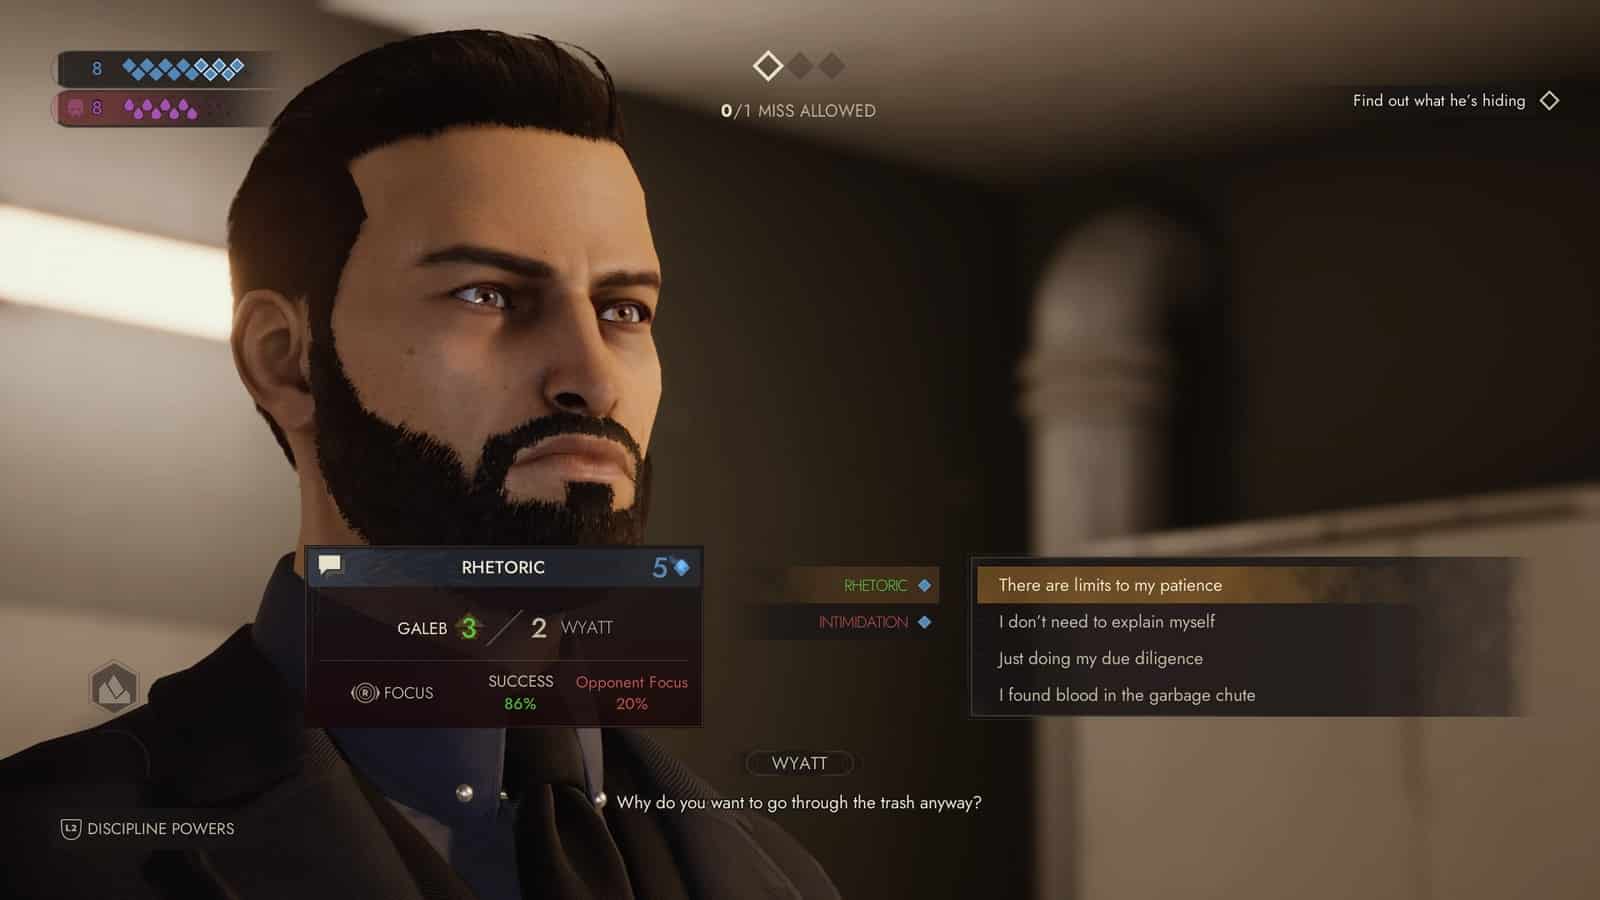
For the first stage of the Confrontation, you can use Rhetoric(2) or Intimidation(3) to start things off. Otherwise, choose ‘I found blood in the garbage chute’.
The second stage is pretty much the same, Rhetoric(2) or Intimidation(3) to build up your masteries. Or you can choose ‘Why is he being so difficult?’.
The third and final stage has Persuasion(3) and Psychology(2) options. Or you can finish it by choosing ‘I don’t have to answer to him’.
Once you’re done, go back to the room and open up the trash bins. One of the bins contains Wyatt’s blood lab and the other is a revelation. And I will leave that there.
That’s pretty much it for the level. Now to exit via the secret panic room.
You’ll need to pay attention to the clues scattered throughout the level. You need to decipher the code written on Mrs. Moore’s planner. And then head to the master bath in Moore’s bedroom. On the phone setting on the mirror, enter the code to unlock the room.
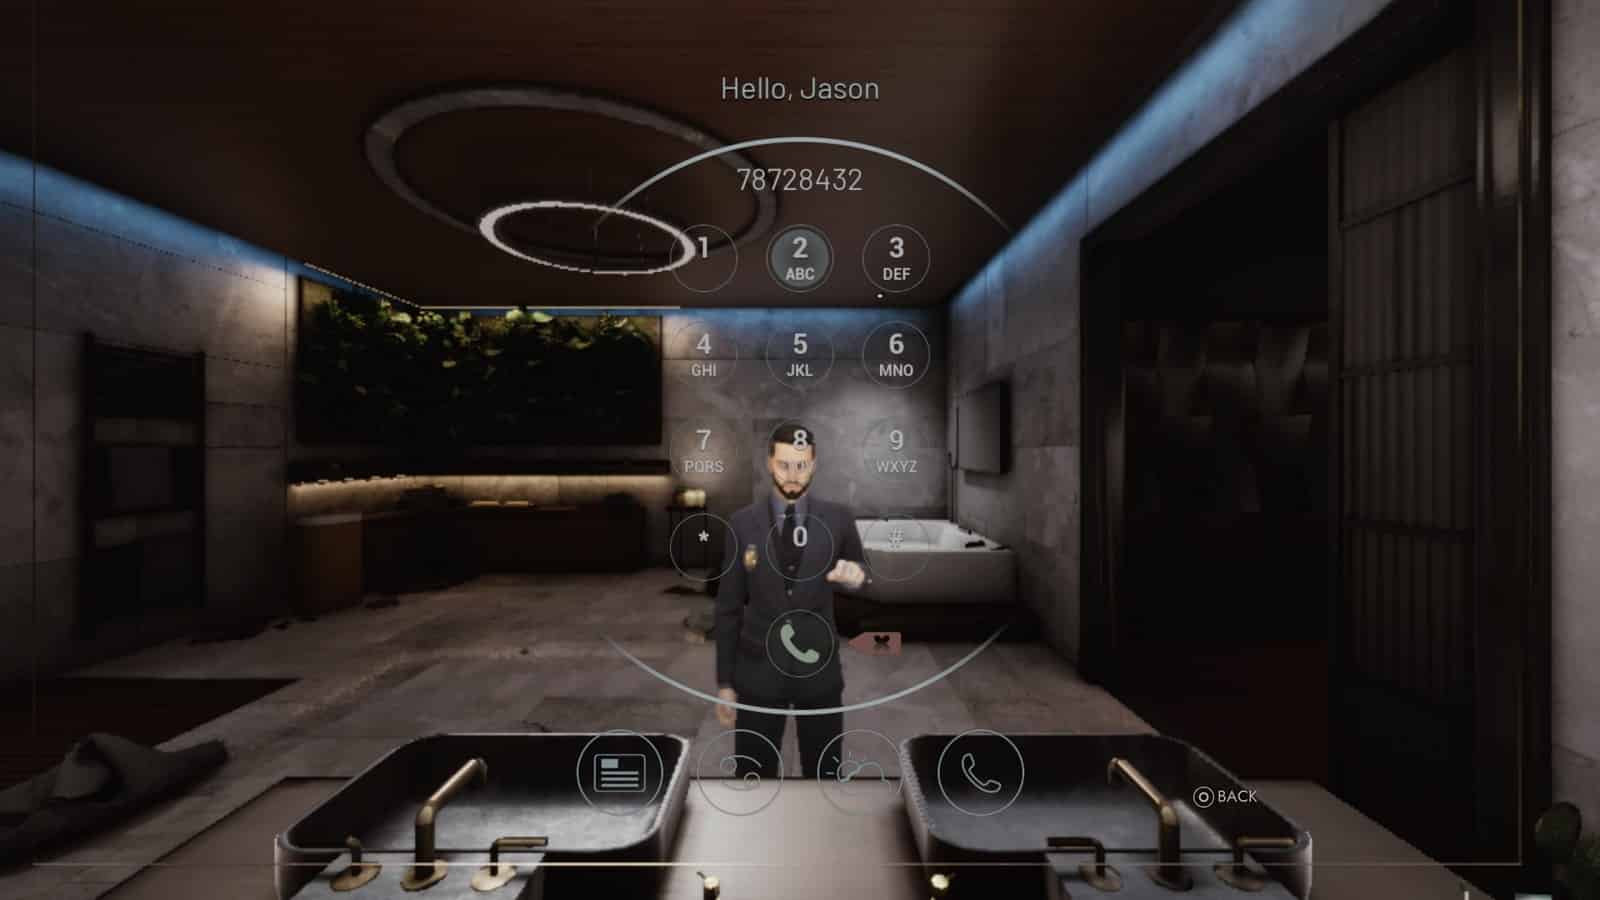
Here’s the code; 78728432.
This ending brings to light many things other players would have taken for granted. It certainly rewards players who took the time and effort to get to the bottom of the mystery. And there’s a surprise twist in it for you too if you chose to do things a certain way.
And that’s it for this guide. And don’t worry if you didn’t do everything the first thing around. It’s always more fun to do these kinds of levels again armed with hindsight.
All Vampire the Masquerade Walkthrough guides:
- Vampire the Masquerade Swansong Walkthrough Part 1 – Prince’s Quarters
- Vampire the Masquerade Swansong Walkthrough Part 2 – Loft
- Vampire the Masquerade Swansong Walkthrough Part 3 – Moore’s Apartment
- Vampire the Masquerade Swansong Walkthrough Part 4 – Unknown
- Vampire the Masquerade Swansong Walkthrough Part 5 – Prince’s Quarters
- Vampire the Masquerade Swansong Walkthrough Part 6 – Long Island
- Vampire the Masquerade Swansong Walkthrough Part 7 – Anarch’s Domain
- Vampire the Masquerade Swansong Walkthrough Part 8 – Red Salon
- Vampire the Masquerade Swansong Walkthrough Part 9 – SAD Base (Leysha)
- Vampire the Masquerade Swansong Walkthrough Part 10 – SAD Base (Emem)
- Vampire the Masquerade Swansong Walkthrough Part 11 – SAD Base (Galeb)
- Vampire the Masquerade Swansong Walkthrough Part 12 – Intelligence Elevator
- Vampire the Masquerade Swansong Walkthrough Part 13 – Basement 3
- Vampire the Masquerade Swansong Walkthrough Part 14 – Server Room
- Vampire the Masquerade Swansong Walkthrough Part 15 – Basement 4 Labs
- Vampire the Masquerade Swansong Walkthrough Part 16 – Hospital Chapel
Check out our other Vampire the Masquerade: Swansong content:
- Vampire the Masquerade Swansong – Deeper Look into the Mechanics
- Vampire The Masquerade Swansong – Best Starting Profile For Each Character
- Vampire The Masquerade Swansong – Removing the Red Salon Guard
- Vampire The Masquerade Swansong – QR Code ARG
- Vampire The Masquerade Swansong – Which Coffin for Miley
- Vampire The Masquerade Swansong – The Right Dose of Trajax
- Vampire The Masquerade Swansong Secret Endings
- All Vampire The Masquerade Swansong Endings
Also check out this video by Trophygamers on Vampire the Masquerade Swansong Parley Trophy – Scene 2, Moore’s Apartment:


