
The Tea ‘N Tea is a level in Escape Academy where players are tasked to disarm a bomb that has been set in the middle of the Academy grounds. This might be a harrowing task given that a bomb could explode, but when done correctly and methodically, the bomb can be disarmed in less than half the time limit.
In this guide, we will be walking you through the Tea ‘N Tea level by showing you what to look for and how to solve the puzzles.
How to unlock the Tea ‘N Tea level in Escape Academy
The Tea ‘N Tea level can be unlocked after completing The Tea Kettle level.
In the Tea ‘N Tea level, you’ll be called on to The Quad by Professor Bonilla to disarm an explosive device as part of a test. Since Professor Bonilla’s past life was an explosives expert, she was tasked by Eel to create a bomb and have you disarm it to test your skills as an escapist. You only have 25 minutes to complete the entire level.
There are a couple of ways on how to start solving the Tea ‘N Tea level and the most common way is to look at the bomb first. For this guide, we will go for a more efficient method which assumes prior knowledge of info from some puzzles ahead.

Get the Solvent
For the first task, you will need to get a Solvent which will be needed to create a bomb later on. Head to the Blue Tent and at the board to the left is where you can get the Campus Police Keycard.
Go to the Campus Police Van and open the backdoor using the keycard. Inside is where you’ll find the Solvent, as well as the bomb making machine and the Periodic Table. You can already insert the Solvent in the bomb making machine at this point.
Head to the driver’s seat and grab the Police Keychain.
Get the RDX
The second component that you’ll need is the RDX. Go to the table outside where a blue toolbox is on and the word NaNO can be seen on the pin board. The toolbox is locked and it needs a combination code. NaNO serves as the clue and refers to the atomic numbers of the three elements in it:
- Na: 11
- N: 7
- O: 8
Keying in “1178” on the lock will open it and you’ll obtain the Russian English Dictionary and the Bonilla’s Bouquets Keycard. Use the keycard to open the back of the Bonilla’s Bouquets Van where you’ll find the RDX and the Map of the Quad.
Head to the driver’s seat and grab the Flowers Keychain.

Get the Plasticizer
With the two keychains on hand, go to the bomb in the central tent and use both keys to open the bomb case. Get the Tea Recipe and take note of how the bomb parts are arranged.
Head back to the blue tent and go to the locked case with the teapot icon on it. Based on the note on the side and on the Tea Recipe, you’ll have to divide the amounts in the recipe by three since you only need one cup of tea. Doing so will leave you with the number “143” which you can use to unlock the case. You’ll then obtain the Plasticizer and the Door Buster Recipe.
Make the Door Buster Bomb
Head back to the Campus Police Van and insert the RDX and Plasticizer in the machine. Based on the recipe, you’ll have to find the right amount of balance among the ingredients as depicted by the > and <.
The right mixture to create a Door Buster Bomb is as follows:
- RDX: 60%
- Solvent: 10%
- Plasticizer: 20%
Find the Disarming Button Combination
With the Door Buster Bomb on hand, go to the semi truck and place the bomb on its doors. Stand back and after it explodes, check on the screens as it shows a bomb part configuration on the right and its disarming combination on the left.
Use the remote control to scroll through the options until you find the right one that matches with the one seen on the bomb, then take note of the buttons to know which ones should be pressed or lit.
The buttons to press (O) are as follows:
- 1st row: OO
- 2nd row: XO
- 3rd row: XX
- 4th row: OO

Find the Disarming Switch Combination
Head back to the driver’s seat of the Campus Police Van and tune the radio to 900AM. Then listen to the person on the radio as he gives out the switch combination, which goes like this:
- A: Up
- B: Down
- C: Down
- D: Down
- E: Up
- F: Up
The broadcast will loop in case you missed some parts of it.
Get the Clippers
Head to the box outside that has buttons on a grid on top of it. Using the dictionary, the box requires you to find the location of the three red bouquets scattered within the Quad. The Quad map will show the locations of the bouquets marked with a ?, but it does not tell what their colors are.
You can go to the marked spots to see the bouquet colors yourself, or you can push these buttons on the box instead: A4, B6, д2. Once opened, you’ll obtain a VHS Tape and the Clippers.
Find out which Wires to cut
Head back to the blue tent and insert the VHS Tape into the projector. With the dictionary on hand, the projector will show Russian words on the wall that translate to the colors, plus words that say either yes or no. Going through the words, you’ll get that both yellow and green are tagged with yes, which are the same wire colors that you will need to cut later on.
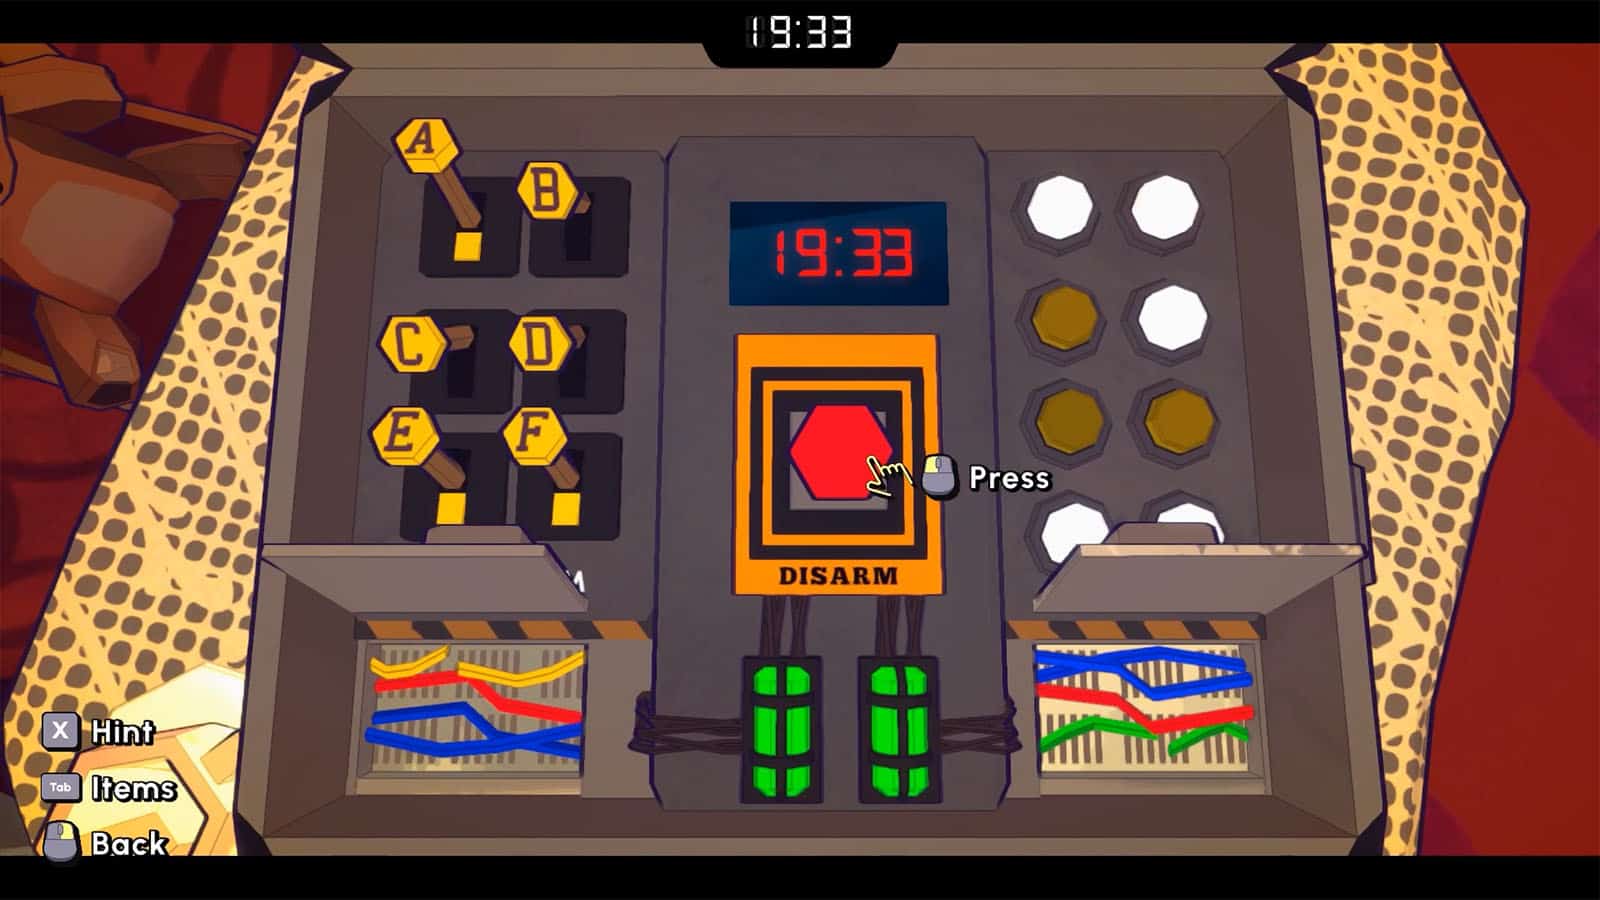
Disarm the Bomb
Head back to the central tent and do the switch and button combinations accordingly. Afterwards, cut the yellow and green wires, and then press the Disarm button. Congratulations! You have successfully disarmed the bomb.
If you like this guide, be sure to check out our other Escape Academy articles:
- Escape Academy Prologue Walkthrough Guide
- Escape Academy The Entrance Exam Walkthrough Guide
- Escape Academy Escape Artist Walkthrough Guide
- Escape Academy Under Pressure Walkthrough Guide
- Escape Academy The Breakout Walkthrough Guide
- Escape Academy Lab Rat Walkthrough Guide
- Escape Academy Trial By Taste Walkthrough Guide
- Escape Academy The Tea Kettle Walkthrough Guide
- Escape Academy The Rival Room Walkthrough Guide
Check out this video by Game Guides Channel showing how to solve the Tea ‘N Tea level:


