
The Pox Mart is where the player goes to upgrade their weapons and armor in Destroy All Humans 2 Reprobed. It can be accessed by setting the icon when the player is about to board the saucer. Each upgrade requires Furotech Cells with the most powerful upgrades requiring a single but rarer Furotech Reactor.
In this guide, you will everything there is to know about the gear that can be upgraded in the game, along with their cost in Furotech Cells and Reactors.
Furotech Cells can be found on the map as a collectible. However, the best source for both resources is through mission completion. In general, Furotech Reactors are harder to come by, and getting them should be your priority in side missions. Even if they only are a reward in a handful of side missions.
You can refund upgrades using genetic material. However, it should be noted that the cost of refunding upgrades steadily increases after every refund. Be very careful where you spend your points.Once the cost of refunding goes as high as 500 DNA, it will reset back 100. Which is better than having the cost reach 1000’s.
List of all Pox Mart Upgrades
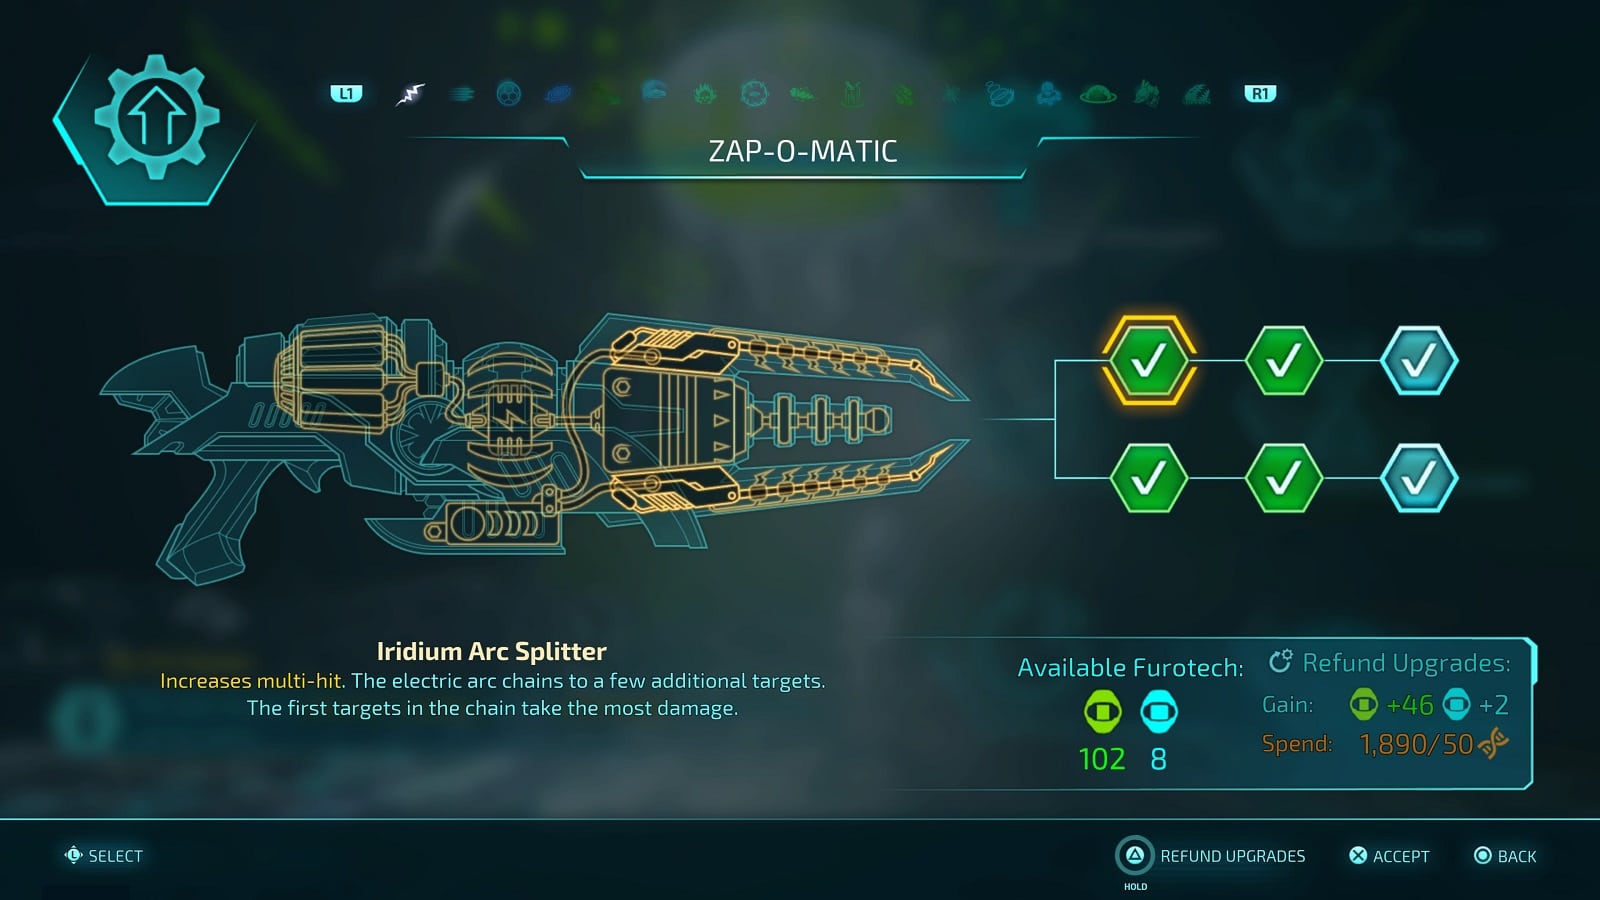
Zap-O-Matic
1st branch
- Iridium Arc Splitter (Cost: 10 Furotech cells)
- Increases multi-hit. The electric arc cahins to a few additinal targets. The first targets in the chain take the most damage.
- Iridium Arc Spreader (Cost: 16 Furotech cells)
- Greatly increases multi-hit. The electric arc chains to several additional targets. The first targets in the chain take the most damage.
- Compound-R-Izer (Cost: 1 Furotech reactor)
- Maximizes firepower. The electric arc deals full damage when chaining.
2nd branch
- Fluxocell Capacitor (Cost: 8 Furotech cells)
- Shoot for longer. Increases the ZapoCel battery charge capacity.
- Fluxocell Accumulator (Cost: 12 Furotech cells)
- Shoot for longer. Greatly increases the ZapoCel battery charge capacity.
- Gortan Shock Multiplier (Cost 1 Furotech Reactor)
- Hit harder. Increases damage in relation to the current battery charge. The higher the charge, the higher the boost.
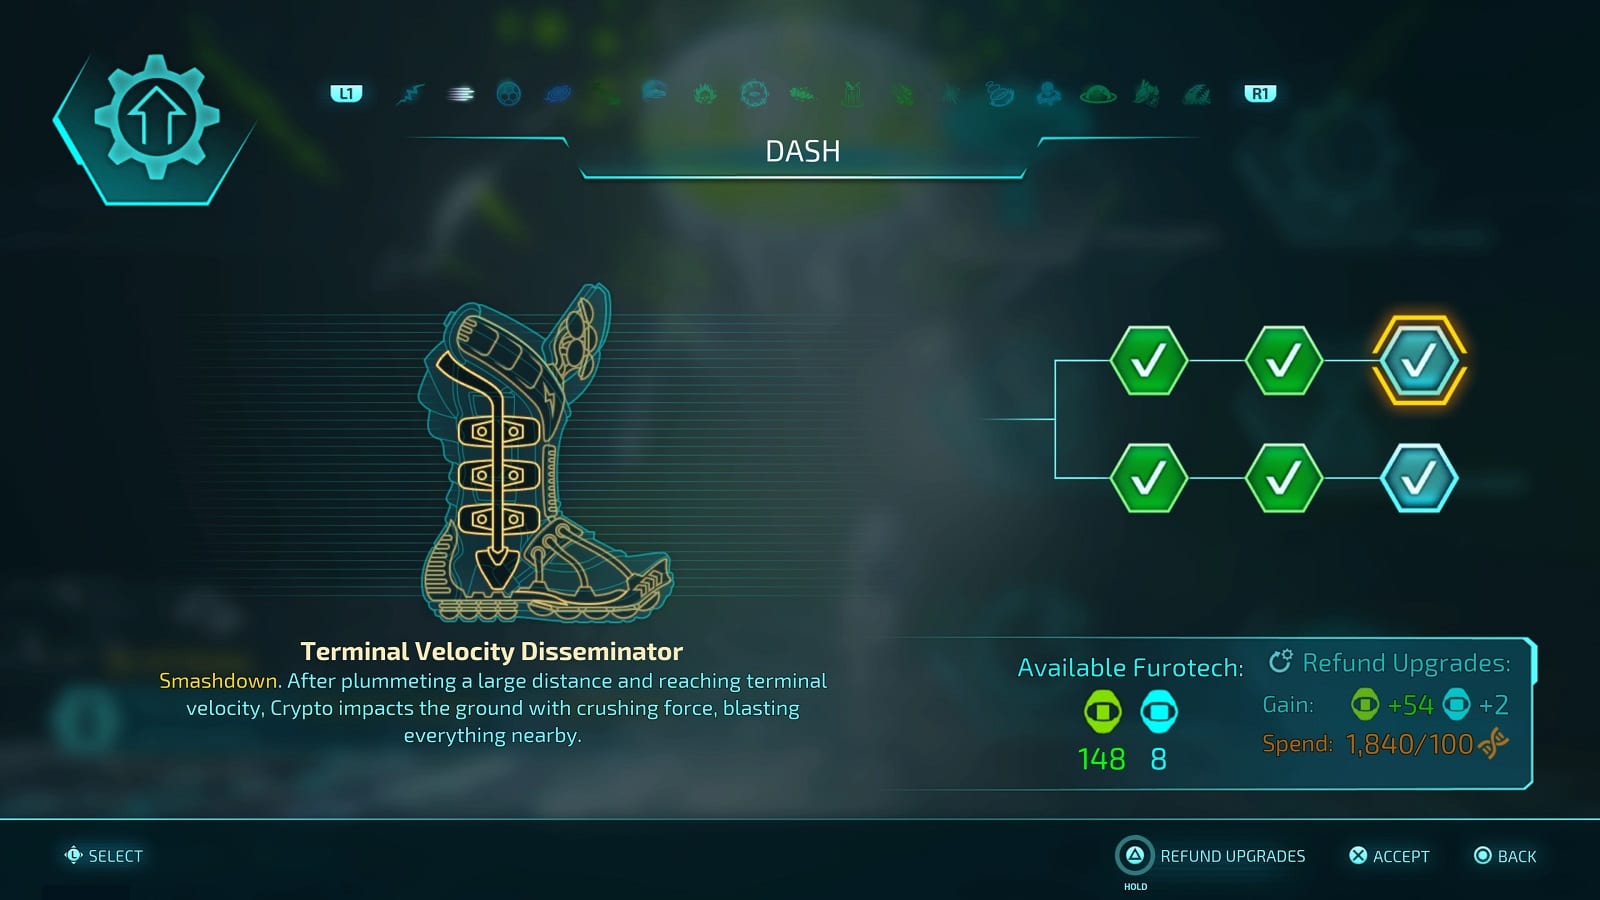
Dash
1st branch
- Thurst-A-Tron 2000 (Cost: 10 Furotech Cells)
- Shockwave. Dashing triggers a small shockwave that knocks down enemies and deflects projectiles.
- Launch-A-Tron 5000 (Cost: 14 Furotech Cells)
- Superjump. Activating the jetpack immediately after jumping catapults Crypto upwards with massive force.
- Terminal Velocity Disseminator (Cost: 1 Furotech Reactor)
- Smashdown. After plummeting a large distance and reaching terminal velocity. Crypto impacts the ground with crushing force, blasting everything nearby.
2nd branch
- Suprakinetic Antigrav Thrust Enhancer (Cost: 12 Furotech Cells)
- Increase max speed. Increases max skate speed and reduces acceleration time to reach max skate speed.
- Zero Friction Thrust Enhancer Enhancer (Cost: 18 Furotech Cells)
- Allows Crypto to S.K.A.T.E. furiously fast.
- Psychokinetic Suprakintetics (1 Furotech Reactor)
- Smash through obstacles. S.K.A.T.E. can no longer be interrupted by puny attacks and smashes through the equally puny obstacles in Crypto’s path.
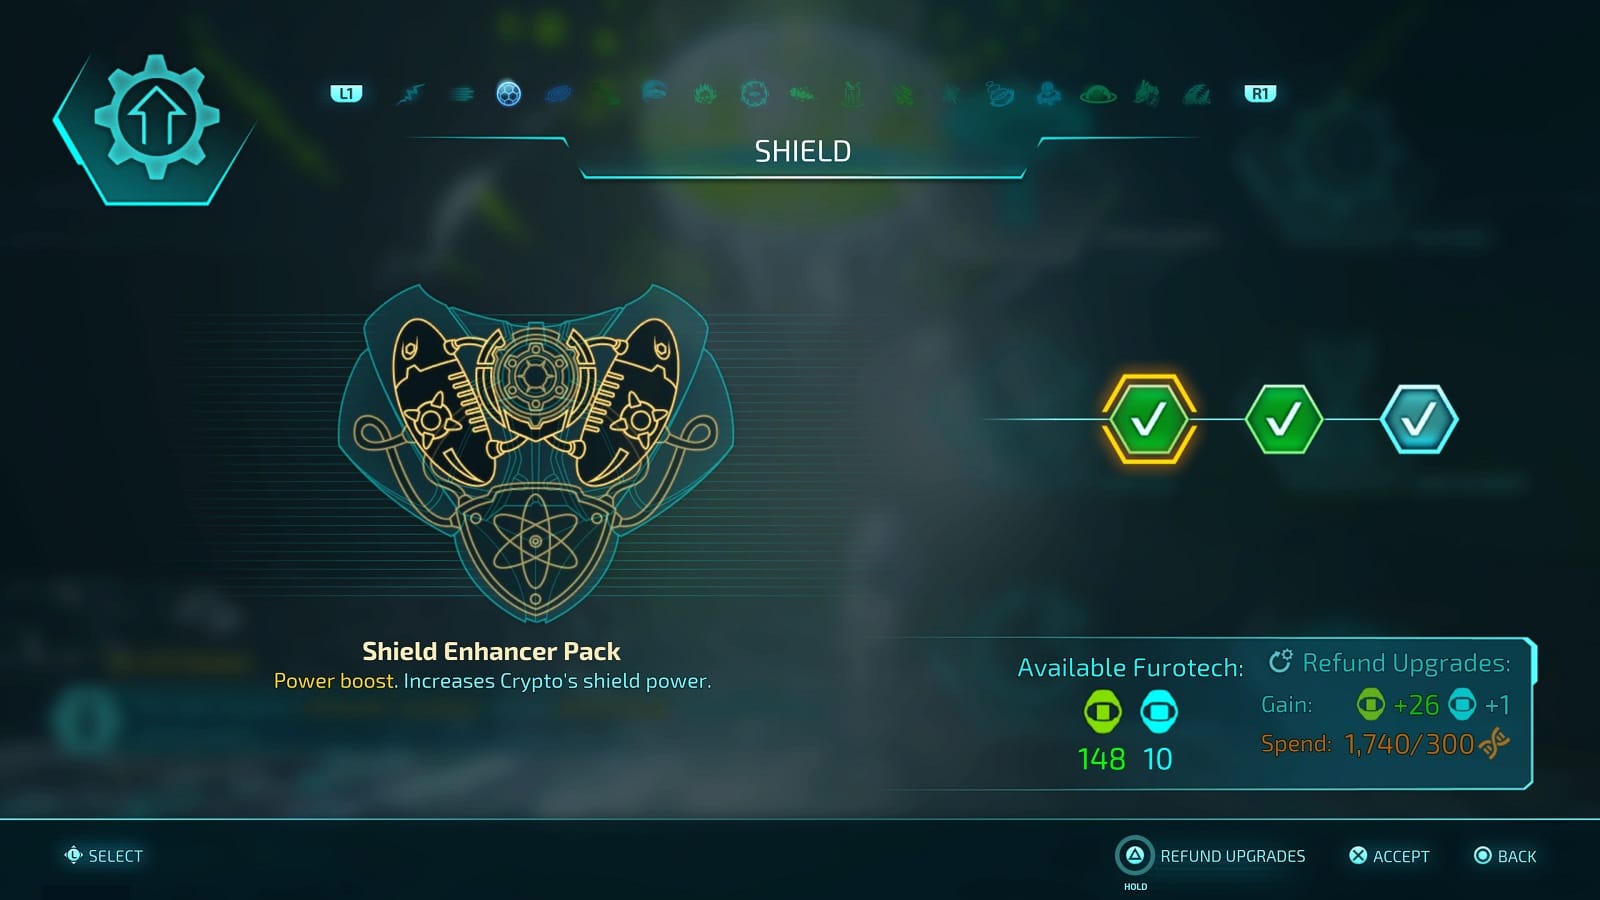
Shield
- Shield Enhancer Pack (Cost: 10 Furotech Cells)
- Power boost. Increases Crypto’s shield power.
- Shield Enhancer Plus (Cost: 16 Furotech Cells)
- Power boost. Greatly increases Crypto’s shield power.
- Shield Failure Catastrophizer (Cost: 1 Furotech Reactor)
- Exploding shields: Die Harder. On failure, Crypto’s shield detonates with catastrophic consequences for all nearby non-Furon entities.
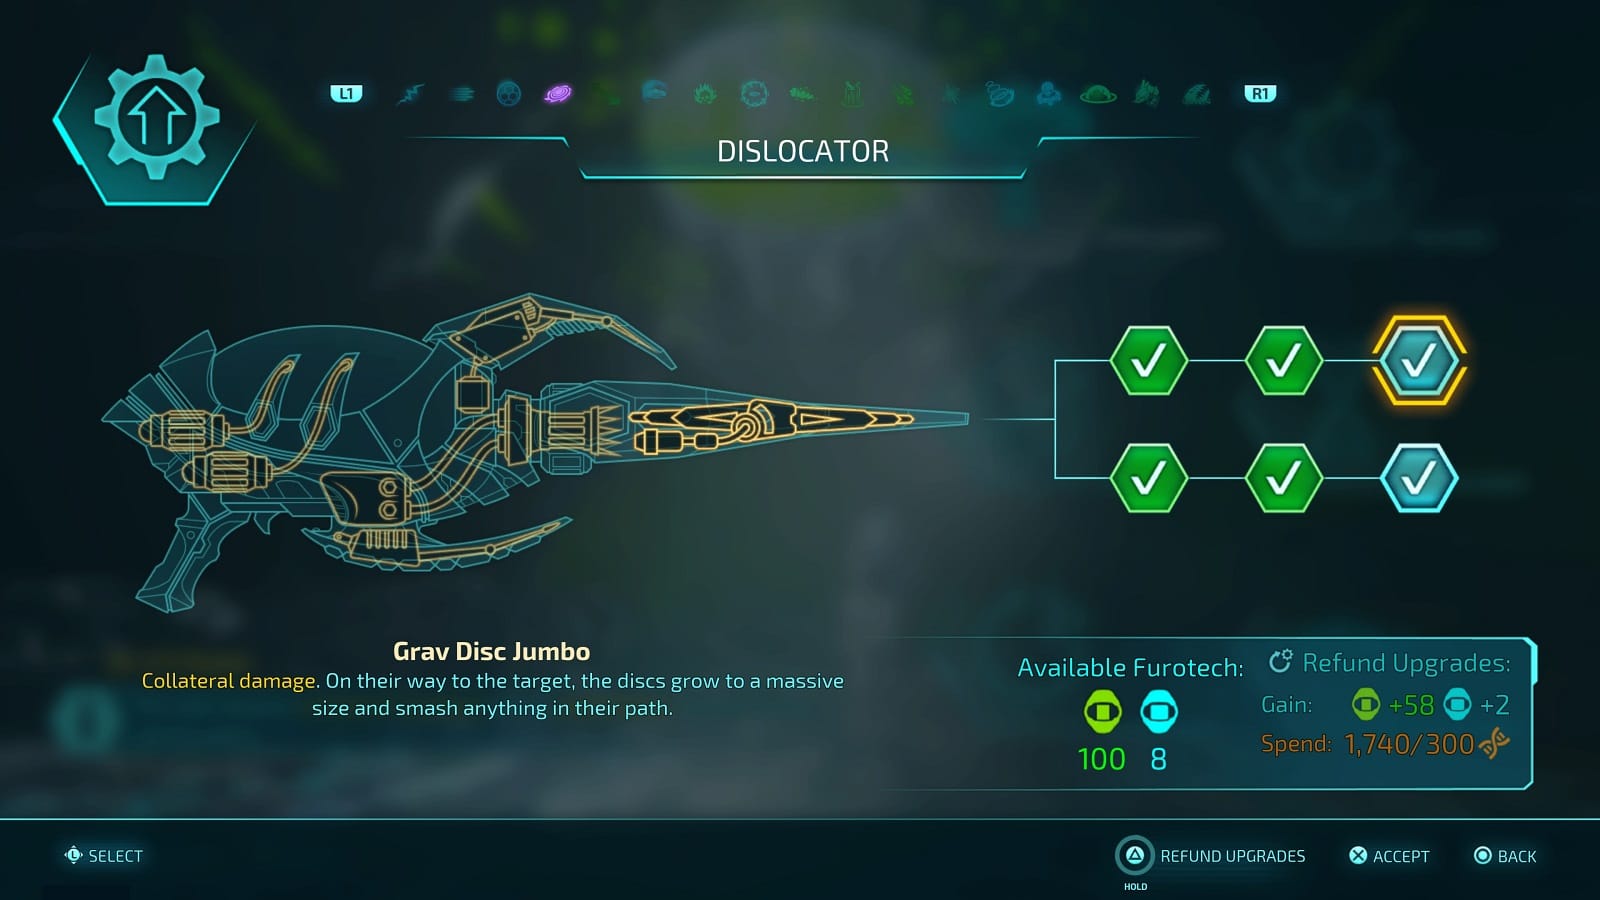
Dislocator
1st Branch
- Technograv Accelerator (Cost: 10 Furotech Cells)
- Shoot vehicles faster. Increases the Dislocator charge-up speed versus vehicles.
- Omnigrave Accelerator (Cost: 16 Furotech Cells)
- Shoot everything faster. Increases the Dislocator charge-up speed again – versus everything!
- Grav Disc Jumbo (Cost: 1 Furotech Reactor)
- Collateral damage. On their way to the target, the discs grow to a massive size and smash anything in their path.
2nd Branch
- Rowdy Rover AI (Cost: 14 Furotech Cells)
- Hit more targets. The discs home in on a secondary target on their second bounce.
- Red-Hot Rocket Impeller (Cost: 18 Furotech Cells)
- Exploding discs. Dislocating discs explode with every strong impact.
- Burning Discharge Aperture (Cost: 1 Furotech Reactor)
- Fire on impact. Dislocating discs ignite the patch(es) of the ground where they impact.
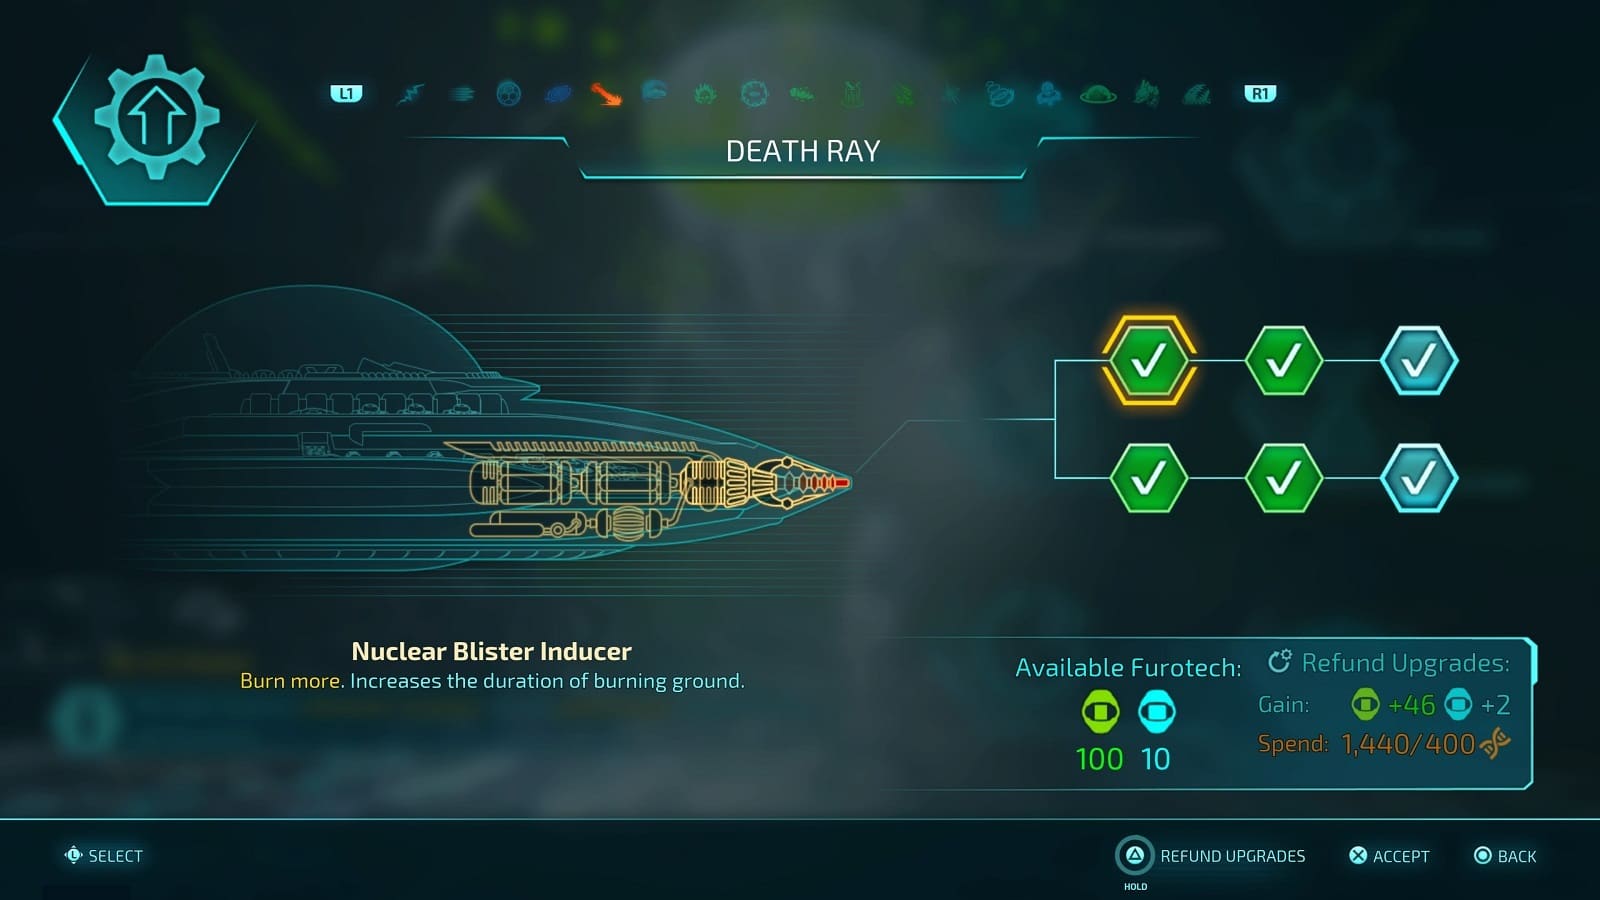
Death Ray
1st branch
- Nuclear Blister Inducer (Cost: 8 Furotech Cells)
- Burn more. Increases the duration of burning ground.
- Nuclear Ulcerator (Cost: 12 Furotech Cells)
- Burn more. Greatly increases the duration of burning ground.
- Fusion Scorcher (Cost: 1 Furotech Reactor)
- Hotter burn. Increases the damage dealt by burning ground.
2nd branch
- Liquid N2 Cooling (Cost: 10 Furotech Cells)
- Shooter longer. Increases the Death Rays’ charge capacity.
- Liquid NaK Cooling (Cost: 16 Furotech Cells)
- Shoot longer. Greatly increases the Death Ray’s charge capacity.
- Superfluid Heat Exhaust (Cost: 1 Furotech Reactor)
- Supercharge. Increases recharge rate in relation to the current charge. The more charge left, the higher the boost.
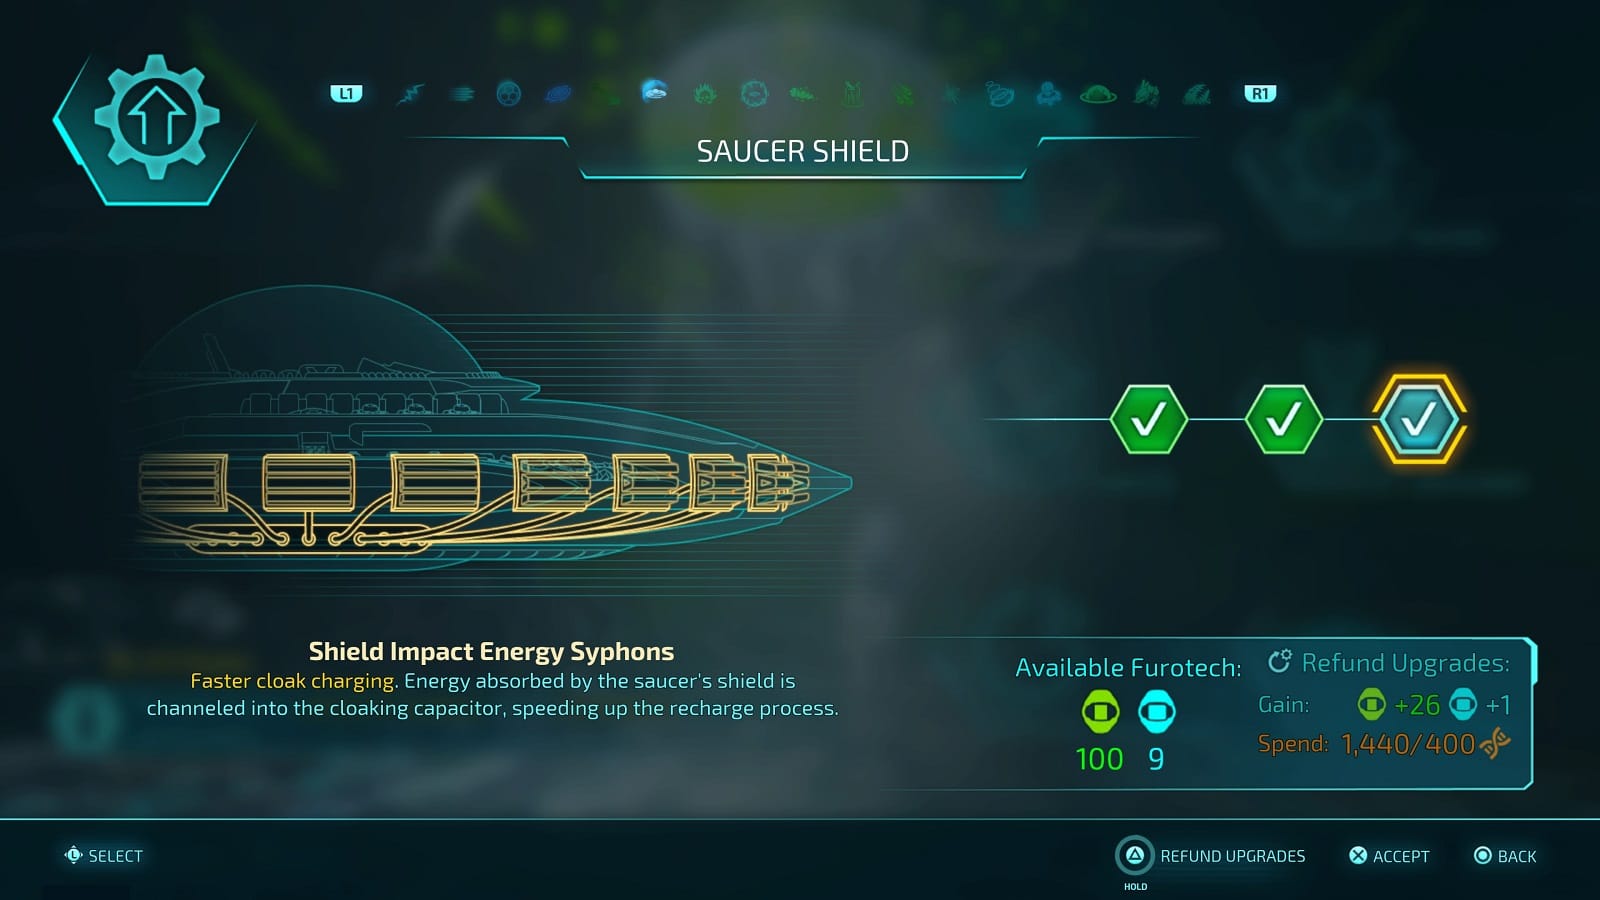
Saucer Shield
- Shield Generator Alpha (Cost: 10 Furotech Cells)
- Power boost. Increases the saucer’s shield power.
- Shield Generator Epsilon (Cost: 16 Furotech Cells)
- Power boost. Greatly increases the saucer’s shield power.
- Shield Impact Energy Syphons (Cost: 1 Furotech Reactor)
- Faster cloak charging. Energy absorbed by the saucer’s shield is channeled into the cloaking capacitor, speeding up the recharge process.
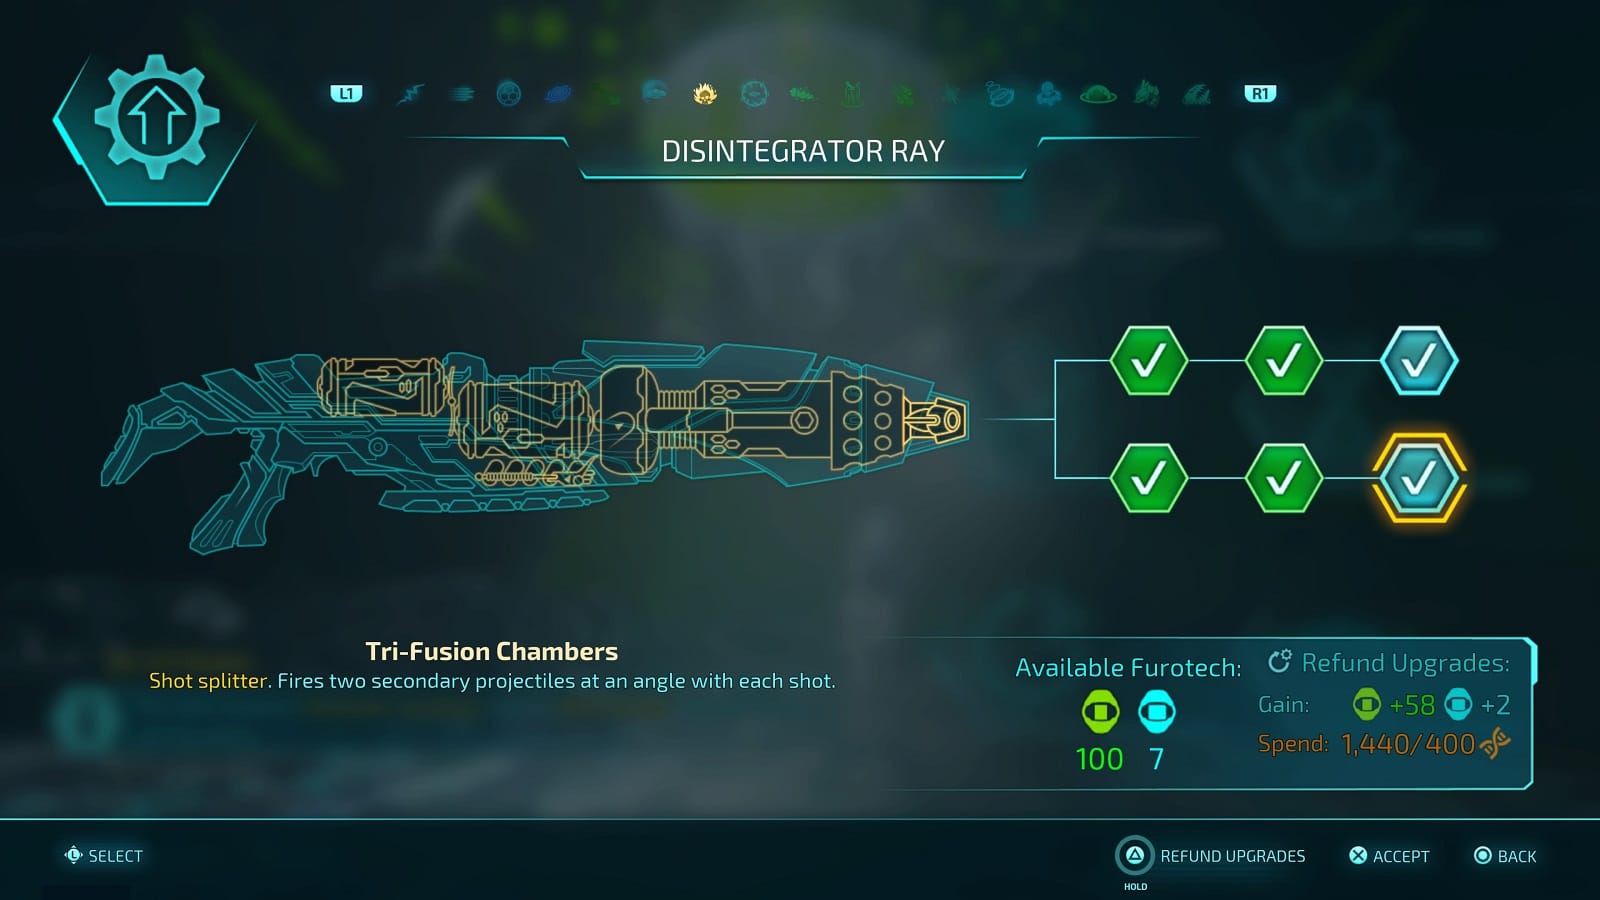
Disintegrator Ray
1st branch
- Proton Clip (Cost: 10 Furotech Cells)
- Ammo boost. Increases the Disintegrator Ray’s capacity. (10)
- Proton Magazine (Cost: 16 Furotech Cells)
- Ammo boost. Greatly increases the Disintegrator Ray’s capacity. (16)
- Proton Prontonizer (Cost: 1 Furotech Reactor)
- Rapid-fire. Turns the Disintegrator Ray into a rapid-fire weapon.
2nd branch
- Surplus Proton Infusionizer (Cost: 12 Furotech Cells)
- Explosive rounds. Regularly infuses a projectile with protonic overload, causing an explosion on impact.
- Excess Proton Infusionizer (Cost: 20 Furotech Cells)
- Rapid-fire explosive rounds. Frequently infuses a projectile with protonic overload, causing explosions at a rapid pace.
- Tri-Fusion Chambers (Cost: 1 Furotech Reactor)
- Shot splitter. Fires two secondary projectiles at an angle with each shot.

Repulse-O-Tron
- Pulse Field Maximizers (Cost: 12 Furotech Cells)
- Range boost. Increases the range of the Repulse-O-Tron.
- Pulsotronic Reversal Channels (Cost: 18 Furotech Cells)
- Range boost. Greatly increases the range of the Repulse-O-Tron. (18)
- Retroactive Revenge Ray (Cost: 1 Furotech Reactor)
- Counterattack. Redirect missiles and projectiles to enemy targets.
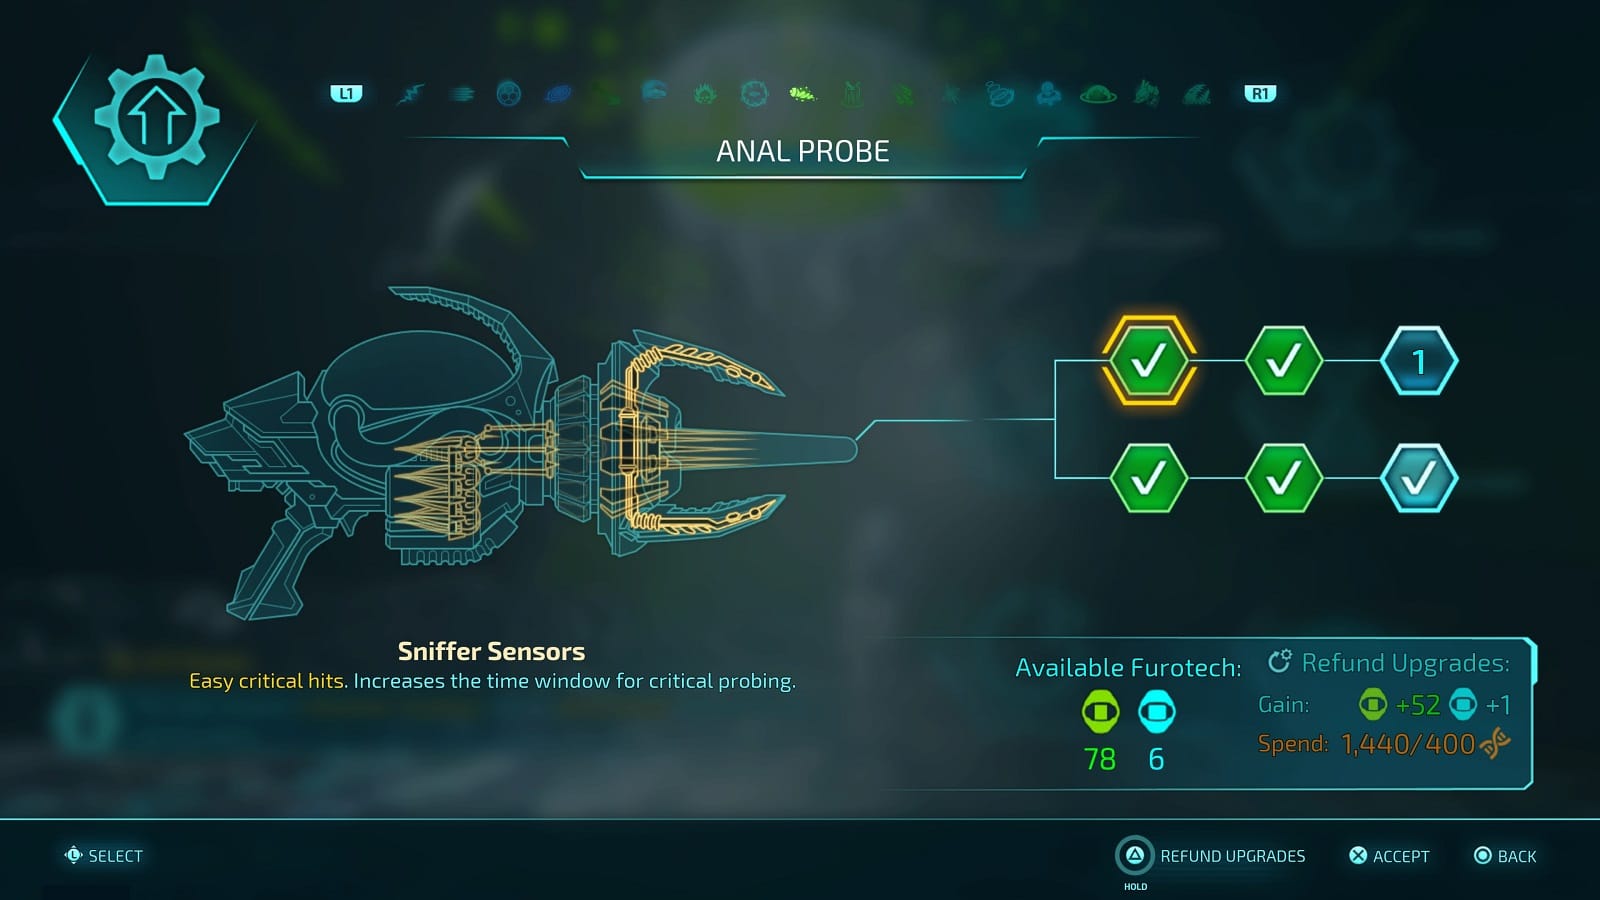
Anal Probe
1st Branch
- Sniffer Sensors (Cost: 10 Furotech Cells)
- Easy critical hits. Increases the time window for critical probing.
- Cavernous Cavity Coupling (Cost: 12 Furotech Cells)
- Ammo boost. Increases the maximum ammo capacity.
- Centripetal Probulator (Cost: 1 Furotech Reactor)
- Chaining. Successful probes chain to nearby targets when they burst out of the current subject.
2nd Branch
- Butt Pressure Amplifier (Cost: 14 Furotech Cells)
- Critical damage boost. Increases the damage dealt by critical probes.
- Butt Pressure Maximizer (Cost: 16 Furotech Cells)
- Total damage boost. All probes deal even more damage.
- Craniorectal Catalyst (Cost 1 Furotech Reactor)
- Shield charger. Picking up a brain immediately starts Crypto’s personal shield regeneration.
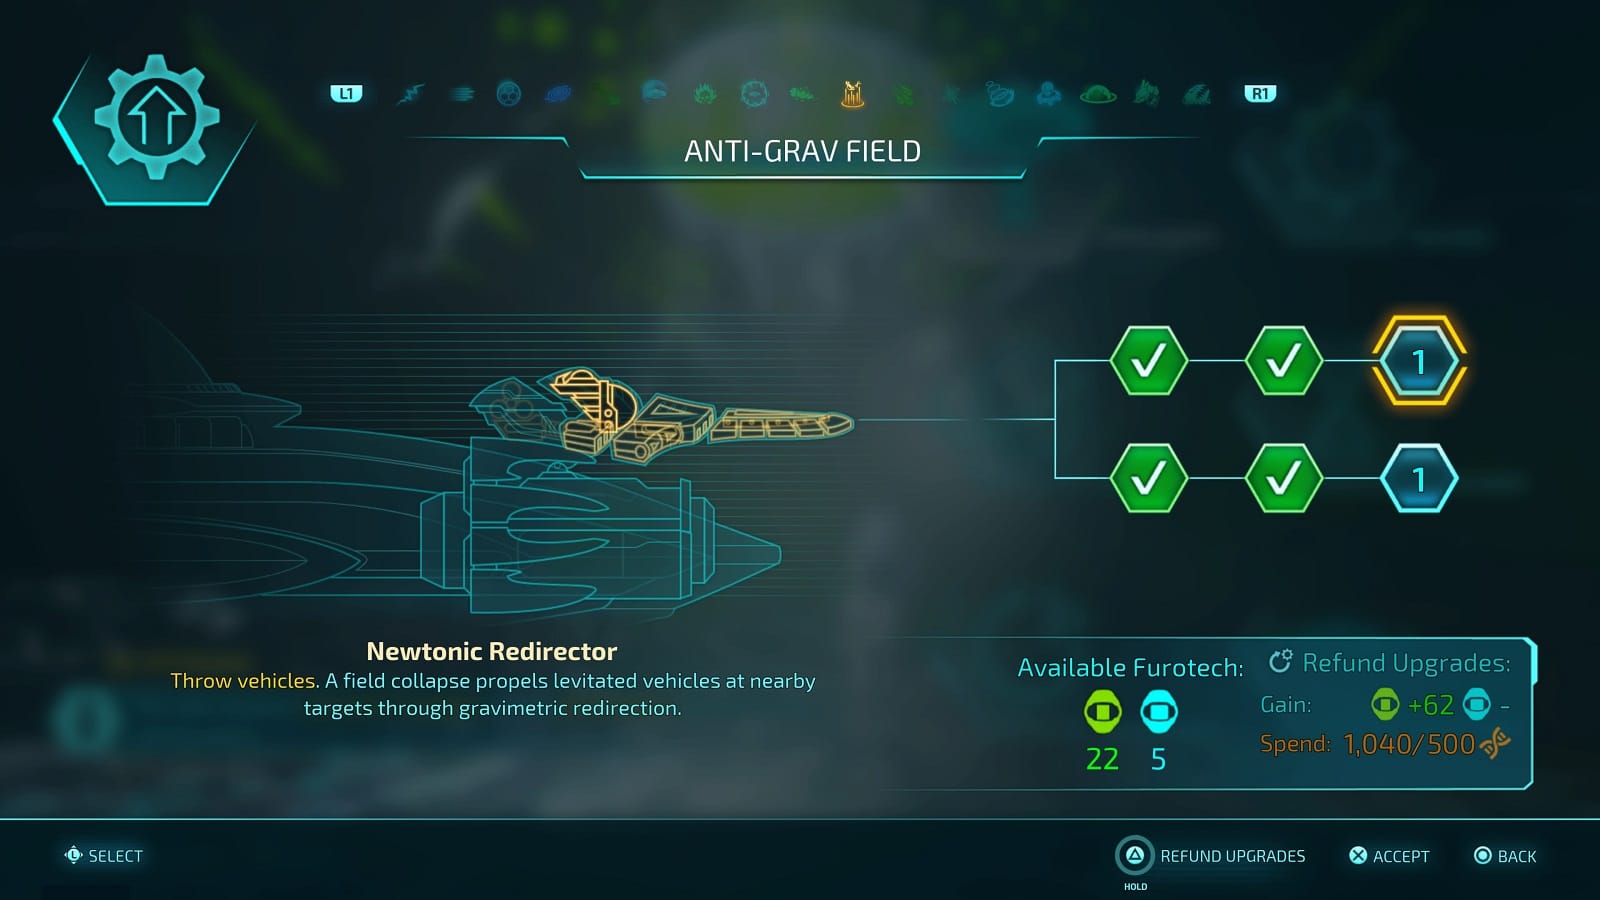
Anti-Grav Field
1st Branch
- Schroedinger’s Clock (Cost: 14 Furotech Cells)
- Duration boost. Simply by looking at the clock, it is easily proven that Anti-Gravity Fields last longer.
- Heisenberg Potency Pump (Cost: 20 Furotech Cells)
- Increased area. Overcoming any reasonable level of uncertainty, the Heisenberg Potency Pump definitely increases the size of Anti-Grav Fields.
- Newtonic Redirector (Cost: 1 Furotech Reactor)
- Throw vehicles. A field collapse propels levitated vehicles at nearby targets through gravimetric redirection.
2nd Branch
- Dark Energy Cells (Cost: 10 Furotech Cells)
- Ammo boost. Increases the ammunition capacity for the Anti-Gravity Field gun.
- Hawking Multiverse Generator (Cost: 18 Furotech Cells)
- Stabilize field creation. Leverages the multiverse to allow for the creation of additional Anti-Gravity Fields at a greatly lessened risk of interference with existing ones.
- Impregnable Einstein Barrier (Cost: 1 Furotech Reactor)
- Great barrier fields. Nearby Anti-Gravity Fields are higher than before, providing increased protection to the saucer at high altitudes.
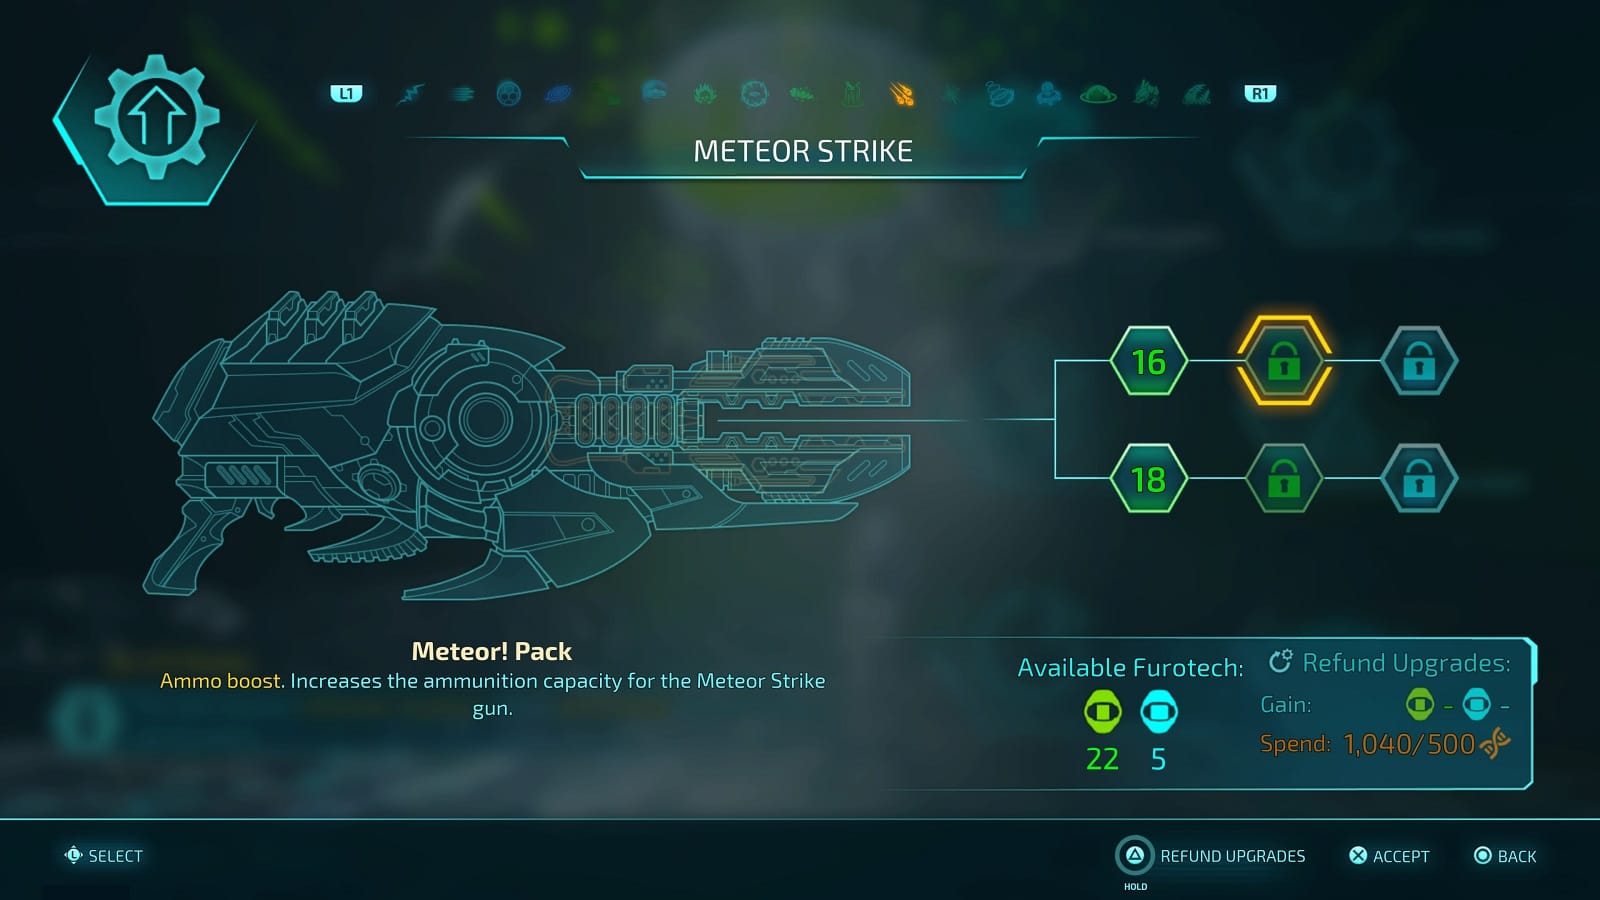
Meteor Strike
1st Branch
- Deep Impact Triangulation System (Cost: 16 Furotech Cells)
- Range boost. Increases the Meteor Strike’s targeting laser range, allowing Crypto to rain doom upon his foes from afar.
- Meteor! Pack (Cost: 24 Furotech Cells)
- Ammo boost. Increases the ammunition capacity for the Meteor Strike gun.
- Existential Angst Motivator (Cost: 1 Furotech Reactor)
- Crowd Control. Provides an early impact warning to humans in the target area, inflicting them with mindless terror for their last moments in life.
2nd Branch
- Armageddon Avalanche Actuator (Cost: 18 Furotech Cells)
- Area Boost. Increases both the impact radius in which the meteors strike and the number of meteors that emerge from the vortex.
- Ice Age Accelerator (Cost: 22 Furotech Cells)
- Massive meteor showers. Further increases the number of meteors that rain down upon humanity.
- Anthropocene Extinction Precipitator (Cost: 1 Furotech Reactor)
- Final blow. Adds a large meteor at the end of the shower that flattens what is left of the opposition.
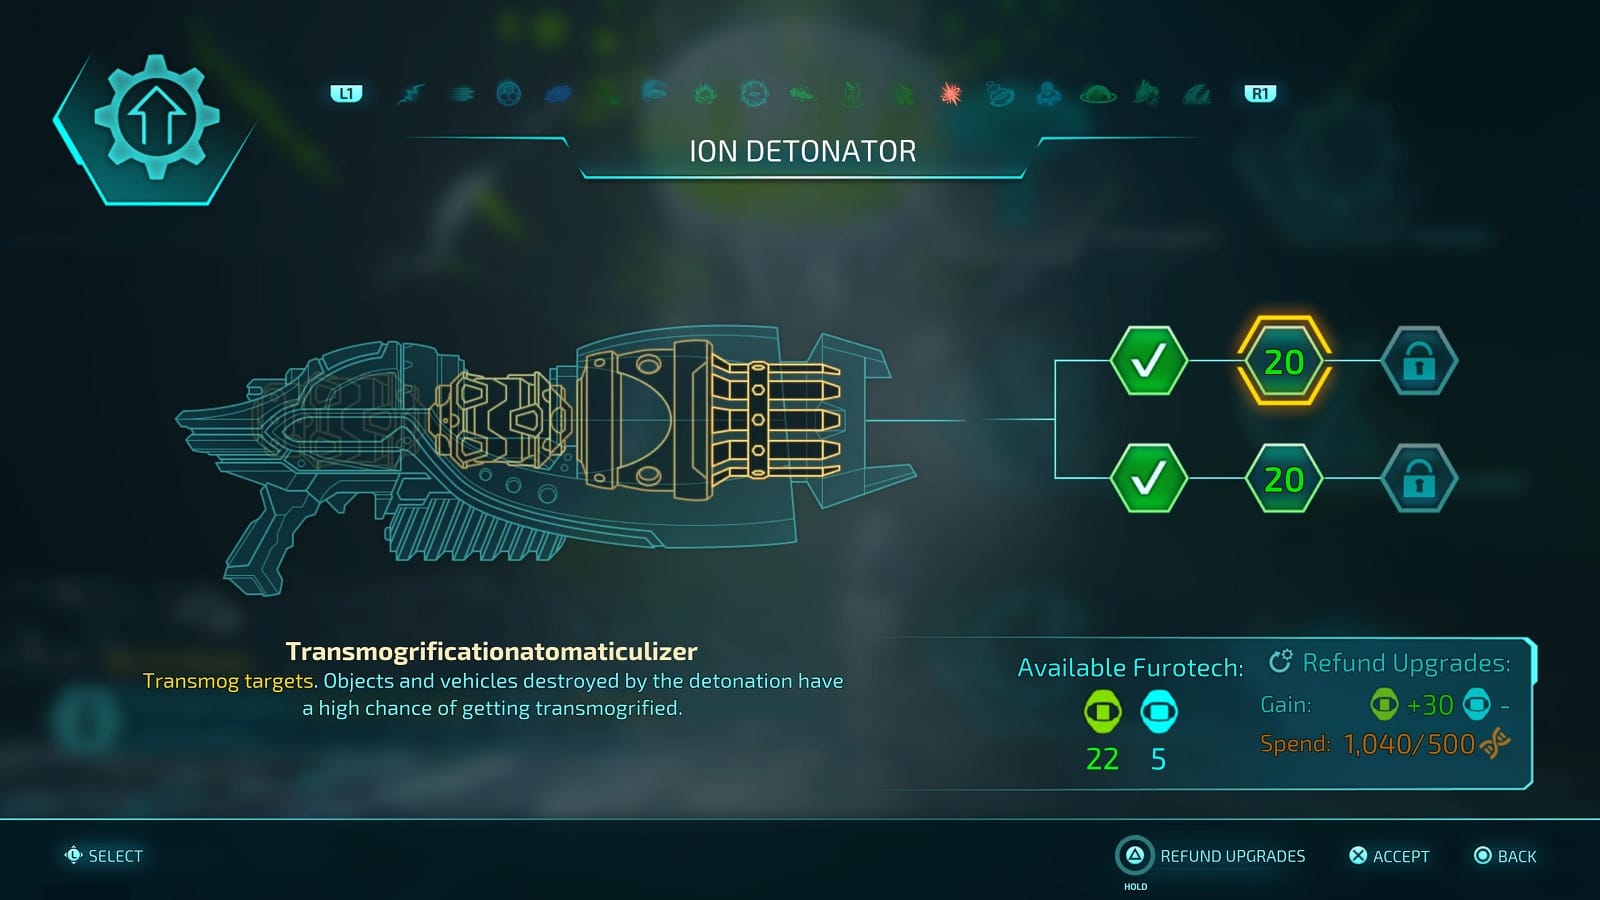
Ion Detonator
1st Branch
- Transmogrificationizer (Cost: 16 Furotech Cells)
- Transmog targets. Objects and vehicles destroyed by the detonation have a chance of getting transmogrified.
- Transmogrificationatomaticulizer (Cost: 20 Furotech Cells)
- Transmog targets. Objects and vehicles destroyed by the detonation have a high chance of getting transmogrified.
- Gray Matter Weaponizer (Cost: 1 Furotech Reactor)
- Exploding collateral damage. Humanoid enemies killed by the explosion may be converted to organic explosives that detonate when enemies draw near.
2nd Branch
- Ion Storage Beta (Cost: 14 Furotech Cells)
- Ammo boost. Increases the Ion Detonator’s capacity.
- Ion Storage Zeta (Cost: 20 Furotech Cells)
- Ammo boost. Greatly increases the Ion Detonator’s capacity.
- Ion Vortex Coils (Cost: 1 Furotech Reactor)
- Damage vortex. The ion grenade pulls in everything around it when it lands.
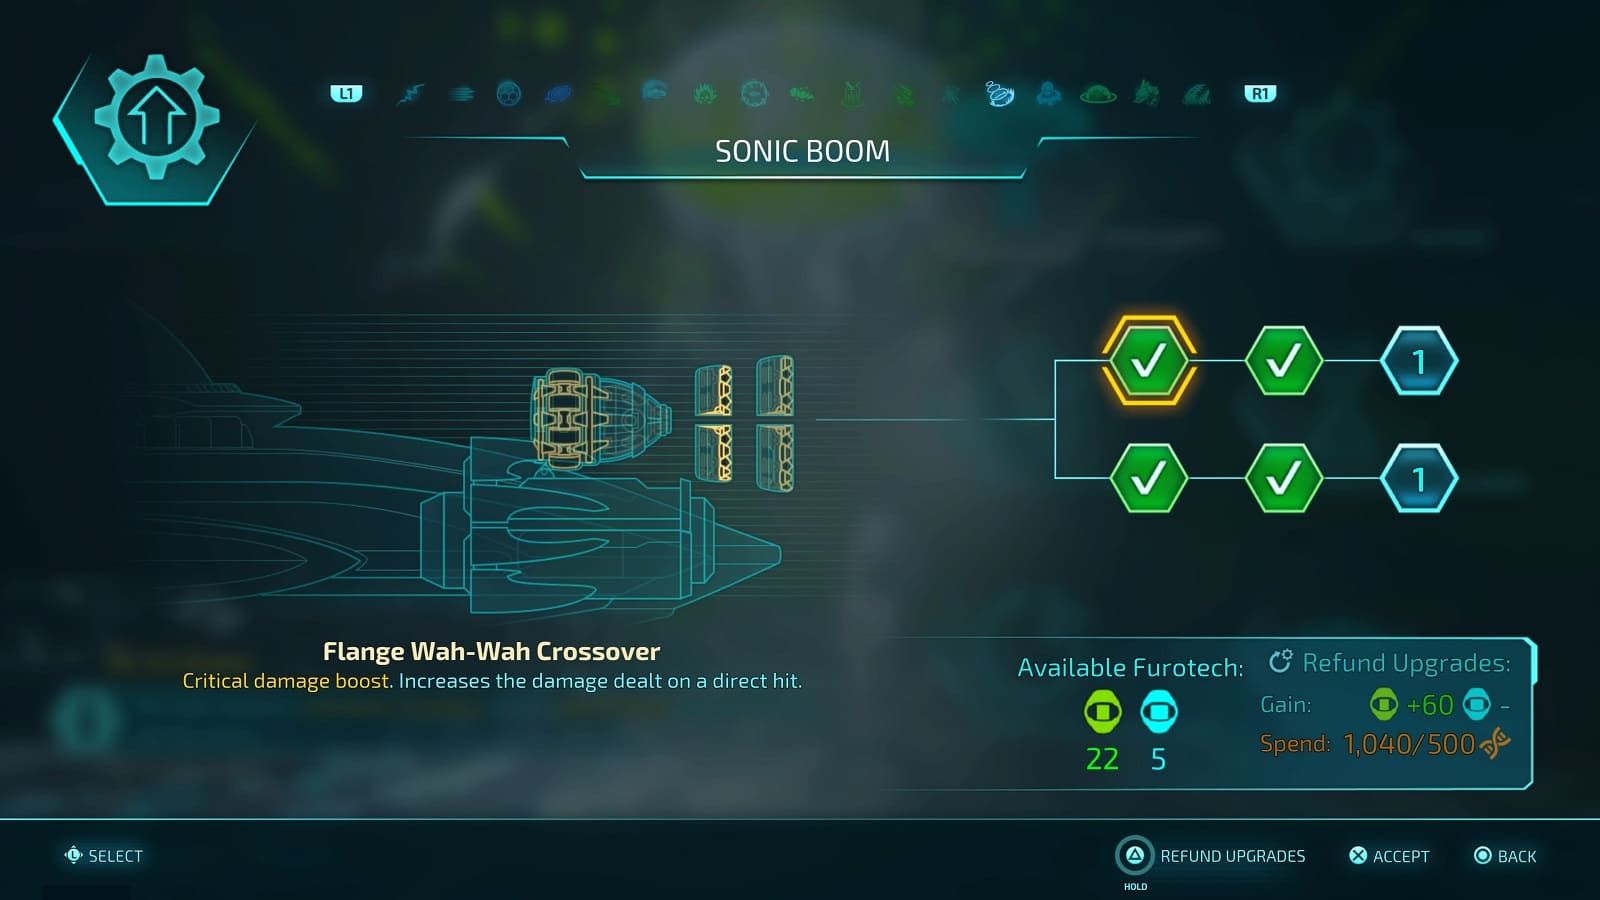
Sonic Boom
1st Branch
- Flange Wah-Wah Crossover (Cost: 12 Furotech Cells)
- Critical damage boost. Increases the damage dealt on a direct hit.
- Chorus Phase Oscillator (Cost: 18 Furotech Cell)
- Total damage boost. Greatly increases damage on a direct hit.
- Volume Control 11 (Cost: 1 Furotech Reactor)
- Reverberating damage. Destroying a vehicle triggers a large shockwave. Vehicles destroyed by the shockwave trigger shockwaves of their own.
2nd Branch
- Eight Track Booms (Cost: 14 Furotech Cells)
- Ammo boost. Increases the Sonic Boom’s capacity.
- Cassette Tape Booms (Cost: 16 Furotech Cells)
- Shoot longer. Greatly increases the Sonic Boom’s capacity.
- Bada Booms (Cost: Furotech Reactor)
- Absorb and add damage. Sonic Gooms are surrounded by a large vortex that sucks in missiles and projectiles, adding their damage to the booms.

Gastro Gun
1st Branch
- Gastric Flux Stabilizer (Cost: 16 Furotech Cells)
- Duration increase. Increases the duration of Gastro’s deployment.
- Furon Shock Trooper (Cost: 20 Furotech Cells)
- Rapid fire. Gastro fires at his foes more frequently.
- Furon Commando Care Package (Cost: 1 Furotech Reactor)
- Add grenades to arsenal. Gastro also fires Ion Detonator grenades at the enemy forces.
2nd Branch
- Homicide License Extension (Cost: 16 Furotech Cells)
- Ammo boost. Increases the ammunition capacity for the Gastro Gun.
- Annihilator Accelerator (Cost: 20 Furotech Cells)
- Shorter spin-up. Reduces the delay before timing.
- Excessive Force Certificate (Cost: 1 Furotech Reactor)
- Add Disintegrator Ray to the arsenal. Gastro’s weapon is enhanced with spare Disintegrator parts, increasing its power and incinerating its victims.
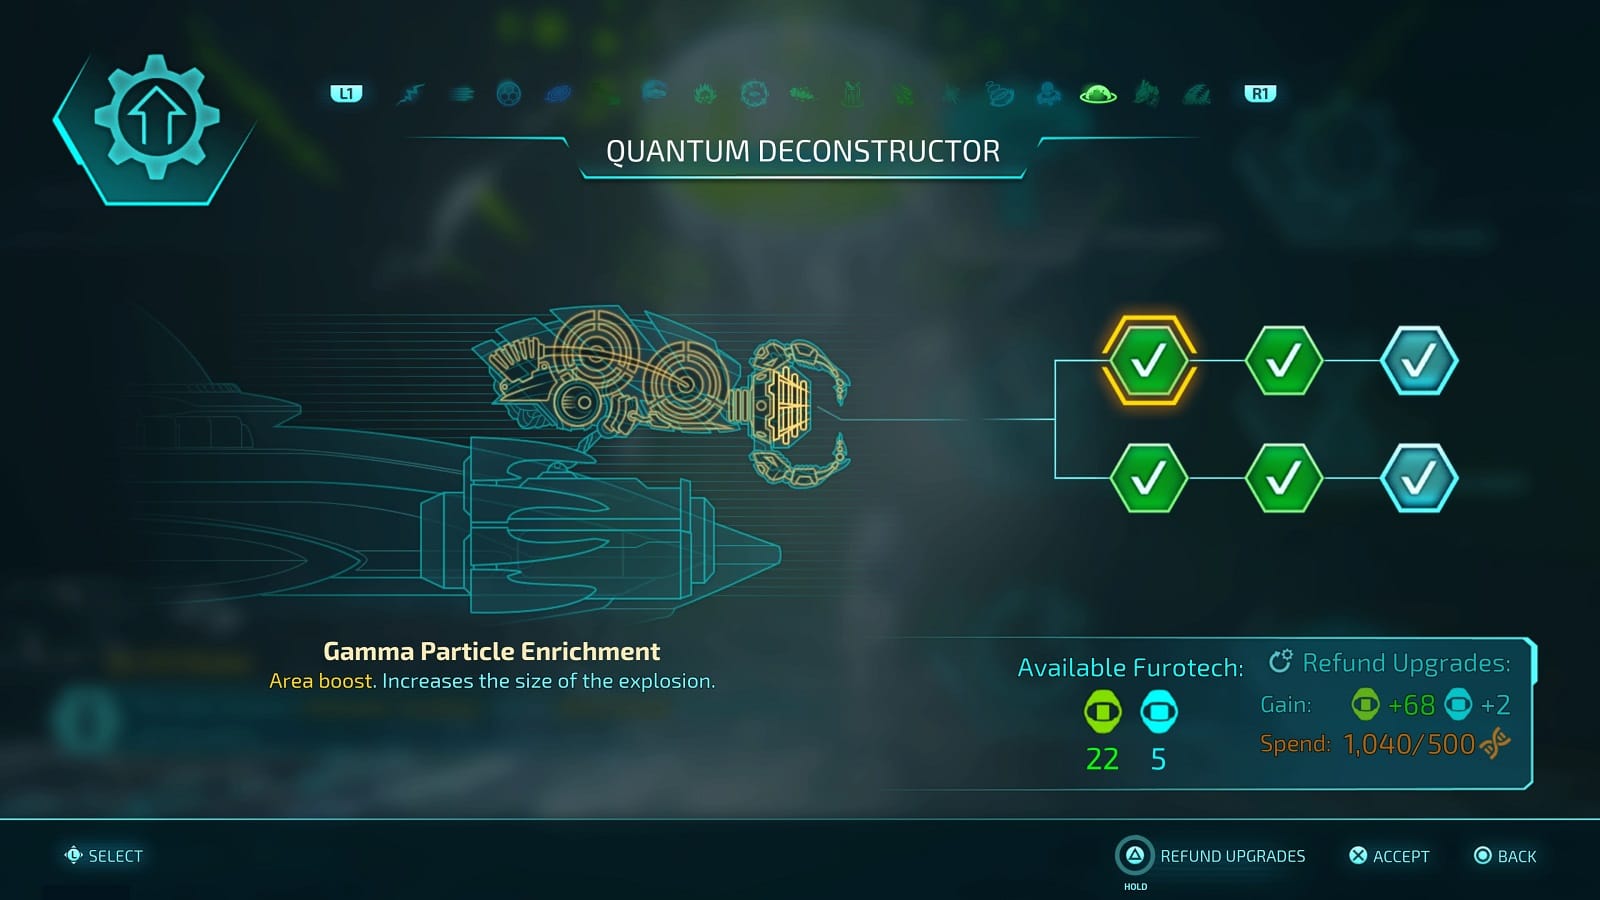
Quantum Deconstructor
1st Branch
- Gamma Particle Enrichment (Cost: 16 Furotech Cells)
- Area boost. Increases the size of the explosion.
- Gamma Particle Aggregation (Cost: 20 Furotech Cells)
- Area boost. Greatly increases the size of the explosion.
- Neutron Fields Fluxuators (Cost: 1 Furotech Reactor)
- Free ammo. Vehicles destroyed by detonation might also get transmogrified.
2nd Branch
- Magneto Storage (Cost: 14 Furotech Cells)
- Ammo boost. Increases the Quantum Deconstructor’s capacity.
- Dynamo Storage (Cost: 18 Furotech Cells)
- Shoot longer. Greatly increases the Quantum Deconstructor’s capacity.
- Repulsor Charge Accumulator (Cost: 1 Furotech Reactor)
- Automatic reload. Destroying with the Death Ray or Sonic Boom gradually recharges the Quantum Deconstructor.
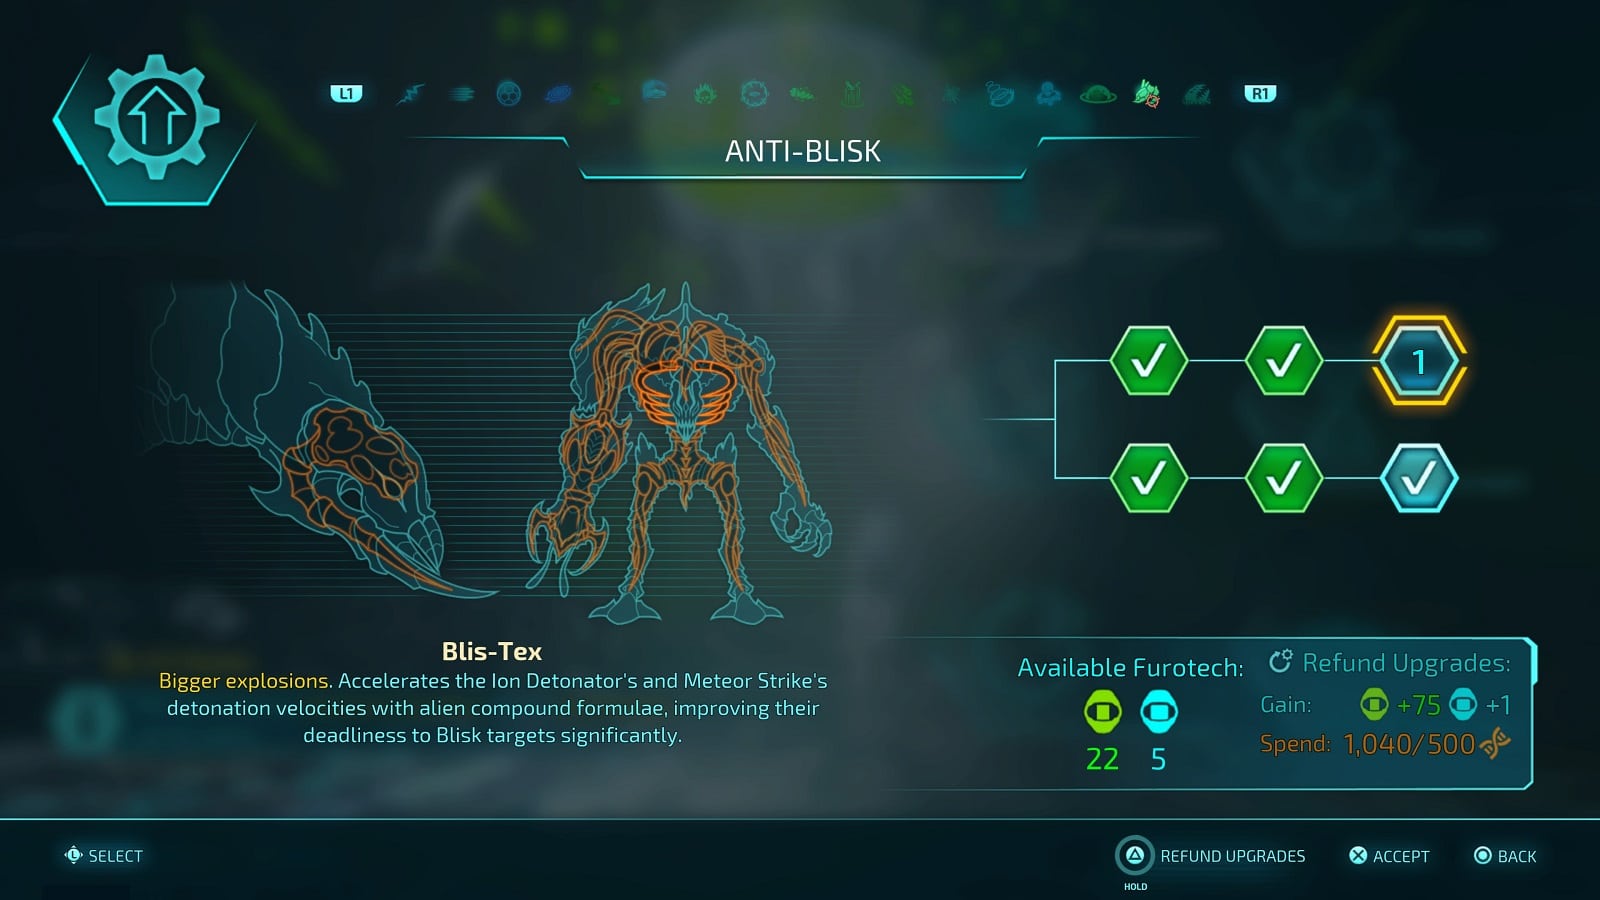
Anti-Blisk
1st Branch
- Energy Bliskondenser (Cost: 18 Furotech Cells)
- Increased damage. Improves the Zap-O-Matic’s and Disintegrator’s energy efficiency with reverse-engineered Blisk tech, improving its deadliness to Blisk targets significantly.
- Igno-Rigortive Bliskerizer (Cost: 22 Furotech Cells)
- Improves shields. Upgrades the resilience of Crypto’s shield against Blisk technology, reducing shield loss when taking a hit from a Blisk source.
- Blis-Tex (Cost: 1 Furotech Reactor)
- Bigger explosions. Accelerates the Ion Detonator’s and Meteor Strike’s detonation velocities with alien compound formulae, improving their deadliness to Blisk targets significantly.
2nd Branch
- Blisk Brutalizer Mod (Cost: 15 Furotech Cells)
- Increased damage to Blisk. Increases the Anal Probe’s and Burrow Beast’s effects on alien organic substances via in-depth knowledge of alien anatomy, improving their deadliness to Blisk targets significantly.
- Blisk Animosity Inducer (Cost: 20 Furotech Cells)
- Greatly increased Blisk damage. Rewrites the Dislocator’s and Gastro’s artificial intelligence with reverse engineered Martian Kill Code, improving their deadliness to Blisk targets significantly.
- Blisk Blocker 9000 (Cost: 1 Furotech Reactor)
- Anti-Blisk shields. Supercharges Crypto’s shields when hit by an attack of Blisk origin, rendering the shield impervious to incoming damage during a brief time frame.
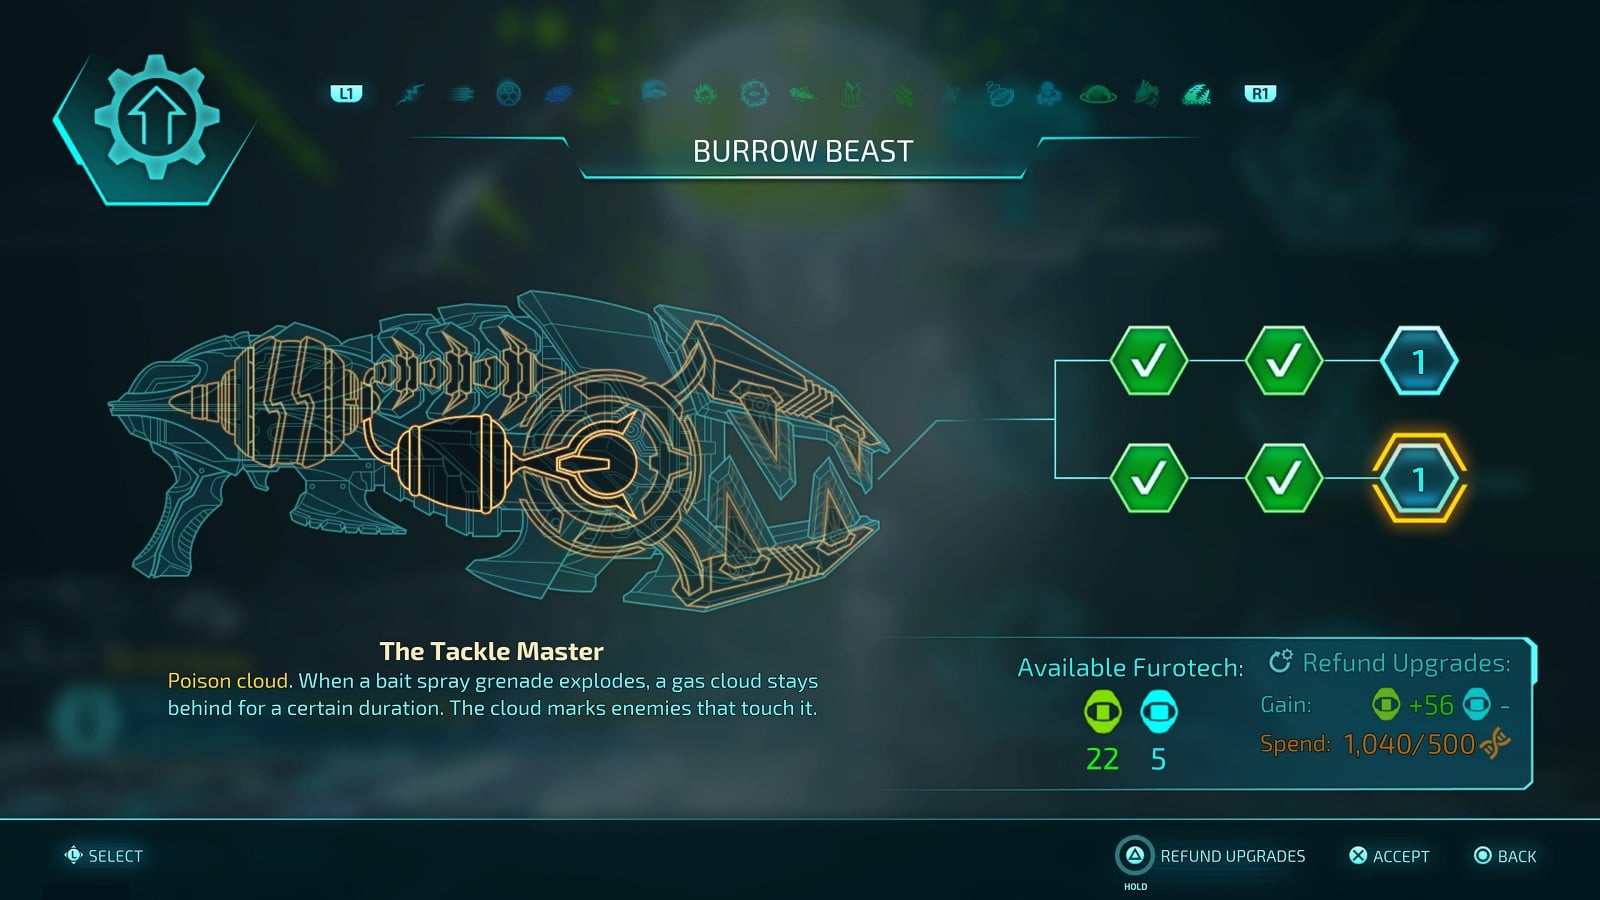
Burrow Beast
1st Branch
- Goon Juice (Cost: 12 Furotech Cells)
- Duration boost. The Burrow Beast stays around for longer after no more marked targets are nearby.
- Boost Juice (Cost: 16 Furotech Cells)
- More autonomous. The Burrow Beast kills targets of its own volition more frequently when nothing is marked. It also moves more quickly while targets are marked. (16)
- Jaws of Steel (Cost: 1 Furotech Reactor)
- Attack vehicles. The Burrow Beast also attacks vehicles. Vehicles can be marked with Bait Spray.
2nd Branch
- Furon Tackle Box (Cost: 13 Furotech Cells)
- Ammo boost. Increases the bait launcher’s maximum ammo capacity.
- Big Splasher (Cost: 15 Furotech Cells)
- Mark more targets. Increases the bait spray grenade’s explosion radius.
- The Tackle Master (Cost: 1 Furotech Reactor)
- Poison cloud. When a bait spray grenade explodes, a gas cloud stays behind for a certain duration. The cloud marks enemies that touch it.
Destroy All Humans 2 Reprobed is out now on current-gen consoles and PC (via Steam).
Check out our review of the game:
Destroy All Humans 2 Reprobed – Review
Also check out our other Destroy All Humans 2 Reprobed articles:
General guides:
- Destroy All Humans 2 Reprobed – Tips and Tricks
- All Psi Powers in Destroy All Humans 2 Reprobed
- Destroy All Humans 2 Reprobed All Geneblender Upgrades and Where to Find Them
- Destroy All Humans 2 Reprobed All Pox Mart Upgrades
- Destroy All Humans 2 Reprobed All Saucer Skins
- Destroy All Humans 2 Reprobed All Weapons List
- How to Unlock All Gene Blender Upgrades in Destroy All Humans 2 Reprobed
- Does Destroy All Humans 2 Reprobed Have Split Screen Co-op?
- Destroy All Humans 2 Reprobed Characters List
- Destroy All Humans 2 Reprobed Ending (Explained)
- How Long to Beat Destroy All Humans 2 Reprobed?
- Destroy All Humans 2 Reprobed Trophy Guide & How to Platinum
All Artifact, Furonigami, and Furotech cells locations:
- Destroy All Humans 2 All Bay City Collectibles Locations
- Destroy All Humans 2 Reprobed All Albion Collectibles Locations
- Destroy All Humans 2 Reprobed All Takoshima Collectibles Locations
- Destroy All Humans 2 Reprobed All Tunguska Collectibles Locations
- Destroy All Humans 2 Reprobed All Solaris Collectibles Locations
Strategy guides:
- Destroy All Humans 2 Reprobed I Left My Parts In San Fran…Err, Bay City Guide
- Destroy All Humans 2 Reprobed Rage Of Aquarius Guide
- Destroy All Humans 2 Reprobed Publicity Stunt Guide
Check out this video from Youtuber MKIceAndFire where they show a gameplay walkthrough (No commentary) for Destroy All Humans 2 Reprobed.


